Chapter 5 of the Missouri Master Gardener Core Manual
Vegetable gardening is a rewarding activity that can provide fresh, flavorful produce. It offers many of the same benefits as other gardening activities, including exercise, fresh air, landscape beautification and enjoyment. In addition, it promotes a varied and nutritious diet at a lower cost by reducing food expenditures more than the costs associated with growing the vegetables. Moreover, many gardeners find that their homegrown produce tastes better than what they can buy at a supermarket, thanks to freshness and more choice of varieties.
Vegetables are defined as "any herbaceous plant whose fruit, seeds, roots, tubers, bulbs, stems, leaves or flower parts are used as food." Herbaceous is a key word here. Vegetables are generally annual plants, whereas fruit crops are produced from perennial plants, such as trees (apples), vines (grapes), bushes (blueberries), canes (raspberries) or crowns (strawberries). If it is produced by an annual, it is most likely a vegetable. There are two perennial vegetables — asparagus and rhubarb — but we eat the stalks of both, not the fruit. Understanding why a plant, such as a watermelon, is considered a vegetable and not a fruit can sometimes seem archaic, but it can be useful to help determine where they will be found in plant and gardening references.
Basics of vegetable gardening
Which vegetables gardeners choose to grow will be influenced by what they like to eat, preserve, process, share — or, for the competitive gardener, exhibit. Family resources of time and energy are also a factor. Some vegetables, such as snap beans or sweet corn, may take more time to manage, from planting through harvest and processing. Space and tools available also help determine what can be grown.
For a large area, the gardener will probably need some motorized equipment, such as a rototiller or even a tractor to turn the soil between seasons. A smaller area can usually be managed with hand tools. Simple hand-pushed planters will probably be adequate for even large gardens.
Some gardeners may prefer to use organic methods, which are covered in more detail in MU Extension publication G6220, Organic Vegetable Gardening Techniques. Some information from this guide on organic vegetable gardening techniques is interspersed in this chapter. Organic gardening may include reduced expenses from lower input costs and possible human and environmental health benefits, but it may require more time and labor, and frequently results in produce with more blemishes due to insect and disease damage. These days, recommended integrated pest management (IPM) approaches to gardening apply many of the same principles and cultural pest controls as organic methods, with an emphasis on maintaining optimal soil and plant conditions to prevent problems.
Selecting a site
G6201, Vegetable Planting Calendar, to see recommended spacing and approximate planting area needed per person for many vegetables' fresh and processed end uses.
Selecting the location for a garden is an important decision. The right spot can make gardening more pleasant and convenient and contribute to plant health and survival. In most cases, the primary considerations for a site are adequate sunlight (a minimum of eight hours in the growing season, preferably with full sun), proximity to supplemental water, soil that is well-drained and deep, and convenience for care and harvest. Of course, soil can be amended, water lines run and trees removed.
When space is limited, intensive techniques, such as raised beds, can help gardeners obtain more crops from an area. One way or another, many homeowners can find a suitable site on their property. The following are several other factors that can influence siting:
- Favored areas of pets and or wildlife that might damage plants
- Tools or equipment needed
- Proximity to trees and shrubs that will shade plants or draw away moisture.
- Compatibility with the landscape design of the yard
To size a garden, gardeners should consider their personal limitations of time and skill, as well as the site, the space requirements of the crops they want to grow and the amount of produce desired. Consider starting small and increasing the size of the growing area as you gain experience. To estimate the production area required for each crop, refer to MU Extension publication
Climate
The climate in the central Midwest makes it possible to grow and harvest vegetables from April to October, or even longer for gardeners who make the most of spring and fall crops. To extend the growing season, gardeners can use simple cold frames, greenhouses or even containers that they bring inside on cool nights.
The wide variation in temperature typical of the Midwest, especially in the spring and fall, can challenge the most experienced gardener. If available, a location with a southern or eastern exposure that is sheltered by buildings or trees to the north and west can help create a microclimate to protect against weather extremes such as cold or strong winds. An elevated site that can allow cold air to flow away from plants on clear, still, cold nights is also considered desirable.
All but two vegetable crops — asparagus and rhubarb — are cultivated as annuals. Thus, cold hardiness, which is determined by the lowest winter temperatures typically encountered in an area, has little bearing on vegetable crops. A better guide for vegetable gardening is the American Horticultural Society Heat Zone map. This map rates most of Missouri as fairly warm, receiving 60 to 90 days hotter than 86 degrees Fahrenheit.
Refined through years of experience and meteorological data, MU Extension publication G6201, Vegetable Planting Calendar, gives recommended planting spring and fall planting dates in south, central and northern Missouri for more than 35 vegetable crops. The publication also provides some basic nutritional information about these vegetables.
Soil fertility
A good soil for vegetable production is well-drained and deep. It should contain adequate levels of the major nutrients (phosphorus, potassium, calcium, sulfur and magnesium), a pH of 6.0 to 6.8, and an organic matter level of 5 percent or greater. To achieve all these conditions usually requires amending the soil.
The first step to determine the nutritional status of the soil is to take a soil sample. MP555, Soil Sample Information Form for Lawns and Gardens, gives instructions for taking and submitting a sample. Recommendations for adjusting the fertility of soil are provided with the soil test report. It is critical to understand these recommendations as you evaluate what to do with the information. Several useful MU Extension publications provide guidance, including MP733, Lawn and Garden Soil Test Interpretations and Fertilizer Recommendation Guide. However, this information does not account for yield estimates or different crops' specific preferences for nitrogen or pH. Nitrogen recommendations are simplified to one application, generally at planting, based on soil organic matter. Application is usually made by side-dressing. If organic matter is high enough, no nitrogen is recommended. For more detail, gardeners can review recommendations for commercial growers. Many soils in Missouri and the Midwest are low in organic matter, with levels at or below the recommended 5 percent. This means that soil amendments and additional maintenance steps will often be needed. Several MU Extension publications give useful information on improving soils, each with a slightly different perspective. These include G6955, Improving Lawn and Landscape Soils, G6956, Making and Using Compost, and G6220, Organic Gardening Techniques, which cover manure use, alternative fertilizer sources and cover crops.
Table 1 provides guidance on the level of nitrogen fertilizer recommended for popular vegetables when a soil test is not available. Gardeners can also use the following general recommendations. Apply 1 to 2 pounds of a balanced fertilizer for every 100 feet of row. For an unplanted area, sprinkle 2 pounds of fertilizer for every 100 square feet of garden (2 cups of fertilizer is approximately equivalent to 1 pound by weight). Leafy vegetables (collards, kale, lettuce, mustard, Swiss chard, etc.) benefit from 10-10-10 or 12-12-12 fertilizer formulations. Vegetables grown for fruit, roots or bulbs do best with 5-10-10 or 5-10-5 formulations.
G6950, Steps in Fertilizing Garden Soil: Vegetables and Annual Flowers
Table 1
Recommended nitrogen side-dressings for popular vegetables.
| Crop | Ammonium nitrate* per 100 feet row** | Time of application (Sprinkle the nitrogen fertilizer in the row middles and water in if rain is not likely.) |
|---|---|---|
| Annual flowers | One pound |
|
| Asparagus | Two pounds |
|
| Cabbage, cauliflower, broccoli | One pound |
|
| Cucumber, cantaloupe | One pound |
|
| Onions (mature) | One pound |
|
| Peas and beans | One pound |
|
| Peppers, eggplants | One pound |
|
| Potato | One and a half pounds |
|
| Spinach, kale, mustard and turnip greens | One pound |
|
| Sweet corn | One pound |
|
| Sweet potatoes, watermelons | None |
|
| Carrots, beets, turnips, parsnips, lettuce | None |
|
| Tomato | One pound |
|
*Other forms of nitrogen such as urea (45 percent N), calcium nitrate (15.5 percent N) and ammonium sulfate (21 percent N) may be used on an equivalent nitrogen basis.
**A pint of ammonium nitrate (33 percent N) weighs approximately one pound.
Source
MU Extension publication
Tillage
Gardeners typically "work" garden soil one to several times each season. Often, they till soil in the spring to create a favorable seedbed for plants and incorporate soil amendments, and in the fall, to disrupt pest cycles and incorporate organic matter or cover crops. A rototiller or garden tiller is a small mechanized piece of equipment designed for this purpose.
Avoid excess tillage. Overtilling can harm soil structure and create a "hard pan," a hard layer of soil that develops at about the depth that the tiller tines penetrate (4 to 6 inches). For similar reasons, gardeners should avoid working the soil when it is wet.
Irrigation
Supplemental irrigation for gardens is usually necessary throughout the Midwest, especially during the hottest summer months. When irrigating, avoid shallow, frequent doses. It is best to water thoroughly and less often. Shallow watering encourages shallow roots, which makes plants more susceptible to drought.
The best time to water is early morning, about 6 to 8 a.m., because leaves will dry more quickly than in the evening. Evening watering is also fairly efficient, but plants that are susceptible to leaf disease are more likely to be infected if leaves remain wet overnight. The least efficient watering time is during midday when temperatures are high and evaporation is rapid.
Efficient irrigation systems can save a lot of water. Trickle or drip irrigation, including the use of soaker hoses, is the most water-efficient of commonly used systems. Overhead sprinkling generally is less efficient than watering at the soil surface or within the soil. During hot weather, overhead sprinklers lose considerable water to evaporation and runoff. During dry weather, plants need about 1 to 1-1/2 inches of rainfall or irrigation water each week. During very hot weather, their need for water is greater, and watering may be increased up to 2 inches per week.
Although drip irrigation is water-efficient, it makes it difficult to determine how much water has been applied. There always will be more water in the soil closer to the hose or to each emitter than at distances farther away. Check a few spots in the irrigated area by carefully digging out soil with a trowel or spade: The top 6 inches of soil should be moist but not soggy a few hours after the irrigation system has been turned off. If water starts to run off before areas are thoroughly soaked, stop irrigating and do not restart again until the water penetrates so that the soil becomes more absorbent. Efficiency is lost rapidly when water runs off the surface.
If you do use an overhead sprinkler, estimate how much water you have applied by placing wide-mouthed cans or jars with vertical sides within the sprinkler area and measuring the water they collect. Reduce water loss from evaporation by watering during the cooler parts of the day.
Vegetable crops have periods of development when water use is most critical. These periods depend on the type of crop, as indicated:
- Root crops, during root enlargement
- Sweet corn, during tasseling and ear filling
- Cucumbers, pepper, tomato and melon, during flowering, fruit set and fruit development
- Onions, during bulb development
- Potatoes, during tuber initiation and development
Crop rotation
Practice crop rotation to improve your garden's soil quality and reduce disease and insect pressure. To rotate crops, avoid planting any vegetable from the same plant family on the same area of ground year after year. The standard recommendation is to plant a vegetable crop from its own family on the same ground only once every three years.
This fundamental cultural practice has been used by gardeners and farmers for centuries. It is still one of the best ways to establish healthy plants and soil and to avoid excessive pesticide use.
Animal control
Deer, raccoons, woodchucks, rabbits, mice, squirrels and even turtles are often unwanted visitors to vegetable gardens. The first line of defense against browsing wildlife is to try to keep them out of the garden area. Locate the garden plot away from areas that are obvious as favored wildlife areas or travel paths. Leave as much open area as possible between field edges and garden plantings. Fencing will restrict many mammals, but a good fence is expensive. To effectively prevent damage from deer, a fence must be 8-feet tall. For many other garden pests, such as woodchucks or turtles, a fence needs to be dug into the soil about 6 inches.
Commercially available products designed to deter animal pests through scent, sound or touch, are usually only partially effective and can be a problem to maintain. Some animals, including deer, are partially deterred by hanging bars of very fragrant soap near plants. The presence of a dog or a cat may be a more effective choice for control, depending on the pests of concern.
Seeds and transplants
Gardeners can start many vegetables indoors from seed. Species, such as tomatoes, peppers, squash and onions, that are started indoors and then transplanted to the garden will produce an earlier harvest. Some plants, however, such as beans and carrots, are best sown directly outdoors when weather and soil conditions permit.
The proper time for sowing seeds depends primarily on when plants may normally be moved outdoors. This period ranges from four to 10 weeks, depending on the growing conditions and the seedlings' expected growth rate (Table 2). For estimated time of seeding, and growing comments specific to the most common vegetable plants started indoors, see MU Extension publication G6570, Starting Plants from Seeds, which offers recommendations for selecting seeds, containers and soil mixes or other growing media. It also gives step-by-step instructions for seeding, growing, transplanting and hardening off of transplants.
Some gardeners may want to use cold frames to harden off transplants or to start cold-tolerant vegetables, such as lettuce and cabbage, earlier than would possible out in the open. Cold frames, also called hotbeds, are protected plant beds, usually made of a bottomless wooden box with a removable glazed top. They are easy to build and can be made from recycled materials, such as old windows (MU Extension publication G6965, Building and Using Hotbeds and Cold Frames).
Table 2
Timing to sow vegetable seeds in the home garden.
| Vegetables | Recommended seeding time | Comments |
|---|---|---|
| Cool-season crops | ||
|
Late February |
|
| Warm-season crops | ||
|
Late March |
|
| Vine crops | ||
|
Late April |
|
* Approximate time for seeding is listed for mid-Missouri (Zone 6).
In the Bootheel area (Zone 7), sow about two weeks earlier.
In North Missouri (Zone 5), sow about one week later.
Source
MU Extension publication G6570, Starting Plants from Seeds
Modifying the garden bed
Mulching the vegetable garden is an excellent way to protect the soil, reduce the need to water, decrease the incidence of diseases and weeds, and raise or lower soil temperatures. Natural mulches will generally reduce soil temperature and build organic matter. Plastic or synthetic mulches are typically used to raise soil temperature. MU Extension publication G6960, Mulches, describes commonly used mulches and some of their pros and cons.
Vegetable crops that respond well to mulching are the warm-season crops, beans, peppers, sweet corn, tomatoes and vine crops, and cool-season crops, broccoli, cabbage, cauliflower and potatoes. Keep asparagus and rhubarb constantly mulched to conserve soil moisture and reduce weed problems. Good material for mulching annual vegetable crops includes composts, straw or hay, materials that will be largely decomposed by the end of the season.
Raised beds have become a popular garden modification (Figure 1). Raised beds take a little more time initially to develop, but they offer many advantages, especially in areas such as Missouri that tend to have poor soils. Benefits include improved drainage, increased yields from a small space, an expanded growing season and ease of maintenance. The main disadvantage to raised beds is that increased irrigation is often required to maintain adequate soil moisture in the raised soil area, which tends to warm up and dry out more quickly. See MU Extension publication G6985, Raised Bed Gardening, for more information on construction materials, design, soil mixes and maintenance.
Intensive gardening methods
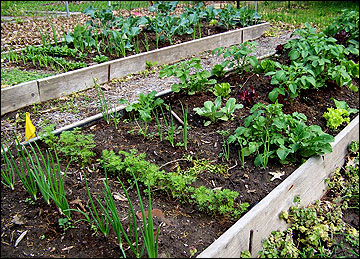 Figure 1
Intensive gardening bed. Raised beds offer many benefits, including improved drainage, increased yields from a small space, an expanded growing season and ease of maintenance.
James Quinn photo
The purpose of intensive gardening is to harvest the most produce possible from a given space. Different approaches to intensive gardening are popular, including "French intensive" and "square foot" gardening methods. More traditional gardens usually consist of long, single rows of vegetables that are often widely spaced. Much of the garden area consists of the space between rows that is not occupied by plants. An intensive garden minimizes wasted space. However, the practice is not just for those with limited garden space; other reasons that gardeners plan an intensive garden include creating an ideal plant environment and obtaining better yields with less labor and other inputs.
A good intensive garden requires early, careful planning to make the best use of space. Interrelationships of plants must be considered before planting, including nutrient needs, shade tolerance, above- and below-ground growth patterns and preferred growing season. The following techniques are common to most high-yielding intensive gardens:
- Raised growing beds
Raised beds are the basic unit of an intensive garden. A system of beds allows the gardener to concentrate soil preparation on small areas, which results in effective use of soil amendments and creates an ideal growing environment. - Interplanting
This practice of growing two or more types of vegetables in the same place at the same time can help reduce weed and pest problems. Proper planning is essential to use interplanting effectively. Though the technique has been practiced for thousands of years, it is just now gaining popularity in this country. - Close spacing
Individual plants are usually more closely spaced than in a conventional garden. An equidistant spacing pattern is often used that calls for plants to be planted so that the center of one plant is the same distance from plants on all sides. In beds of more than two rows, this means that the rows are staggered so that plants in every other row are between the plants in adjacent rows. - Succession planting
Successional plantings involve replacing the spent plants of one crop with something new. Again, planning is key to raising a series of crops that will produce from spring through late fall, such as spring peas followed by summer corn succeeded by a fall lettuce crop. - Relay planting
Relaying consists of overlapping plantings of one type of crop. The new planting is made before the old one is removed. For example, this might be done by seeding three different plantings of green beans two weeks apart.
Studies have investigated which crops bring the most value per square foot of garden space, partly to aid small-space gardeners in making planting decisions. Perennial crops were not considered with this list. Values were based on pounds produced per square foot, retail value per pound at harvest and length of time in the garden. Table 3 shows the general conclusions of this type of analysis, with the highest- and lowest-value crops indicated.
Despite the benefits, the intensive garden may not be for everyone. Some people enjoy the sight of long, straight rows in their gardens. Others prefer machine cultivation to hand weeding. Though there is often less weeding to do in intensive plantings because of fewer pathways and closely spaced plants, the weeding that is needed must be done by hand or with hand tools. Some gardeners like to get their gardens planted in a very short period of time and harvest all at once, later in the growing season. The intensive garden focuses on growing something in every part of the garden during an extended growing season.
Vegetable culture and harvest basics
The information presented on vegetable culture and harvest is grouped for similar crops that share general growing condition requirements:
- Cool-season crops
Cole crops, greens, radish and turnips - Root crops
Carrots, beets, onions, garlic and sweet potato - Cucurbits
Cucumbers, melons, squash and pumpkins - Legume crops
Beans, peas and southern peas - Solanaceous crops
Tomato, potato, peppers, eggplant - Sweet corn
- Perennial vegetables
Asparagus and rhubarb
Two MU Extension publications, G6201, Vegetable Planting Calendar, and G6226, Vegetable Harvest and Storage, are the source of much of this information. Common vegetable insect pest and disease problems are discussed in several MU Extension publications, including G6203, Common Diseases in the Home Garden and MG13, Preventing and Managing Plant Diseases. Additional Extension publications specific to a vegetable are referenced in that section. Seed catalogs, plant tags and seed packets provide similar information.
Cool-season crops
Radish, turnips, greens and lettuces and cole crops all grow best in cool conditions. The term "cole" was derived from the Latin word "caulis," which refers to a herbaceous or woody stem that bears leaves and may bear flowers. Cole described the Mediterranean forerunners of our modern cabbages, broccolis, cauliflowers, brussels sprouts and kohlrabi. A cole crop now means any crop from the Brassica genus, which includes all the vegetable crops mentioned, as well as several oilseeds, including canola.
Cole crops
Establish these vegetables in early spring; transplants will likely produce larger plants and greater yields than plants directly seeded in the garden. For both broccoli and cauliflower, the immature flower head is the part eaten. This is usually ready in about 50 to 80 days. Once a broccoli head is cut, secondary shoots continue to grow for about a month; cauliflower does not reliably produce secondary shoots. Broccoli heads turn yellowish when overmature, as the yellow flower buds start to show. For cauliflower, the head may discolor purplish if too mature, or if conditions are too hot when the head, also known as the curd, is swelling. This purple color usually disappears when it is cooked, but the taste may still be bitter. Some cauliflowers require blanching — tying the top leaves up around the developing head to protect it from the sun and keep the white curd from discoloring. Self-blanching cauliflower varieties are now commonly available.
Cabbages grow in a wide range of soil conditions. Depending on the variety, they can be grown in the garden from April through November. Cabbages are referred to as spring or summer. Summer varieties tolerate warmer temperatures and take longer to mature (60 to 70 days versus 85 to 100 for spring types). Savoy cabbage, with its distinctive wrinkled and curled leaves, has a sweet, non-bitter flavor. It can be planted as a spring or a fall crop and matures in only about 55 days. Cabbage heads may split if a heavy rainfall occurs when they are enlarging. Late or summer cabbage keeps well for three to four months if in good condition when harvested and stored correctly (32 degrees Fahrenheit and slightly moist).
Brussels sprouts are more challenging to grow in the spring in Missouri. They take a fairly long time to develop (80 to 100 days). Thus, the sprouts form on the plants as summer heat begins, and they grow bitter if exposed to too much heat.
Insect pests common to cole crops
Common pests of cole crops include cabbage butterfly, cabbage looper (also known as measuring, or inch worm) and imported cabbage worm. Floating row covers can be helpful to exclude pests. Additional control measures include the application of the insecticides carbaryl or permethrin to the foliage, or the use of an organic insecticide.
Greens and lettuce
Swiss chard, spinach, parsley, lettuce, collards and endive should be planted early in the season, from mid-March to early May. They do best in cool, spring temperatures and can provide quick crops. They need plenty of moisture for rapid germination and growth, as most are shallow rooted.
Of the main types of lettuce, leaf, butterhead or Bibb, and cos or romaine, are the most popular and easy to grow in Missouri. Leaf lettuces, colored in a wide range of greens and reds, produce crisp leaves loosely arranged on stalks. Time to harvest may be as fast as 30 days for baby lettuce and up to 60 days for full head development. Bibb and romaine types are more susceptible to heat-related problems such as tip burn than are leaf types.
Swiss chard is from the same family as beets. It is easy to grow and tolerates both heat and cold. Chard is a nutritious, colorful plant that stores longer than most greens. Both its stalks and its leaves can be eaten. A single planting will often provide leaves and stalks from early summer through the first moderate freezes.
Spinach varieties are described as smooth or savoy, the latter being wrinkled and curled. Planted in the spring, spinach is a 30- to 50-day crop. Planted in the fall, it will overwinter to yield heavily the following April.
Radish and turnip
Radish and turnip crops are grown for their fleshy taproots, although the tender top leaves also provide nutritious greens. The traditional small round red radish is a quick crop that matures in a month or less. The French white radish takes a little longer to mature. Asian "Daikon" varieties are long and white and can grow quite large. They develop in 50 to 65 days.
Turnip varieties are typically white, red or white with a purple skin on the upper half. They produce in 40 to 50 days and can be harvested from the time they are 1 inch in diameter. They will be sweeter if harvested before they are exposed to heat. In Missouri, turnips usually do best as a fall crop and can withstand several light freezes. The tops make excellent greens, regardless of the size of the root.
Root crops
Root crops include beets, carrots, onion, garlic, parsnips and sweet potatoes. Planting date suggestions for beets, onions, parsnips and carrots vary slightly, but early spring is generally the best time. Garlic is fall-planted to be harvested the following late summer. Sweet potatoes are planted in late spring, after the soil warms, to be harvested around the first frost.
Beet
Beets are high in fiber and vitamins. They are a good source of folate, antioxidants and minerals, including boron. Beet juice has long been used as a health food and a source of red dye. Beets should be planted early in spring for harvest in 45 to 55 days. Beet tops can be harvested earlier to eat as greens (some cultivars are specifically raised for their greens). The traditional round, red beet is not the only choice now. White and yellow varieties are available, in addition to pink- or candy-striped types. Cylindrical shaped beets are especially good to cross-slice for grilling or roasting.
Each beet "seed" is an entire ripened ovary that contains several seeds, so they should be thinned after they emerge from the soil to reduce competition.
Carrot
Early varieties (55 days) are often distinguished from later, storage varieties known to keep well (65 to 70 days). Carrots' palatability is superior when harvested before extended hot weather. Carrots planted in late summer for a fall crop are generally harvested before the first moderate freeze, but they can overwinter outdoors in the ground under heavy mulch.
Carrot varieties come in V-shaped, cylindrical and round; the latter is good for heavy soils that are difficult for a long root to penetrate. The tip of the carrot may be described as blunt, stump or tapered. Carrots with yellow flesh or purple-colored skin are now available. Some "baby" varieties produce small roots more quickly to eat early in the season.
Onion
Green onions are started from seed. Full-sized bulb onions are started from small green plants (sets) or small bulbs (bulblets). The former are often sold in bundles of 50 to 100. Green onions mature in only 25 to 35 days. Of the bulb onions, quick-growing "minis" produce in 60 to 68 days, and other types in 90 to 110 days.
Harvest onions when the tops fall over and the necks shrivel. Dig carefully when harvesting. Remove the tops and place in shallow boxes or mesh bags and cure in an open garage or shed for several weeks. Then store in mesh bags in as cool a place as can be found in midsummer and keep ventilated during humid weather. Sweet, mild types of onions do not store well.
Red, white and yellow onion varieties are available, but only yellow storage onions are recommended to grow in Missouri's climate. Shallots, a smaller, sweeter onion relative that is particularly valued for nutrition and health benefits can also be grown in the Midwest. Good growing conditions — especially adequate water — will decrease onions' sulfur content and sweeten their flavor.
Sweet potato
This warm-season vegetable is started from small plants known as "slips," which are 6- to 9- inch-long sprouts with leaves and roots. Sweet potatoes take 120 to 150 days to mature. Similar to potatoes, they are typically planted in hills or ridges spaced about 1 foot apart in rows 3 feet apart. Harvest in the fall, around first frost. After digging, let the tubers lay on the warm soil for 2 to 3 hours. For a sweeter potato, place in a warm, humid room for 10 to 14 days (at about 85 percent humidity and 85 degrees Fahrenheit) to allow conversion of the starch to sugar. They can be stored in cool conditions for 6 to 10 months.
Cucurbits
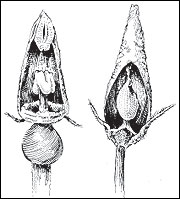 Figure 2
Cucurbit flowers are female and male. Most cucurbits are monoecious, meaning they have separate female (left) and male flowers. The male flowers always fall off after they mature. The female flowers follow and do not fall off.
This group of vegetables from the Cucurbitaceae family originated in Asia. Europe and Africa. It includes cucumbers, summer squash (e.g., zucchini), winter squash (e.g., acorn and butternut), pumpkins, watermelons and melons (including cantaloupe and muskmelons). These vegetables are generally directly seeded into the garden in May. Summer squash and cucumbers are the quickest maturing (50 to 60 days). Melons and watermelons take a little longer (70 to 85 days), and the winter squash and pumpkins take the longest (90 to 110 days).
These vegetables are often planted in hills or mounds so that excess water drains away from the seedlings. Plant five or six seeds close together 4 to 6 feet apart and cover the seeds with about an inch of soil. After emergence, thin to the strongest seedlings. To save garden space and keep fruits off the ground, many varieties of cucumbers and small melons can also be planted next to fences or trellises, which they will climb.
Most cucurbits are monoecious, meaning they have separate male and female flowers. The male flowers always fall off after they mature and, since they occur first on the plant, many gardeners will wonder why their cucurbits are not setting fruit. Bees or other insects carry the pollen to the female flowers. If pollination is successful, the female flowers do not fall off (see Figure 2). Although different species of cucurbits are in the same family, they will not cross-pollinate with one another.
Different types of cucurbits should be separated to different areas of the garden, and rotated with other crops, to help discourage diseases and pests. Cucumber beetles are a significant pest of most cucurbits. The beetles do the most damage about two to four weeks after transplanting. Row covers can be used to exclude the beetles until female flowers form.
Cucumber
Cucumbers have been developed from the species Cucumis sativus. Most gardeners think of pickling or slicing cucumbers as typical types. Varieties associated with the pickling process tend to be a little smaller then slicing varieties, which are used fresh. Both have waxy, prickly skins. A new group of cucumbers referred to as "sweet, crisp and seedless" have less wax, are smooth-skinned and seedless. Asian "burpless" types are similar to the European seedless cucumbers that are produced in greenhouses and sold shrink-wrapped in stores, but they are better adapted to garden culture. Specialty cucumbers may be white, yellow, round or striped.
Cucumbers should be harvested daily since they mature rapidly on the vine. Types destined for pickling are harvested when quite small, whereas slicing types are allowed to develop more fully.
Cucumbers are susceptible to bacterial wilt that is transmitted by striped and spotted cucumber beetles. Controlling these beetles is the best way to limit the disease. The slicing cucumber ‘County Fair' has some tolerance to bacterial wilt.
Melon
Melons, often referred to as muskmelons, are cultivated varieties of Cucumis melo, whereas watermelons are from another genus. Both melons and watermelons are native to Africa and Asia and thrive in warm, dry climates that offer a long growing season.
Different types of melons are described with common names that may not be used consistently. Further confusion results from intercrossing, different seed supplies, and names associated with geographic production areas. Cantaloupes and muskmelon are difficult to distinguish; both have orange flesh, netted rinds and a musky aroma that gives muskmelon its name. Honeydews have a smooth rind, high sugar content and no musky flavor. Varieties of melons, including Asian, Butterscotch, Galia or Tropical, Ananas, French Charentais, Spanish and Bitter. The Bitter melon is used in Asian cuisine and is generally cooked.
Optimal growing temperatures for melons are 70 to 85 degrees Fahrenheit. Harvest when the rinds change from green to tan-yellow between the ribs, and the stem separates easily where the vine attaches to the fruit.
Melons are subject to many of the same insects and diseases as cucumbers.
Watermelon
Watermelons resulted from selection and breeding of Citrullus lanatus. Like melons, they prefer a warm, dry climate with a long growing season. Optimal growing temperatures are 70 to 85 degrees Fahrenheit. Watermelons grow better in a lighter, or more sandy soil. They are usually established from transplants set out after the soil warms and take about 75 to 85 days to mature.
Harvest time is critical to good table quality. Look for several indicators that occur at the same time to show a watermelon is ripe: Tendrils on the stem near their spot of attachment turn brown and die, the fruit's surface color becomes dull and waxy, the skin resists penetration by a thumbnail, and the bottom of the melon turns from light green to yellowish.
The traditional red-fleshed type of oblong-shaped watermelon with seeds is just one of several choices. Yellow- and orange-fleshed varieties, as well as small, round (icebox) types with any of these flesh colors are available.
Summer squash
Summer squash includes many varieties of zucchini, crookneck, and pattypan (or scallop) squash that have been bred from Cucurbita pepo, which includes plants with all-yellow, all-green or yellow and green fruits. They should be planted in well-drained areas of the garden. They are often planted in small hills with two to four plants each. Mulching to keep fruits off the soil will improve the yield and quality of squash.
Harvest in 80 to 90 days before the skin becomes hard or tough. Summer squashes should be refrigerated. They have a shorter storage life than winter squash.
Winter squash and pumpkins
Three species comprise the varieties commonly called winter squash and pumpkin. They have hard, thick skin and mature later in the growing season. Plant well after the danger of frost has passed, when the soil warms in spring.
Harvest when the vines die back, which often occurs just after a light frost. The rind should be hard and uniform in color. Winter squash tends to keep well into winter when stored in a cool, dark, well-ventilated place.
Insect pests common to cucurbits
The cucumber beetle is the number one pest for this plant family. Both 12-spotted and striped beetles cause damage to all of the cucurbit vegetable crops. The beetles are especially harmful to seedlings and small plants because they can cause severe stunting or eat the entire plant. Insecticides like carbaryl and permethrin should provide adequate control in most situations.
Squash bugs typically affect summer and winter squash, including pumpkin, much more than the other cucurbits. Squash bugs are difficult to kill with pesticides unless treated in the nymph stage. It is important to treat both the top and bottom of leaves to achieve control, but complete coverage of the plant at the critical time to control squash bugs is often difficult to attain. Gardeners should learn to recognize squash bug eggs, which are copper colored, about the diameter of a pinhead and generally laid in clusters on the bottom of leaves. Remove the eggs by hand to help minimize damage.
Squash vine borer is a serious pest of winter squash, pumpkin and zucchini, but butternut squash and other C. moschata varieties are resistant. The adult borer is a moth that lays its eggs at the base of the plant. When the eggs hatch, the emerging larvae tunnel into the stem. Look for a small hole about one-fourth inch diameter that will have frass (insect excrement), a material that looks like wet sawdust, falling out. Insecticides are not likely to work as the larvae are inside the plant, but the larvae can be manually controlled by spearing with a small sharp object.
As stated earlier, row covers that keep the insects from reaching the plants are a good cultural control for these pests. Most cucumber varieties need insects for pollination, though, so the floating row covers usually need to be removed when flowering begins. Otherwise, the plants will not bear fruit. By this time, however, plants are larger and can more easily tolerate pests.
Diseases common to cucurbits
Some varieties of cucurbits are prone to mosaics and other viruses, which may show symptoms like green blotches, bumps, or other warty growths. These cause stunted plants with yellow and green mottled leaves. The fruit may also be mottled, misshapen and warty. Good sanitation and prevention of spread by insect vectors are the best way to manage these viruses.
A devastating disease called bacterial wilt can be transmitted to several cucurbit species, especially cucumber, melon (watermelons are resistant) and summer squash. The bacteria enter the plant through exposed spots where beetles feed, infecting plant tissues that transport water. Once the plant displays symptoms, the bacteria are inside the plant and it cannot be saved. Remove and dispose of infected plants promptly.
Powdery mildew is a fungal disease that frequently affects pumpkin foliage as the weather cools in the late summer and dews become heavy. The best control is to select resistant varieties, which are available from some suppliers.
Legume crops
Legume crops refer to several genera of the family Fabaceae (formerly Leguminosae) that originated in Central America and are popular for human and animal food. This large group of plants includes peas, Southern peas, sugar snap peas, soybeans, peanuts, lentils and beans. Legume crops that are raised solely for their dried seeds are sometimes called pulses. Most legume crops are valued for their fiber and nutritional content. They generally contain higher levels of protein than do other vegetables, though the amount varies by species and variety.
This family of plants is also important because most varieties can "fix" their own nitrogen from atmospheric sources, with the help of bacteria that develop within their root nodules. This process is most effective if the bacteria have been introduced to the garden soil previously. If not, bacterial inoculum should be applied at the time of seeding to encourage nitrogen fixation. The type of inoculum depends on the plant species. Gardeners can also apply additional nitrogen fertilizer to compensate for lack of nitrogen fixation, but they should take care: Excessive nitrogen can prevent pods from setting.
Legume crops require an average amount of water, and they do best in well-drained soil.
Green bean
Bush beans are the most popular bean. The pods are eaten when immature and tender (50 to 60 days after planting). They produce vigorously and do not need trellising. Green bush beans were formerly called "string" beans because of the fiber that developed along the seams of the pods. This fiber has been eliminated by plant breeding efforts and these beans are now often referred to as stringless or snap beans. French, or filet, beans are also in this category; they are grown to pick when small, slender and tender. Yellow, purple and Italian flat types are available also.
Early plantings of bush beans should be made in the spring, after the soil warms and the danger of frost has passed. Green bean seeds planted in cold soils germinate slowly and are susceptible to rotting. Also, seedlings grow slowly in cool temperatures. Consider planting several crops of bush beans two to three weeks apart until the end of May. Planting after that is often not productive as hot weather prevents pods from setting. Later, a fall crop of beans can be planted in August to harvest just before frost.
Lima beans, which include the variety known as butter beans, mature in about 85 days. Planting and care recommendations are similar to those for bush beans. Pick when the pods become full and lumpy, but are still green. The immature seeds of lima beans are eaten but not the pods. They may be stored fresh up to a week in a cool, moist place and can also be dried, canned or frozen.
Fava or broad beans are quite hardy and mature in about 75 days. In cool climates, they are often substituted for limas. Favas are sown early in spring similar to peas, discussed below.
Pole-type beans, which come in many varieties, mature in about 60 to 70 days and generally bear over a longer period than bush types (55 to 78 days). Because they require trellising, they generally yield more from the same amount of space, but they tend to shade neighboring crops. Many types of trellises work well. Trellises should be 6 to 8 feet tall and sturdy enough to withstand strong winds and rain. Pole beans are natural climbers, but they do not interweave themselves through horizontal wires.
Some beans are used primarily as dried beans, including kidney, pinto and black beans. Some of these varieties are suitable for Midwestern growing conditions. They are the same species as snap beans, but have higher seed yields and dry well for storage. Many can also be used green, and when cultivated for this use, are referred to as fresh shell beans (70 to 75 days). If gardeners want dry beans, they should let bean pods dry on the plant and harvest in late fall. In the small garden, growing dry beans is seldom practical, because they require ample space to produce enough for storage. However, some dry bean varieties available to gardeners are either rare or completely unavailable in the supermarket.
Green vegetable soybeans, also known as edamame or edible soybeans, are becoming increasingly popular thanks to their high nutritional value and versatility. These soybeans have been bred to do well under ordinary garden conditions. They require a shorter season (75 to 100 days) and do not grow as tall as field-type soybeans. There is also a difference in flavor and texture, as there is between sweet and field corn. Harvest edamame the same as green shell beans, but to soften the difficult-to-open pod, cook for a few minutes and then remove the edible bean inside.
Peas
Commonly grown garden peas include shell, or snap peas, and snow, or sugar peas, all which mature in about 50 to 60 days. Shell peas are harvested before the seed matures and are removed from the pod for cooking. Snap varieties have low-fiber pods that can be "snapped" and eaten along with the immature peas. Typically, strings — which should be removed — develop along the pod suture, but many new snap pea varieties have almost no string. Snow-type peas are picked to eat whole when the pods are flat, before the seeds develop.
Peas do not withstand hot temperatures well and should be planted early in spring, as soon as the soil can be worked.
Southern peas
Botanically, southern peas are not actually beans or peas, but are in separate genus (Vigna). Common types include black-eyed pea, cream pea and crowder pea. They are available in both pole and bush forms. Southern peas are usually harvested in the green-shell or dried-pea stage (60 to 70 days). Plantings from late May to early July will produce well. Since hot temperatures do not hurt their pod set, southern peas can fill in for bush beans in the heat of summer. The yard-long, or asparagus bean, is related to black-eyed peas and has similar flavor, but the entire pod is typically eaten (this can also be done with the southern peas). Asparagus beans need warm temperatures and a long growing season to do well.
Solanaceous crops
Vegetables in the Solonaceae family have widely varying growth forms and gardening requirements. Potatoes, tomatoes and peppers, among the most well-known examples, were discovered in the New World. Eggplant originated in India. These vegetables were slow to be accepted as food sources among Europeans because another Solonaceae, Atropa belladonna, known as deadly nightshade, was notorious as a poison in Europe.
Potato
The potato is native to the Andean region of South America and was cultivated by the Incas as many as 4,000 years ago. Hundreds and possibly thousands of different types of potatoes are still grown there. Many of these resemble our specialty potatoes that come in a myriad of skin and flesh colors as well as diverse shapes. "Fingerlings," a popular specialty type, yield small, long tubers that are superb for roasting and boiling. Home gardeners most frequently grow white-skinned and red-skinned potatoes with white flesh that are derived from a variety developed by Luther Burbank. This variety mutated to produce a tuber with a russeted skin that led to the introduction of the ‘Russet Burbank' potato, which, 125 years later, is still the mainstay of the potato industry. Potatoes of standard size and shape are now available with red, blue or yellow flesh, the last of these well-known as ‘Yukon Gold'.
Potatoes' time to maturity varies: Early potatoes are ready to harvest in about 100 days, and medium varieties mature in 110 to 120 days. Late varieties that mature in about 130 days are sometimes called main crop potatoes and generally store longer.
Potatoes generally grow best in soils with a pH level between 6.0 and 6.5; however, incidence of scab disease will be reduced with a lower pH of 5.0 to 5.2. If possible, purchase certified seed stock that has been inspected for diseases. Saving your own seed potatoes is not recommended because viruses and diseases often show up the next year. Seed potatoes should be firm and unsprouted. Wilted and sprouted potatoes usually have lost vigor from being stored where temperatures were too warm. Cut the seed pieces into sizes of about 1-1/2 to 2 ounces or 1-1/2-inch cubes (6-ounce potatoes should cut nicely into four pieces). Each seed should have at least one good bud, or eye. Plant cut-side down in furrows 3 to 5 inches deep. Maintain good weed control and side-dress with nitrogen when the plants are in full bloom.
When the tops grow too large to allow cultivation, one final finishing cultivation, sometimes called laying-by or hilling-up, is done. For this, pull soil over the potatoes to prevent exposure of the potatoes to sun, which can cause greening or scalding. Green portions on potatoes taste bitter and contain an alkaloid that can be toxic when enough is ingested. Cut off and discard green areas (and any sprouts or stems) before using.
Dig early potatoes when tubers are large enough to eat. Harvest potatoes for storage two weeks after the vines die. Avoid skinning tubers when digging and avoid long exposure to light. Wash potatoes and remove those that are diseased or damaged. Cure for about a week in a shaded, well-ventilated place (open barn, shed or garage). Store in as cool a place as possible. Ideal storage conditions (40 degrees Fahrenheit with 85 to 90 percent relative humidity) at harvest time, other than commercial cold storage, are difficult to find. Cool basements are often the best storage available. Keep humidity high and provide good ventilation. Under good conditions, potatoes can keep for two to four months.
Insect pests common to potatoes
Colorado potato beetle probably is the most problematic pest of potato. On the underside of leaves, it deposits clusters of yellowish eggs that hatch into larvae with voracious appetites. Heavy infestations can defoliate plants. Pesticides that the insect ingests can provide effective control, or when infestations are light, the beetles can be removed by hand.
Tomato
Tomatoes are the most popular vegetable for home gardeners in Missouri. They require a small area, bear throughout the growing season, are widely adapted and easy to grow and have many culinary uses. There are a wide variety of tomato types, which are often grown for different purposes. These include slicing types for fresh table use, processing types for canning, cherry tomatoes for salads and plum varieties for sauce. If the varieties of tomato plants available seem overwhelming to a new gardener, then it may be worthwhile asking gardening friends for names of their favorites. Disease resistance to common tomato disorders, including Fusarium wilt and Verticillium wilt, should be considered when selecting resistant varieties.
Plant-growth characteristics
Determinate tomatoes, which terminate growth with flower clusters, include the midget, dwarf and patio varieties. They tend to be smaller and more compact, with a concentrated harvest period. Indeterminate tomatoes always have a vegetative growing point and continue to produce new leaves for the life of the plant. They form flowers along their stems as they grow. Indeterminate plants can grow very tall and benefit from trellising or staking.
A recent development is the semi-determinate tomato, which still ends its growing point with a flower cluster but produces a large plant along the way. Semi-determinate tomatoes do well with cage support or trellising using a variation of the stake and weave system.
Fruit characteristics
Tomatoes come in many different sizes, shapes and colors. Slicing tomatoes are usually round or oblate in shape. While 6- to 8-ounce fruits are common, fruit weights well over a pound are possible, especially from some of the "beefsteak" types. Processing tomatoes usually are pear or plum shaped. Typically, they have small fruit with "meaty" interiors that contain few seeds. Cherry and grape tomatoes are small and shaped like the fruit they are named after. Tomato colors available include red, pink, bicolor or striped, yellow, green, black, orange and white.
Time to maturity
The length of time following transplanting to mature fruit varies from less than 68 days for early-season varieties, 68 to 80 days for mid-season and 80-plus days for late-season tomatoes.
Heritage
Most of the tomato varieties available today are F1 hybrids. Hybrids are produced when two standard-bred varieties (or breeding lines) with different characteristics and genetic makeup are crossed. This usually results in the offspring having known or predicted beneficial traits, such as disease resistance, fruit quality and generally improved or superior growth. This third characteristic, called "hybrid vigor," is a well-understood and research-proven synergistic result that modern plant breeding has exploited.
Heirloom varieties are generally understood as being older than 50 years and should not have any "hybrid or other advanced" breeding techniques used to produce the seeds. They are said by many to taste better, but may lack advantages of hybrids, especially disease resistance, fruit-cracking resistance and higher yields.
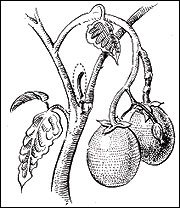 Figure 3
Pruning tomatoes. Large-vine, indeterminate varieties need some of their side shoots removed to maximize fruit development. To prune, remove small axillary shoots, often referred to as "suckers." These grow at the node of a leaf, the point at which the leaf attaches to the main stem.
Tomato culture
To grow tomatoes, set out transplants when the weather has warmed and soil temperatures are above 60 degrees Fahrenheit. Temperatures below 50 will impair tomato growth. In southern Missouri, plant tomatoes outside from approximately April 20 to May 15; in central Missouri, plant from May 5 to 20; and in northern Missouri and the Ozark region, plant from May 10 to 20. The use of raised beds and mulch (usually black plastic) is popular with commercial growers as it raises soil temperature 5 to 10 degrees, while also conserving moisture and discouraging weeds and diseases.
Tomato planting distance depends on the type of tomato. Generally speaking, 24 to 36 inches between plants is the ideal spacing for most home-garden varieties. Planting more closely reduces air circulation around the plants, which can trigger disease outbreaks. Large vine tomatoes should be spaced 36 inches apart, with rows 4 to 5 feet apart.
Staking and other methods of support improve early maturity, marketable yield, fruit set and fruit quality, and also facilitate harvest and other operations such as pesticide application. Staked plants are less likely to get diseases because of improved air circulation around the leaves. Stakes can be made from a 1- by 2-inch piece of wood 6 feet long and pointed at one end. Place it firmly in the ground, about 4 inches from the plant at the time of transplanting. Use soft cord or fabric strips to tie plants loosely to the stake; allow at least half an inch of slack for stems to grow. Many gardeners prefer to support tomato plants in cylindrical wire cages to save time required for staking, pruning and tying. Use a mesh that is large enough so that you can reach through to pick fruits inside.
Determinate tomatoes typically do not need pruning. However, large-vine, indeterminate varieties need some of their side shoots removed, or they should be topped to prevent plants from getting too bushy and tall. This helps direct the plant's energy into fruit development, rather than foliage, and it also keeps the plant from becoming overgrown. To prune, remove small axillary shoots (Figure 3). When plants are grown in cages, less pruning is required.
Tomatoes benefit from regular, deep watering. A tomato plant will use from 2 to 4 quarts of water daily. Side-dress tomatoes with fertilizer.
Tomato color and flavor development are optimal when average daily temperatures are about 75 degrees Fahrenheit. During ripening, high temperatures of 92 degrees and above reduce fruit flavor, texture and color. Fruit exposed to high temperatures develops internal white tissue and yellow color on the surface. Good vine growth helps shade the fruit from intense sunlight, thus reducing fruit temperature.
Do not refrigerate tomatoes after harvest. Keep the fruit at room temperature to best preserve flavor and quality. Mature green fruits harvested in the fall can keep for several weeks. Select fruits free of disease, wrap them in paper and store them at about 60 to 65 degrees Fahrenheit. They will ripen slowly and provide good tomatoes for several weeks. Green tomatoes can be fried or cooked in soups.
For more detailed information, MU Extension publications G6461 and GH1456 on growing and canning tomatoes are oriented to the home gardener, whereas G6370 has a commercial focus.
Diseases common to tomatoes
Tomato plants are typically easy to grow if they have adequate fertility and moisture until frost. However, diseases often weaken and eventually kill tomatoes. Four of the most common diseases are discussed below.
Septoria leaf spot (Septoria lycopersici) and early blight (Alternaria solani) are fungi that infect leaves; early blight can also affect the fruit. Virtually anyone who raises tomatoes in Missouri has seen these diseases that infect the lower leaves first and gradually work their way up the plant. Septoria's symptoms are small circular brown to tan lesions with a light tan center. At first glance, leaves infected with early blight look similar to leaf spot. However, blight spots are larger than Septoria lesions and usually exhibit more chlorosis, or yellowing, around the lesion, and they often have concentric rings that give the spots a target-like appearance.
Bacterial spot and speck, Xanthomonas axonopodis pv. Vesicatoria and Pseudomonas syringae pv. Tomato, can also produce lesions on leaves, but the lesions usually appear dark, water-soaked and greasy, and mature lesions are surrounded by a yellow halo. The spots are initially small, but they can come together and affect larger portions of the plant. Small dark, crusty spots also often disfigure the fruit.
To help prevent these diseases, purchase vigorous, healthy transplants that show no signs of disease. Modern tomato varieties often develop fewer symptoms than older heirloom varieties, though most tomato varieties have little disease resistance. Wait to plant until after the soil warms and use good growing practices throughout the season. Splashing water spreads these diseases, and disease development is likely during periods of heavy dew, rain and high humidity. Water at the soil surface, not overhead, to minimize leaf wetness and stake or space plants far enough apart to allow for good air circulation. Reduce leaf contact with soil by mulching and avoid walking or working in the tomato patch while foliage is wet. You cannot cure plants once they have become infected, but plants with these diseases can often produce well, especially when diseases develop later in the season. Because all these diseases can survive between crops on infected tomato debris, remove and destroy debris soon after the plants stop producing.
Two of the most common tomato fruit problems are cracking and blossom-end rot. Fruit cracking varies by variety. It is usually a problem when soil moisture fluctuates widely. Tomatoes exposed directly to sunlight are highly susceptible. Select varieties that are crack resistant and do not allow them to completely dry out between waterings. Blossom-end rot appears as a depressed, brownish dry rot the size of a dime to a half-dollar on the blossom end of the fruit. It is caused by wide fluctuations in available moisture, often coupled with a calcium deficiency. Training and pruning may also promote blossom-end rot. Remove the affected fruits so others on the plant will develop normally. To reduce the incidence of blossom-end rot, keep plants as evenly watered as practical. Some varieties, especially early varieties, are much more prone to this problem. If a problem persists with a number of different varieties and suitable moisture has been provided, it is worthwhile to do a soil test. Low soil calcium can be amended with gypsum or lime, the latter used if the soil pH is too low. Mulch to maintain more uniform moisture conditions. Avoid cultivating (hoeing) near the roots.
If Septoria and early blight are severe year after year, fungicide formulations that contain chlorothalonil will help. For bacterial speck and spot, use copper-based products (e.g., copper hydroxide, copper sulfate or copper resinate). Organic formulations with copper are available, but no organic products are available to control Septoria and early blight. Use fungicides according to directions on the label, which usually recommend applying every 7 to 10 days during disease outbreaks.
Insect pests common to tomatoes
The three most common insect pests are tomato hornworm, stinkbugs and tomato fruitworm. Hornworms are large green worms up to 4 inches long that eat foliage and fruit. Handpick them if there are only a few; use insecticide sprays for large infestations. The moths that lay the eggs are commonly referred to as hummingbird (sphinx) moths, which many gardeners appreciate.
Stinkbugs are brown, green or black shield-shaped bugs that emit a foul odor. They suck juices from the plant and cause hard, whitish spots just under the skin of the fruit. The adult stage of this insect is difficult to kill with insecticides available to homeowners; the best course may be to tolerate the relatively minor damage they cause.
Tomato fruitworms are green, brown or pink worms that eat holes in fruit and buds. They are the larvae of a nondescript brown moth about three-fourths of an inch wide. Spray during June to help control this insect, but expect to need several applications, as the label directs.
Pepper
Peppers originated in Mexico and Central America. In tropical regions, the pepper grows as a perennial plant, but it is cultivated as an annual in temperate regions such as the Midwest. Pepper is a member of the Capsicum genus and there are five domesticated Capsicum species. Their fruit (botanically, a berry) is often referred to as a pod and considered a vegetable.
Most peppers commercially grown are C. annuum and are distinguished by pod shape, color, pericarp, or wall thickness and pungency. Types include ancho, bell, jalapeno, pepperoncini and yellow wax. Hot peppers, also called chilis, are noted for their fruit's fiery pungency caused by a compound called capsaicin. Many popular chilis are elongate in shape and ripen to shades of deep red. Bell peppers are generally large, thick-walled, sweet, blocky types. Traditionally in the United States, four-lobed bell peppers have been harvested green, but it is becoming more common to allow the fruit to ripen and change color to yellow, orange or red before harvest. Varieties that produce brown, purple and white fruit are also available.
Establish peppers as transplants because the seeds are slow to germinate outdoors. Peppers require warmer growing temperatures than tomatoes and are typically transplanted about two weeks later. Temperatures hotter than 94 degrees Fahrenheit or cooler than 50 can reduce fruit set. Peppers have a shallow root system; when fruit loads are heavy, plants can bend and even uproot. Stake peppers to keep plants upright and prevent splitting during a heavy fruit load, and to reduce the incidence of sunscald on fruits.
Moisture stress will cause flowers and small fruit to drop and reduce leaf area, causing sunscald on the fruit. Irrigation is particularly crucial during transplanting, flowering and fruit set. Inadequate water can increase incidence of blossom-end rot, a common physiological disorder of sweet peppers. It starts as a water-soaked lesion on the bottom, or blossom end, of the pepper fruit wall. Eventually the lesion becomes discolored and papery dry. As with tomato, blossom-end rot signifies a calcium deficiency in the fruit, which can be triggered by long periods of dry weather followed by heavy rains. During dry periods, calcium does not enter the fruit in sufficient amounts because of reduced plant fluids.
After harvest, cool peppers immediately to preserve quality. The optimal temperature for cooling peppers is 50 degrees Fahrenheit and 95 percent relative humidity. To avoid chilling injury, do not expose peppers to temperatures lower than 45 degrees. Also, do not immerse peppers in water immediately after harvest because moisture can seep into the fruit cavity and cause premature rot.
Insect pests of peppers are generally minor in home gardens. However, European corn borer and aphids are two pests that do occur. For more information on growing sweet peppers, see MU Extension publication G6372.
Eggplant
Eggplant (Solanum melongena L.) is a bushy, vigorous plant with large leaves, a woody stem and a deep taproot, which helps it tolerate dry weather. Native to India and China, eggplants thrive in warm, dry weather and are more sensitive to low-temperature injury than tomatoes and peppers. Thus, eggplants should be transplanted after all risk of frost has passed. Flowers open for two to three days and are self-pollinated. Fruits vary in size and shape, from round to bell-shaped, oval or elongated. The fruit surface of eggplant is smooth and glossy. Dark purple is the traditional eggplant color, but the fruits also come in violet, white, black, yellow and green, and in various combinations of these colors.
Stake eggplants for optimum growth and yield. Harvest 60 to 80 days after transplanting, when the fruit surface is glossy and tender, and before the seeds within the fruit turn brown. Overmature fruits have a dull, bronze appearance and the seeds are bitter.
For home gardeners, flea beetles are likely to be the most significant pest. They chew small holes in the leaves, but they do not damage the fruit. New transplants are especially prone to damage.
Cucumber beetles and Colorado potato beetles may feed on eggplant leaves and damage fruit. Row covers or lightweight insect-exclusion covers can be used to prevent these insects from feeding on the plants. If infestations are heavy, an insecticide such as permethrin can provide adequate control in most situations. For more on growing eggplant in the Midwest, see MU Extension publication G6369.
Sweet corn
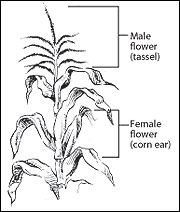 Figure 4
Sweet corn is monoecious. Sweet corn is a monoecious plant, which means it has a separate male and female flower on each stalk. The tassel is the male flower, which produces the pollen, and the ear is the female flower. For kernels to form on each ear, pollen from the tassel must reach the silk of the ear.
Sweet corn (Zea mays L. var. rugosa) is one of the most popular summer vegetable crops and the only common vegetable from the grass family. It is native to the New World, where it has been cultivated for more than 4,000 years. This monoecious plant is wind pollinated, although bees are often seen collecting nectar and pollen from the tassels (Figure 4). For small plantings of sweet corn, a series of short rows rather than a single, long row will encourage pollination.
Sweet corn is sensitive to cool weather and should be directly seeded into the garden when soil temperatures reach at least 60 degrees Fahrenheit or about 7 to 10 days before the last killing frost. Plant sweet corn seed about 2 inches deep. Corn can be planted in hills about 3 feet apart, each hill containing three or four seeds. At wider spacing, sweet corn sometimes develops suckers or tillers (these do not reduce yield and should be left on the plant). Sweet corn matures in about 72 to 89 days, typically producing one or two ears per plant.
Early plantings avoid many insect pests that become established later in the growing season. For early harvest, plant an early-maturing variety. An option for even earlier planting is to sow sweet corn as double rows (14 to 24 inches apart) under clear, perforated plastic (1 to 1.25 mil). The plastic is left on the plants for about 30 days, which raises the soil temperature and speeds growth. Later, when plants are 6 to 12 inches tall, the plastic can be slit and removed. Early-maturing varieties can be seeded 8 inches apart within rows, while later maturing varieties should be seeded 9 to 12 inches apart.
Sweet corn is generally classified in two ways, by kernel color (white, yellow or bicolor) or by the level of sugar content. Bicolor sweet corn has 80 percent yellow kernels and 20 percent white kernels on each ear. Originally, sweet corn was a standard or sugary type labeled as Su-1, referring to the gene that gives sweetness to the kernel. Today, these types of sweet corn are used primarily for processing. Sugar-enhanced (SE) sweet corn has a tender kernel and higher sugar content. SE sweet corn can be either heterozygous or homozygous. Heterozygous SE sweet corn is the offspring of an SE and Su-1 cross while homozygous SE sweet corn has both SE types as parents, making it the sweetest type of SE sweet corn. Supersweet or "ultra/extra sweet" corn contains the SH2 gene, which is associated with slightly tougher kernels, increased sweetness over SE types and a longer shelf life. Avoid planting supersweet varieties in cool soil (below 60 degrees) as they lack germination vigor.
A new group of sweet corn varieties includes synergistic (SY), or triple-sweet types. These types of sweet corn have about 75 percent of their kernels as SE sweet corn and 25 percent as supersweet. Synergistic types have higher sugar content than regular SE types and have excellent shelf life and kernel texture. In all cases, sugar is converted to starch as soon as the ear is removed from the plant. Thus, for the best table quality, eat sweet corn as soon as possible after harvest.
Adequate water is particularly critical to sweet corn during silking, tasseling and ear development. Poor pollination during hot, dry weather results in ears with "skips" in the kernels and poor tip fill. Heavy rains during tasseling can wash off pollen or cause it to stick to the tassel, reducing pollination. Sweet corn is ready to harvest about 20 days after silking. Ripe ears have a dried silk and feel full to the touch. Ripe kernels will be plump and squirt a milky liquid when punctured with a thumbnail. For more on growing sweet corn, see MU Extension publication G6390.
Insect pests common to sweet corn
Corn earworm is the most significant and consistent sweet corn pest in the Midwest. This is the same insect as the tomato fruitworm and the cotton bollworm. Tolerance for the pest may be the best course, as it typically affects only the tips of the ears. If treatment is desired, mineral oil mixed with the Bt insecticide Dipel can effectively control corn earworm. Apply the oil by hand to the tip of the ear on each silk about two days after the silk emerges from the ear. Applying the oil any earlier may reduce pollination. This technique works best for small plantings because it can take from 8-10 hours of labor to treat one acre. If an insecticide spray is used to control insects such as earworm, it should be applied to the green silk. Treatment may be necessary every four to seven days, depending on pest pressure. Spraying for corn earworm can stop after the silks dry.
Perennial vegetables
Asparagus
Asparagus (Asparagus officinalis), a member of the onion family, is native to most of Europe, northern Africa and western Asia. It is a high-yielding, early-season vegetable that can produce for many years. The asparagus plant is composed of a crown, a root system and ferns that are not true leaves but are stems that photosynthesize and transfer energy to the crown. Thus, the spears, which are the harvested portion of the plant, are immature ferns.
Yield of asparagus spears in the spring is directly related to the previous year's fern growth — overharvesting one year can weaken the plant and decrease yields the next year. Do not harvest the first year after planting. Harvest for about two weeks the second year after planting crowns (or three years from seed transplants). Three years after planting crowns, asparagus can be harvested over a five- to eight-week period. Cease harvesting when the majority of spears have a diameter the size of a pencil (less than three-eighths inch). Asparagus has a short shelf life. After harvesting, it should be immersed in cold water (hydrocooled) and immediately refrigerated (36 degrees Fahrenheit) to maintain quality.
A perennial vegetable, asparagus requires extra work to plant and maintain, so give it a good location. Select a well-drained area or use raised beds to enhance drainage; asparagus will not tolerate wet, soggy soil. Do not rotate asparagus with other vegetables in the onion family (e.g., leeks, chives, garlic) because they can transmit diseases to the asparagus. Asparagus competes poorly with weeds. Growing a cover crop during the summer (buckwheat) and the fall and winter (rye or wheat) the year before asparagus is planted will suppress weed growth and increase soil organic matter. For chemical weed control in established beds, consider cutting all stalks below the soil surface with the final harvest and then treat all weeds in the bed with glyphosate, followed by mulching for the summer months. Thorough hand weeding can substitute for the herbicide use. The optimal pH for asparagus is 6.5 to 7.0; lime may need to be incorporated into the soil before planting.
Insect pests of asparagus include the common asparagus beetle, cutworms, grasshoppers and aphids. Selecting a site with good drainage and optimal pH will prevent many asparagus diseases. See MU Extension publication G6405 for further details on asparagus production.
Rhubarb
Rhubarb (Rheum rhabarbarum) was probably brought from Siberia to Europe. Easy to grow, rhubarb is one of the few vegetable crops that does well in shade. It grows as a perennial except in the extreme heat of southern climates. Soil pH is not critical, but loose, well-drained soil is important to avoid root and crown rots. Seed rhubarb indoors eight weeks before the last spring frost or sow directly outdoors eight weeks after the last spring frost. Harvest the stalks in the spring. Do not harvest rhubarb the year of planting. You can harvest for one to two weeks the following year.
Rhubarb is a low-maintenance crop. After harvest, weed and mulch for the summer months and water occasionally. Do not fertilize. Add a generous amount of compost around the plant after fall cleanup and mulch the crown for the winter. To propagate by division, all that is needed is a piece of a root with a bud. Though it is a vegetable, rhubarb is prepared like a tart fruit. It can be frozen or canned for later use. Few pests ever bother rhubarb, but for the best productivity and longevity, buy virus-free stock.
Herbs
Botanically, an herb is a plant that does not produce a woody stem and dies back to the ground each winter to a perennial root system. In the garden, herbs are usually considered plants that serve as seasonings in the preparation of foods. They are also often used as ingredients for scents in cosmetics or for medicines or nutritional supplements. Some of these are woody plants that do not fit the strict definition of an herb.
Over the centuries, herbs have had many uses: to season foods, to cure illnesses, to dye homespun fabrics, to repel insects and to cover the unpleasant taste of meats before refrigeration was commonly available. They were also used as fresheners and fragrances for perfumes. With the advent of the supermarket, the practice of growing herbs at home declined because a wide range of dried herbs became available for a low cost. Recently, however, a revived appreciation for fresh herbs and their distinctive tastes and various uses has prompted many gardeners to grow at least a few herbs.
Most herbs need a sunny location. Only a few, including angelica, woodruff and sweet cicely, grow well in partial shade. Most herbs do not require a highly fertile soil, but they grow best in soils that have adequate organic matter. A nearly neutral pH is usually best.
Few insects or diseases attack herbs. In some areas, rust can be a problem for mints. In hot, dry weather, spider mites can be a pest for some herbs. Control is usually not needed until a problem becomes evident. Make certain any pesticides used are labeled for food crops if the herbs are being grown for culinary purposes. See MU Extension publication G6470 for more information about specific herbs and tips for growing and preserving them.
Fall gardening
Fall is an excellent extension of the garden season and a vital period for intensive gardening methods. Many cool-season and some warm-season vegetables attain their peak quality when grown and harvested as late crops. When planning for the fall garden, gardeners must consider the space needed, soil preparation, rotations and varieties desired. Seeds that were purchased for spring planting can be used for the fall garden provided they were stored in a cool location and kept dry.
The challenge with fall vegetable production is to seed or transplant a crop when the weather is hot and harvest as temperatures cool. When seeding in late summer for a fall crop, moisture is often an issue. Water immediately after seeding or transplanting. Plant the seeds slightly deeper than you would normally plant them in spring to improve moisture availability for germination and root growth.
Many warm-season vegetables can be grown successfully in late summer and fall, including fall tomatoes, snap beans and summer and winter squash. Several heat-tolerant tomato varieties can be transplanted in July for a fall crop. Remember that most warm- season vegetables are tender and must be harvested before frost. Any tomatoes left on the vine when frost is predicted can be harvested green for green tomatoes, or, if they have started to turn, can be stored in a paper bag or wrapped in newsprint to ripen inside at 70 degrees Fahrenheit. Snap beans can be seeded in early to mid-August in most areas of Missouri. Bush beans grow best at temperatures from 75 to 85 degrees but will drop flowers if temperatures exceed 90. They mature in approximately 60 days and make an excellent fall crop.
Pumpkins and winter squash are traditional warm-season fall crops that are often seeded or transplanted in mid-June through July for fall harvest. The plant is sensitive to cool temperatures, but the fruit is often harvested after the first frost. Summer squash can also be established in mid-July through August in certain areas of Missouri by direct seeding or transplants. The crop reaches maturity in 40 to 50 days.
Cool-season vegetables will thrive in the cooler nights of late summer and fall and are not as sensitive to frost. Consider planting hardy cole crops such as broccoli, cabbage, cauliflower, brussels sprouts and Chinese cabbage in early to mid-August for fall harvest. Establish late-season cole crops from transplants (four to six weeks old); it is difficult to get uniform seed germination and seedling emergence in the high soil temperatures common in late summer. Transplanting in late afternoon or early evening will reduce transplant shock. Also, you can increase plant spacing to accelerate growth.
Greens (collards, kale, mustards and turnips) are also well adapted for fall harvest. These crops can be seeded through August and harvested approximately 50 days from seeding. Turnips can be planted to produce greens or roots, depending on the variety. Spinach is also a cool-season crop that grows well in the fall, because it is sensitive to high temperatures that can cause it to develop a yellow color and bolt.
Beets can be seeded for fall production from late July to mid-August. It is important to thin beets to about 2 inches between plants, which will allow the beets to grow large enough for harvest.
Container gardening
Container gardening is rapidly gaining popularity. It works well for gardeners with limited space or who lack access to an outdoor garden plot and for individuals who find in-the-ground gardening too strenuous or who might want to avoid some of the insects that are associated with outdoor activities in many areas. Container gardens require less weeding than conventional garden beds, which makes them ideal for busy gardeners. A container garden can also be a way to add decorative appeal to a patio and, at the same time, provide convenient, fresh contributions to meals. With a little bit of planning and creativity, you can have containers filled with many of the same vegetables grown in the traditional garden.
Vegetables that adapt well to container gardening include tomatoes, peppers, parsley, Swiss chard, cucumbers and various herbs. Compact, bushy and dwarf plants should be considered. Seed and plant catalogs often feature varieties specifically recommended for container gardening.
Containers
Feel free to be creative with the selection and arrangement of containers — the choices are nearly unlimited. Just remember, each container should have a hole in the bottom for drainage. For individuals with functional limitations, containers should be lightweight, easy-to-reach and portable. A height of 22 to 24 inches is optimal for someone in a wheelchair. Several practical considerations for selecting containers are provided below.
Darker containers absorb more heat than light-colored containers. Although this can help plants start more quickly, dark-colored containers will dry out more quickly and need more watering if they are in direct sunlight. Lighter colors may work better for most locations.
Plants need room to grow. Consider the mature size of the plants to be grown in containers and the appropriate spacing recommendations. Keep in mind that plants can be spaced closer together in a container than in a garden.
Plastic containers offer advantages. Unglazed clay containers may seem more natural or appealing, but plastic containers may be better if they are to be placed in full sun. Good plastic lookalikes are available for those who prefer the appearance of clay. Unglazed clay pots are porous and water evaporates more quickly from them. Plastic containers will need less frequent watering. In addition, plastic weighs less than clay, so the pots are easier to move.
Drainage and watering
Be sure a container allows for drainage. If it does not have a drain hole in the bottom, add one. If you do not want to put a hole in a decorative ceramic container, put a smaller pot inside, making sure there is some room at the bottom for water to drain. Put a few inches of gravel in the bottom of the decorative pot to keep the growing container out of the drainage reservoir.
Since they have restricted root area, container plants need to be watered more frequently than those grown outdoors in a conventional garden bed. There is no prescribed schedule for watering container plants. Weather conditions, potting mix used and the container material and size will determine how often to water. Check plants regularly and look for signs such as wilting, which indicate the need for water, and yellowing of the leaves, which may indicate overwatering. Check the top three-fourths inch of the pot to see if the growing medium is dry. Containers in the hot sun dry out quickly. Even a gentle summer breeze will cause moisture to be lost quickly from plants. Be prepared to water daily or even twice a day during hot, dry conditions. When you water, soak thoroughly — until the container begins to leak.
Growing medium and fertilization
Use a good, sterile, porous potting medium for successful container gardening. Such mixes usually are composed of organic material and mineral parts. Organic parts may contain amendments such as peat moss, fir bark, redwood sawdust, pine bark or hardwood bark. Mineral amendments may include vermiculite, perlite, pumice, sand, rock wool or calcined clay. Commercial mixes are readily available and easy to use. However, you can mix your own medium to tailor conditions for a certain plant or if you have the materials available. Potting mix recipes are easy to find in gardening references, in magazine articles and on the Internet.
Moisten the potting mix before using it, as dry mixes may initially repel water. Replenish fertilizer regularly. There is a tendency for potting mixes to drain water more rapidly, causing the fertilizer to wash out of containers more frequently than would be the case in a garden. Some gardeners fertilize containers every other time they water. If using a liquid fertilizer, read and follow the directions on the label to determine the concentration. Plants do not need a large amount of fertilizer, but consistency is important. Many gardeners use timed-release fertilizers available in three- or 12-month formulas that release fertilizer in small amounts, as the plants need it.
Enjoy the fruits of your vegetable garden
The USDA recommends that we eat five to nine servings of vegetables a day. Growing your own vegetables is likely to increase the number of servings you and your family eat. However, making the best use of garden produce takes some thought and effort. Refer to MU Extension publication G6226, Vegetable Harvest and Storage, for information on how to prepare and preserve the harvest to retain its flavor and nutritional value.
Many cookbooks feature ways to prepare fresh produce. Magazines and newspaper articles also provide recipes and preparation tips for vegetables that are in season, and websites are another source of recipes, nutritional information and tips on food preparation. For information on preserving vegetables from the garden to enjoy year-round, refer to MU Extension publications including: GH1451, Quality for Keeps: Before You Start to Can — Learn the Basics; GH1452, Quality for Keeps: Steps to Success in Home Canning; GH1454, Quality for Keeps: Preserve Your Garden Delights — How to Can Fresh Vegetables; GH1457, Quality for Keeps: Food Preservation — In a Pickle; GH1501, Quality for Keeps: Freezing Basics; GH1503, Quality for Keeps: Freezing Vegetables.
Related reading
- Maynard, Donald N., and George J. Hochmuth. 1997. Knott's Handbook for Vegetable Growers (fourth ed.). New York, N.Y.: John Wiley and Sons, Inc.
- Voight, C.E., and J.S. Vandemark. 1995. Vegetable Gardening in the Midwest (Circular 1331). Urbana: University of Illinois College of Agriculture.