Compost is partially decomposed organic matter. It is dark and easily crumbled and has an earthy aroma. It is created by biological processes in which soil-inhabiting organisms break down plant tissue. When decomposition is complete, compost has turned to a dark-brown powdery material called humus. The processes occurring in a compost pile are similar to those that break down organic matter in soil. However, decomposition occurs much more rapidly in the compost pile because the environment can be made ideal for the microbes to do their work (Figure 1).
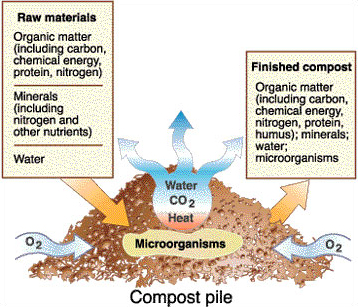 Figure 1.
A compost pile encourages natural decomposition of organic materials.
Why make compost?
Gardeners often have difficulty disposing of leaves, grass clippings and other garden refuse, particularly in urban areas. Missouri law bans these materials from landfills, so finding environmentally sound ways to dispose of them has become even more important. These byproducts of the garden and landscape can be turned into useful compost with little more effort than it takes to bag and haul them away. Home composters avoid hauling or utility costs associated with centralized composting facilities and end up with a valuable soil conditioner or mulch for the landscape and garden.
The value of compost
Good compost consists primarily of decomposed or partially decomposed plant and animal residues but may also contain a small amount of soil. Compost improves both the physical condition and the fertility of the soil when added to the landscape or garden. It is especially useful for improving soils low in organic matter.
Organic matter in compost improves heavy clay soils by binding soil particles together into “crumbs,” making the soil easier to work. Binding soil particles also helps improve aeration, root penetration and water infiltration and reduces crusting of the soil surface. In sandy soils, additional organic matter also helps with nutrient and water retention. Compost also increases the activity of soil microorganisms that release nutrients and other growth-promoting materials into the soil.
Although compost contains nutrients, its greatest benefit is in improving soil characteristics. You should consider compost a valuable soil amendment rather than a fertilizer because additional fertilization may be necessary to obtain acceptable growth and yields.
Compost also is a valuable mulching material for garden and landscape plants. It may be used as a top-dressing for lawns and, when it contains a small amount of soil, as part of a growing medium for houseplants or for starting seedlings.
How compost forms
Composting is a method of speeding natural decomposition under controlled conditions. Raw organic materials are converted to compost by a succession of organisms (Figure 2). During the first stages of composting, bacteria increase rapidly. Later, actinomycetes (filamentous bacteria), fungi and protozoans go to work. After much of the carbon in the compost has been used and the temperature of the pile has fallen, centipedes, millipedes, sowbugs, earthworms and other organisms continue the decomposition.
As microorganisms decompose the organic materials, their heat of respiration causes the temperature in the pile to rise dramatically. The center of a properly made heap should reach a temperature of 110 to 140 degrees F in four to five days. At this time, the pile begins “settling,” which is a sign that the pile is working properly. The pH of the pile will be very acidic at first, at a level of 4.0 to 4.5. By the time the process is complete, the pH should rise to about 7.0 to 7.2.
The heating in the pile kills some of the weed seeds and disease organisms. However, this happens only in areas where the most intense temperatures develop. In cooler sections toward the outside of the pile, some weed seeds or disease organisms may survive. So, proper turning is important to heat all parts of the pile.
The organisms that break down the organic materials require large quantities of nitrogen. So, adding nitrogen fertilizer, or other materials that supply nitrogen, is necessary for rapid and thorough decomposition. During the breakdown period, the nitrogen is incorporated into the bodies of the microbes and is not available for plant use. This nitrogen is released when the decomposition is completed and the compost is returned to the garden.
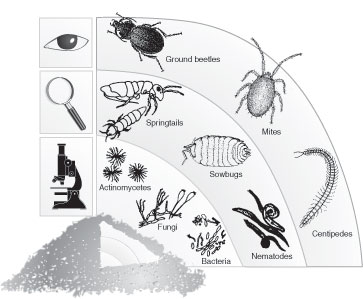 Figure 2.
A succession of organisms decompose organic matter in compost.
What materials may be composted?
Many types of organic materials can be used for compost. Possible materials include sod, grass clippings, leaves, hay, straw, weeds, manure, chopped corncobs, cornstalks, sawdust, shredded newspaper, wood ashes, hedge clippings and many kinds of plant refuse from the garden.
If the compost is to be returned to the garden, leave out weed plants heavily laden with seeds. Even though some seeds will be killed during composting, those that survive might create a weed problem.
Most kitchen scraps also may be used in the compost heap. Some items that should not be used are grease, fat, meat scraps and bones. These materials may attract dogs, rats or other animals. They also may develop an unpleasant odor during decomposition. Fats are slow to break down and greatly increase the time required before the compost can be used.
Unless compost is either completely and thoroughly turned during its formation or allowed to remain unused for several years, diseased plants from the flower or vegetable garden should not be placed on the compost heap. Even though the heating during the compost formation may kill some diseases, some disease organisms may survive to be returned to the garden.
Although animal manures are often good sources of nitrogen, they should be used with caution. Always wash your hands thoroughly after handling compost containing manure of any kind.
The composting process
The length of time necessary for the composting process depends on several conditions:
- Carbon-to-nitrogen ratio
- Surface area of particles
- Aeration
- Moisture
- Temperature
Of the above, the carbon-to-nitrogen ratio is especially important. All organic material contains carbon and nitrogen. Carbon is a major component of the cellulose and lignin that give cell walls their strength. Nitrogen is found in proteins and many other compounds inside plant cells. The carbon-to-nitrogen ratio (C:N) of a material is an estimate of the relative amounts of these two elements it contains. The ratio is usually based on the percent dry weight of carbon and nitrogen in the material. A ratio of about 30:1 is ideal for the activity of the microbes in the compost. This balance can be achieved by controlling the materials included in the compost or by adding nitrogen either from fertilizer or from organic materials high in nitrogen, such as manure or grass clippings.
Table 1 shows the approximate ratios for some materials commonly added to compost piles. The items at the top of the list are highest in nitrogen, and those at the bottom are highest in carbon.
These ratios represent comparative weights. So, in the first example, 5 to 7 pounds of dry pig manure would contain about 1 pound of nitrogen, and near the other extreme, 500 pounds of sawdust might contain only 1 pound of nitrogen.
The 30:1 ratio in compost is the most desirable to supply the microorganisms with the amount of both the carbon they need for energy and the nitrogen they need for protein synthesis so they can function efficiently and quickly. To estimate the C:N of a mixture, average the ratios of the individual materials. For example, a mixture of equal parts grass clippings and leaves might have a C:N of (20 + 50) ÷ 2 = 35.
Table 1.
Carbon-to-nitrogen ratios in various materials.
| Organic material | C:N |
|---|---|
| Hog manure | 5 to 7:1 |
| Poultry manure (fresh) | 10:1 |
| Poultry manure (with litter) | 13 to 18:1 |
| Vegetable wastes | 12 to 20:1 |
| Coffee grounds | 20:1 |
| Cattle manure | 20:1 |
| Grass clippings | 12 to 25:1 |
| Horse manure (fresh) | 25:1 |
| Horse manure (with litter) | 30 to 60:1 |
| Corn stalks | 60:1 |
| Straw | 40 to 100:1 |
| Bark | 100 to 130:1 |
| Paper | 150 to 200:1 |
| Wood chips, sawdust | 200 to 500:1 |
| Wood | 700:1 |
Constructing the pile
Before a compost pile is constructed, the decision must be made where to locate it and whether it will be contained in a structure or just heaped. Once those decisions have been made and the area is ready, the process of layering compost materials, as described below, may begin.
Location
Build the pile in a convenient but inconspicuous place. If the compost will be used mainly in the garden, then a location near the garden would be logical.
Because the compost pile may need to be kept moist during dry weather, a convenient source of water should be available. But don’t locate the pile where water may stand. Excess moisture in the bottom of the pile can cause the process to stop or lead to odor problems.
Locate the pile where occasional earthy odors are not likely to offend neighbors.
A shaded area is generally desirable for best composting. If possible, however, do not locate the pile or structure close to trees. Tree roots may be attracted to the loose, moist organic material in the bottom. During summer, roots of some trees may invade the lower areas of the bin and make the compost difficult to dig and use.
Containing the pile
Although compost can be stacked in a heap, decomposition is best and space is used more efficiently when the compost is placed in some type of bin or enclosure (Figure 3). Air should be able to move through the sides of the structure. The pile may be round, square, rectangular or any other convenient shape. Pile turning and removal of finished compost will be easier if the structure has an open, removable or hinged side.
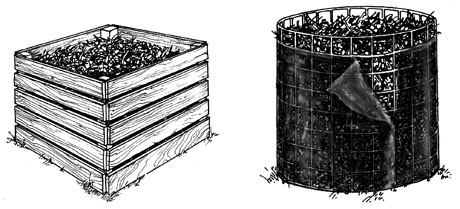 Figure 3
A composter may be built from available materials. If the material is porous (e.g. wire mesh wrap), wrap the bin with weed-barrier fabric or perforated plastic sheeting to reduce moisture loss.
Heaps
Making compost does not require a structure and can be done simply in a heap. However, heaps require more space. The minimum size of a heap should be 5 feet by 5 feet and 3 feet high. Materials can be added as they become available, but when the first heap is high enough, a second one should be started until the first has decomposed enough to be used. Heaps may be turned regularly or not at all. If they are not turned, the upper portions will not be totally decomposed and will have to be pulled off when the compost is used.
Layering
Compost piles develop best when built in layers (Figure 4). Layering is a good way to ensure that the materials are added in the proper proportion. Once several layers are formed, however, composting will be most rapid if the layers are mixed before making new layers. If available materials are limited, building a pile in this way may not be practical. When organic materials are accumulated rather slowly, stockpile them until enough are available to layer properly.
The pile normally may be started directly on the ground. However, to provide the best aeration to the base and improve drainage, dig a trench across the center of the base and cover it with stiff hardware cloth before you begin the layers. Branches or brush may be placed on the bottom as another means of improving lower aeration, but because they will decompose more slowly than finer materials, they may interfere with removal of the finished compost.
Firm each layer of organic material as it is added, but do not compact it so much that air cannot move freely through it.
Lightly water each layer as it is added. The entire pile should be as wet as a well-wrung sponge. Achieving this result is easier if you water each layer of dry material while building the pile rather than trying to wet the entire pile after it is built.
Every two to three layers, use a tool such as a pitchfork or spading fork to mix the layers thoroughly so the materials are evenly distributed. This practice speeds up decomposition.
During construction of the pile, remember the C:N ratios and that the pile needs about one pound of actual nitrogen for each 30 pounds of lightly moist organic matter for best decomposition.
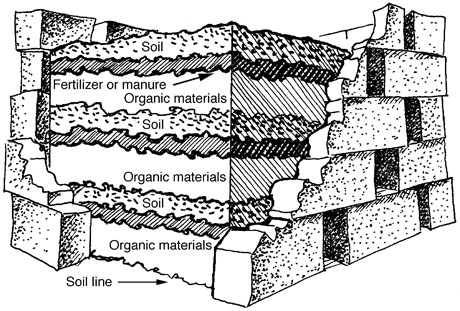 Figure 4.
Proper layering in a compost bin.
First layer — organic materials
Begin the pile by placing a 6- to 8-inch layer of organic matter in the enclosed area. Shredded or chopped materials decompose faster, so if a shredder is available, run coarse organic matter through it. A machete and chopping block are useful for processing brushy yard trimmings. Materials that tend to mat, such as grass clippings, should either be placed in layers only 2 to 3 inches thick or mixed with coarser materials for thicker additions. After the organic layer is built, moisten but do not soak it.
Second layer — fertilizer or manure
Over the layer of plant material, add a layer of a material high in nitrogen or a sprinkling of a high-nitrogen garden fertilizer.
If animal manure is used, a layer 1 to 2 inches thick should be satisfactory.
If organic materials high in nitrogen, such as grass clippings, are used, layer them about 4 inches thick. Although adding grass clippings or other materials that have been treated with herbicides may cause concern, most pesticides break down quickly in a compost pile.
If garden fertilizers such as 12-12-12 are used as a nitrogen source, use about 1 cup per 25 square feet of the top surface of each layer.
When using fertilizer materials, about 0.8 ounce of actual nitrogen per bushel of organic matter such as leaves is needed. For example, one cubic yard (3 feet x 3 feet x 3 feet) of leaves contains about 23 bushels and thus would require about 18 ounces (1.1 pounds) of nitrogen or about 5.5 pounds of a fertilizer containing 20 percent N.
To avoid overwhelming the microorganisms, add fertilizer to the pile in several doses as the pile is turned. More uniform distribution on each layer can be obtained if a water-soluble fertilizer is mixed with water and sprinkled over the surface. Table 2 shows the amount of each material needed to apply 1 pound of actual nitrogen.
Do not add lime to the pile. Adding ground limestone to a compost pile was once thought necessary, but it is no longer considered to be so because the organisms function well with a pH of between 4.2 and 7.2. Compost naturally becomes less acid as it matures. Adding lime helps convert ammonium nitrogen to ammonia gas, which can create an odor problem as it escapes from the pile and can reduce the nutrient content of the finished compost. Adding lime may also cause the pH of the finished compost to be higher than optimal for plant growth.
Table 2.
Quantities of various nitrogen sources required to provide 1 pound of nitrogen
| Nitrogen source | % Nitrogen | Ounces to apply for 1 pound N |
|---|---|---|
| Ammonium nitrate | 33 | 48 |
| Calcium nitrate | 15 | 106 |
| Urea | 46 | 34 |
| Dried blood | 12 | 133 |
| Fish meal | 10 | 160 |
Third layer — soil. Next, add a layer of soil or sod about 1 inch thick
Soil contains microorganisms that help start the decomposition process. If an adequate source of soil is not available, a layer of finished compost may be used as a soil substitute. Compost activators may also be used to introduce organisms into the pile.
Additional layers
Continue to develop and alternate the layers — organic, fertilizer/manure, soil — until the pile is 3 to 5 feet high. Remember, after every two to three layers, mix the layers thoroughly to evenly distribute the materials.
Fast and slow composting methods
The speed at which compost forms depends on the conditions already discussed. Controlling these factors, along with frequent turning of the compost, speeds up the process. But many gardeners are content with the slower, more traditional methods that require less attention.
Fast method
Fast composting methods depend on the use of turning units. They can create good compost in as little as six weeks, depending on how the compost pile is managed. Materials that can be used include nonwoody yard waste, nonfat kitchen waste and similar materials. Structures or containers that allow frequent, easy turning are essential.
Turning units for the fast method are of two general types: a series of bins (usually three) that allow manual turning of the compost from one bin into the next (Figures 5 and 6); or a rotating, horizontally mounted drum, such as a 55-gallon barrel. The materials for fast composting should be added in larger amounts rather than frequent additions of small amounts. Thus, organic matter should be collected until there is enough to properly fill a barrel composter or other unit, such as a 3-square-foot bin. To reduce odor problems, grass clippings should be spread to dry before stockpiling, and food wastes should be covered or buried in the compost.
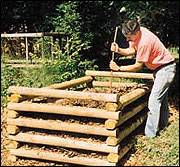 Figure 5.
Compost bin constructed from landscape timbers. To turn the compost, disassemble the bin and restack the timbers close by; then fork the compost into the new enclosure.
Traditional or slow method
In the traditional, slower method of composting, material may be added to the enclosure at any time. Turning can help but is not required. When only one unit is developed, finished compost may be taken from the bottom while new materials are still being added to the top. Two bins are always better where space permits because one bin can be allowed to mature while new materials are being added to the other.
Woven wire fencing, chicken wire, chain link, hardware cloth, wood slat fencing (snow fence), concrete blocks, bricks or lumber can be used to enclose the compost heap. Fencing wires need corner supports although some can be used to make cylinders that need little or no support. If woven wire fencing is too loose to contain finer materials, line the enclosure with plastic that contains some aeration holes to keep the pile neat and speed decomposition. The plastic lining will also prevent excessive drying of the vertical pile surfaces.
Bricks or concrete blocks may be stacked without mortar. Leave 1/2-inch spaces between them to allow adequate air movement through the sides. Line up the holes facing upward as you stack, and drive metal posts down through a few of the holes to make the bin more stable (Figure 6).
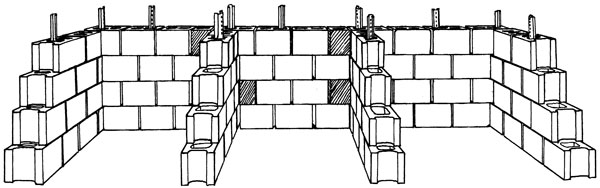
Figure 6
A three-compartment turning unit constructed with concrete blocks and metal ties.
Lumber, whether new or scrap, is suitable for sides of compost bins. Allow enough space between the boards for air movement. Lumber is gradually ruined by exposure to the damp compost, and boards occasionally have to be replaced as they decay. Discarded pallets can be used to make an inexpensive yet durable composting enclosure.
Care of the pile
Decomposition will occur even if a compost pile is ignored after it has been built, but it will occur at a slower rate. Adding water to maintain moist conditions and turning the pile to improve aeration will speed the process. To check the moisture content of the pile, squeeze a handful of compost. If a few drops of water can be squeezed out, moisture is about right. If no drops fall, the pile is too dry. If water trickles out, the pile is too wet. Cover the pile with plastic or other materials during wet weather to avoid excessive moisture buildup.
A properly built pile should develop a temperature of at least 110 degrees F at the center in about a week during summer or up to a month in cooler seasons. When that temperature is reached, the pile should be opened, compacted materials should be loosened, and the pile should be turned or stirred so that the material previously on the top and sides is moved to the center. During warm weather, the pile may need another turning after a second week. The optimum temperature in an active compost pile is 135 to 140 degrees F. Compost piles occasionally reach temperatures as high as 170 degrees F — hot enough to kill some of the microorganisms. This usually happens when excessive amounts of wet, high-nitrogen materials are added to the pile.
The rate of heat buildup and decomposition also will depend on external temperatures. In winter, little decomposition occurs except in the center of large piles.
Piles may be turned by slicing through them with a spade and turning over each slice. The main objectives of turning are to aerate the pile and to shift materials from the outside closer to the center, where they may also be heated and decomposed. Moisten dry spots in the pile by spraying with water during turning.
As materials decompose, the pile heats up and should also shrink, eventually becoming no more than half its original height. Often, the pile’s volume may shrink by 70 to 80 percent.
Compost is ready to use when it is dark brown and crumbly and has an earthy smell. For a very fine product, run the compost through a ½-inch screen and either use the coarser material for mulch or return it to the pile for continued decomposition with other materials.
Diagnosing composting problems
- The pile is producing a bad odor.
Cause: The pile may be too wet, too tight, or both. Turn it to loosen and allow better air exchange in the pile. If the pile is too wet, add dry new materials as you turn it. Odors also may indicate that animal products are in the compost pile. - No decomposition seems to be taking place.
Cause: The pile is too dry. Moisten the materials while turning the pile. - The compost is moist enough and the center is warm but not hot enough for complete breakdown.
Cause: The pile is probably too small. If the pile is not small, more nitrogen may be needed. If the pile is small, collect more materials or add those available to make a larger pile. Turn and mix the old ingredients that may have only slightly decomposed into the new pile. - The heap is moist and sweet smelling, with some decomposition, but still does not heat enough.
Cause: There is not enough nitrogen available for proper decomposition. Mix a nitrogen source such as fresh grass clippings, manure or fertilizer into the pile.
Using compost
When compost is ready to use, it should be dark and crumbly, and you should not be able to recognize the original composted items (Figure 7). If compost is not used promptly, it still makes a good soil amendment, but nitrogen may be lost through leaching.
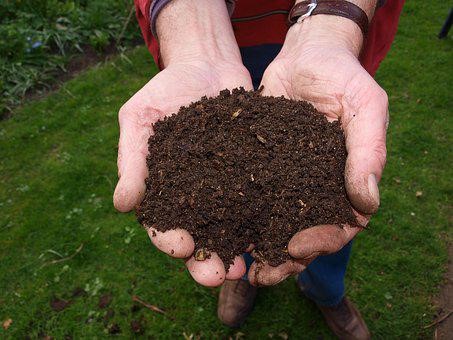 Figure 7.
Well-decomposed compost ready for use.
Fast composting may produce good compost in three to eight weeks. Traditional composting methods will produce a product in three to nine months, depending on the types of organic materials used, temperatures, and how often the compost is turned.
In some cases, screening compost through a 1-inch wire mesh will help sort out incompletely decomposed materials before use. Twigs decompose slowly, and if they have become a part of the debris, they may have to be removed from finished compost to be returned to the heap.
Compost is also very suitable to use for potting houseplants or starting many types of seeds. Recent research has shown that microorganisms found in mature compost can actually suppress plant diseases such as those causing “damping off” as effectively as fungicides. Generally, best results are obtained when compost is mixed with other materials such as perlite and vermiculite, with about 30 percent of the volume being compost.
Compost should be added annually if you are using it to build good soil. The best time to add compost to the vegetable or flower garden is during fall or spring tilling. You can add it to the soil when planting trees, shrubs, annuals or perennials. Compost also is an excellent mulch or top-dressing around flowers, vegetables, shrubs and trees. If used as mulch, the compost need not be completely finished.
Compost may be used as a lawn top-dressing, but it should not be applied more than a ¼ inch thick. For this purpose, the compost should be screened so that only the finer particles are used.