Proper semen handling is essential in order to achieve maximum conception rates with artificial insemination (AI). Reduced conception rates can and will occur if semen is handled improperly before, during or after the thawing process.
Becoming familiar with the liquid nitrogen tank
In order to avoid damaging frozen sperm, it is important to know the structure and parts of a liquid nitrogen tank prior to handling semen. Being comfortable with handling a liquid nitrogen tank will allow for quick and effective handling of frozen straws.
Structure of a liquid nitrogen tank
A liquid nitrogen tank is a double-walled container in which two tanks are fused together with a fiberglass neck. A hinged lid covers the tank canister area and a foam cork fits in the tank neck. Stainless steel canisters hold the semen canes within the tank. Most liquid nitrogen tanks will have a numbered ring upon which the canister handles rest. At the bottom of the liquid nitrogen tank is a structure called the spider, which keeps the canisters in place when retrieving or replacing them. Semen is packaged in ½ or ¼ cc straws, generally with five straws per goblet and two goblets per cane for a total of ten straws per cane. The top of the cane is marked with a cane code to identify the bull and may also include the bull’s common name.
Tank inventory
Maintain an up-to-date inventory of the semen in a liquid nitrogen tank. Knowing in which canister to look for a specific bull’s semen will allow for quick retrieval of straws when preparing catheters. This also helps to prevent repeated lifting and raising canisters for identification, which can cause damage to sperm cells if done improperly.
Retrieving units from the tank
To prevent premature loss of liquid nitrogen and fluctuations in temperature, the lid of the liquid nitrogen tank should be kept closed until straws are ready to be retrieved.
Temperature gradient in tank neck
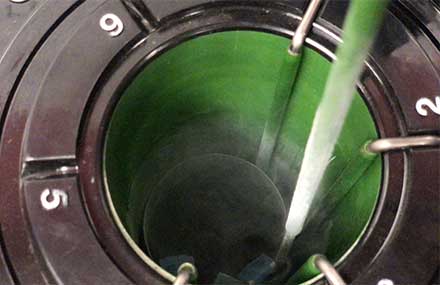
To retrieve a straw, raise the canister until the cane tops are a few inches below the opening of the tank (Figure 1). The temperature of liquid nitrogen is -320 degrees F; however, there is a temperature gradient in the neck of the tank (Table 1). Damage to sperm occurs at temperatures as low as -110 degrees F. Damage to sperm will not be reversed even when returning frozen straws back into the liquid nitrogen immediately. Therefore, it is critical to not raise the straws above the frost line. The temperature drastically increases above the frost line, and raising straws above this point can cause damage to straws that are not intended for immediate use.
Table 1. Temperature gradient in the neck of a liquid nitrogen tank.
| Distance in neck of the liquid nitrogen tank | Range in temperature (degrees F) |
|---|---|
| Top | +36 to +54 |
| 1 inch from top | +5 to -8 |
| 2 inches from top | -40 to -51 |
| 3 inches from top | -103 to -116 |
| 4 inches from top | -148 to -184 |
| 5 inches from top | -220 to -256 |
| 6 inches from top | -292 to -313 |
| Danger zone above the frost line. Damage to sperm occurs at temperatures as low as -110 degrees F. Adapted from Saacke 1978, Proceedings: Conference on AI of Beef Cattle. | |
Retrieving the unit
After identifying the cane needed, bend the identification tab to a 45-degree angle to allow for easier removal of units. If the canister is raised into the neck of the tank for more than eight seconds, lower the canister back into the tank to allow for it to cool again for 20–30 seconds before raising it again. This helps to prevent partial thawing of straws that are not intended for immediate use.
Remember, fingertips are a source of heat, so it is critical to only touch the straw or straws you will remove from the cane for thawing. It may be helpful to use forceps if removing only one straw for thawing or to avoid touching other straws. In addition, forceps can allow for retrieval of straws while keeping the cane further into the neck of the tank where the temperature is lower.
After retrieving the desired straw or straws, lower the cane immediately back into the canister. In order to avoid losing canes within the liquid nitrogen tank, make sure the canister is raised partially into the neck of the tank before releasing the cane.
If the cane has more than one goblet and goblets are removable, remove the top goblet from the cane and discard it after all of the straws have been retrieved from the top goblet. When all of the straws from the cane have been used, remove the cane from the canister and discard or recycle.
Thawing
Exact thawing procedures may be more or less critical based on the type of extender used in production of the units. However, as a general rule, straws should be thawed for a minimum of 45 seconds in 96 degrees F water. Clean water should be used in the thaw bath. Before retrieving a straw from the tank, use a thermometer or a thaw card thermometer to confirm the water in the thaw bath is at the correct temperature.
Time considerations
Straws can remain in the thaw bath for some time. However, it is recommended that semen be deposited into the cow or heifer within 10 minutes of thawing. Therefore, it is suggested to only thaw the number of straws that can be used within that time.
Thawing multiple straws
Multiple straws may be thawed at once, but attention to detail is critical if thawing multiple straws in the same thaw bath. First, it is critical to keep straws identified within the thaw bath in order to avoid confusion, especially if using straws from multiple bulls. Second, straws should not be allowed to stick together in the thaw bath during thawing, as this results in uneven or incomplete thawing of straws. Use caution as to the number of frozen straws placed into the unit at any one time. Each straw is essentially a small ice cube that results in a slight temporary cooling of the water in the thaw bath. In general, it is recommended to thaw no more than three straws in a single thaw bath at any one time. Consider using multiple thaw baths to keep up with a rapid AI process, or to avoid confusion if using multiple bulls.
Electric thaw baths
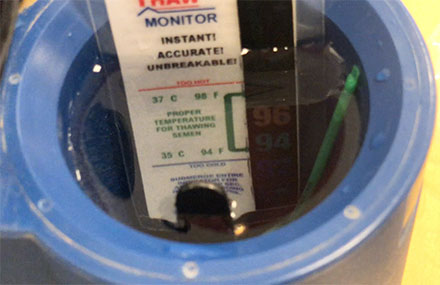
Electric thaw baths (Figure 2) provide an efficient way to thaw straws. Electric thaw baths warm the added water and keep the water at a constant temperature. If using an electrically heated thaw bath, make sure the unit is turned on and the unit indicates it has reached the correct temperature. If hot rather than cold water was placed into the unit, be aware that the water could actually be too hot. Use a thermometer or a thaw card thermometer to confirm the temperature of the water. Occasionally, electric thaw bath units may require calibration to maintain water at the recommended temperature.
Preparing an AI catheter
When handling semen, it is important to keep the workspace and equipment free of any potential contaminants that can be damaging to sperm. Keep the sheaths and AI catheters in a place that avoids contamination from dirt, dust, or manure until it is time to use them.
Thermal protection
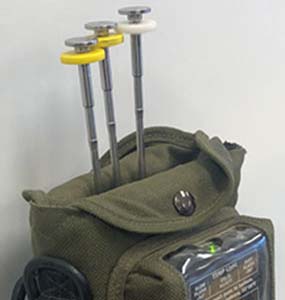
The AI catheter should be warmed prior to straw insertion to avoid cold-shocking the sperm. An electric AI catheter warmer can be used to warm catheters before loading. Electric AI catheter warmers (Figure 3) can also be used to maintain thermal protection of loaded catheters after they are prepared. If there is not an AI catheter warmer available, catheters can be tucked inside a shirt and maintained at body temperature until the straw is ready to be inserted. In addition, catheter sheaths can also be tucked into a shirt to keep warm if it is cold outside.
Loading the catheter
When inserting a straw into an AI catheter, work in a sheltered area out of direct sunlight. Work quickly to avoid exposing the straw to temperature swings.
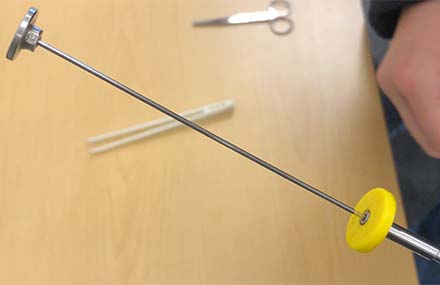
- First, pull the plunger (Figure 4) of the warmed AI catheter back approximately 4 inches to allow for insertion of the straw into the warmed AI catheter.
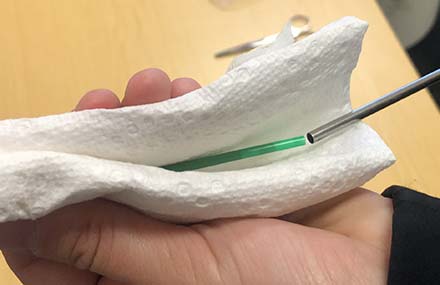
- Next, remove the straw from the thaw unit and dry it in a doubled-over paper towel, as water is detrimental to sperm. The paper towel also serves to protect the straw from light, ambient temperature, and wind.
- Once dried, insert the cotton plug end of the straw into the warmed AI catheter, maintaining the paper towel around the catheter and straw (Figure 5).
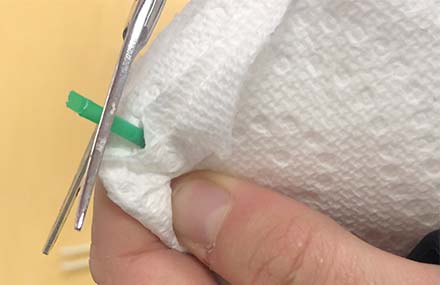
- Using scissors or a straw cutter, cut approximately a quarter inch below the sealed end of the straw near the fluid line. Cut the straw at an approximately 90-degree angle (Figure 6).
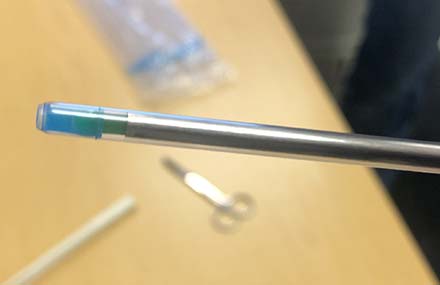
- Slide the plastic sheath over the straw and catheter. Most sheathes are designed with a tip in which the straw will firmly “click” into place, preventing backflow (Figure 7).
The AI process
Once the catheter is prepared, continue to maintain thermal protection for the prepared catheter. Remember, it is recommended that semen is deposited into a cow or heifer within 10 minutes of thawing, so be sure that the animal is already positioned for AI and work efficiently when a loaded catheter is prepared. For more information on the artificial insemination process itself, see MU Extension publication G2019, Artificial Insemination of Cattle: Step by Step.