Soil testing is an important cornerstone of sound nutrient management and comprehensive soil health assessment. It allows producers, land managers, and researchers to make informed decisions about fertilizer inputs, soil amendments, and sustainable management practices. However, the reliability and usefulness of soil test results are dependent on how the soil samples are collected, especially the sampling depth and technique used in the field. Improper sampling can introduce significant errors in the results, potentially leading to inaccurate nutrient recommendations, economic losses, and missed opportunities to enhance soil productivity and long-term soil function.
According to the University of Missouri’s soil-test-based recommendations, soil samples for field crops, horticultural crops, vegetables, lawns and gardens, pastures, and fruit trees should be collected at a depth of 0 to 6 inches. This depth is widely accepted because it represents the zone of highest root density and nutrient uptake for most plant species. It also aligns with the calibration depth used in university fertility recommendations and most national soil testing protocols.
Soil nutrient levels and properties such as pH, organic matter, and cation exchange capacity can change significantly with depth. Inconsistent sampling depths across years or between sampling areas can result in unreliable trends and incorrect comparisons. The importance of depth consistency becomes even more critical when submitting samples for soil health testing. Many biological indicators, such as soil respiration, microbial biomass, POXC carbon, and autoclaved citrate-extractable (ACE) protein, are highly sensitive to depth because biological activity is typically greatest near the soil surface. Sampling too shallow may overestimate biological activity, while sampling too deep may underestimate it. The goal is to streamline procedures to provide recommendations for soil fertility and health testing.
Soil sampling depth
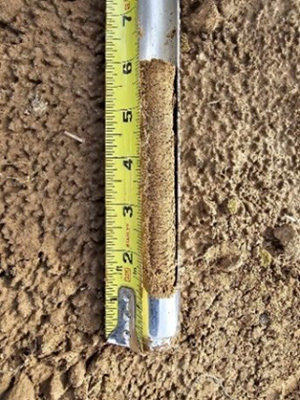
- Field crops (e.g., corn, soybean): Sample to a depth of 6 inches to align with standard calibration depths for soil fertility recommendations (Figure 1).
- Perennial crops (e.g., pastures, orchards): Sample to the depth of the active root zone, typically 6 inches, unless otherwise specified.
- Subsoil sampling: For mobile nutrients like nitrate-nitrogen, additional samples from 6 to 24 inches can be collected to evaluate leaching and deeper nutrient availability (Lory and Scharf, 2000).
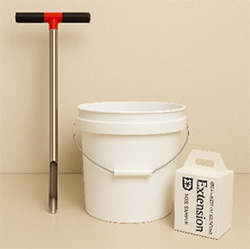
Soil sampling tools
Using the right tools ensures consistency and prevents contamination (Figure 2).
- Soil probe or auger: Preferred for collecting uniform cores at specified depths.
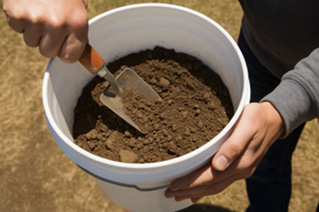
- Clean plastic bucket: Used to combine and mix subsamples. Avoid metal buckets that may contaminate samples.
- Sample bag/box: Use a labeled clean bag or box provided by the testing laboratory.
Soil sampling technique
1. Plan your sampling strategy
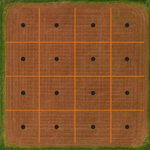
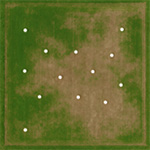
- Grid sampling: Divide the field into equal-sized grids (e.g., 2.5 acres or smaller) and collect samples from each grid to assess spatial variability (Figure 3a). This method of sampling is particularly effective for soil fertility assessment.
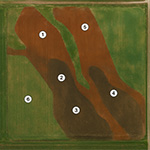
- Zone sampling: Identify management zones based on soil type, topography, or yield data. Collect samples within each zone (Figure 3b). This approach is especially well-suited for evaluating soil health.
- Random sampling: For uniform fields, collect samples randomly to form a composite sample. Each composite sample should represent approximately 20 acres of. More samples are always better to account for field variability (Figure 3c).
2. Collect subsamples

- Remove surface debris before sampling.
- Insert the probe vertically to the desired depth.
- Place all cores into the clean plastic bucket.
- Collect 15–20 cores per sampling area following a zigzag pattern to account for variability (Figure 4).
3. Prepare the composite sample
- Thoroughly mix subsamples in the bucket (Figure 5).
- Remove stones and plant material.
- Fill the sample bag or box with the mixed soil, approximately 1 pint.
- Label the bag with a field ID, sample depth, date, previous crop, and GPS coordinates if possible.
Soil sampling timing and frequency
- When to sample: The ideal times for collecting soil samples are in the fall after the harvest of summer crops or in early spring before planting begins. It is best to take samples at a consistent time of the year. These windows help ensure that test results accurately reflect the soil’s nutrient availability for the upcoming growing season. Avoid sampling immediately after fertilizer application, as this can produce artificially high nutrient levels in the test results. Also, steer clear of sampling during extreme weather conditions, such as periods of drought, saturation, or freezing, which can affect the consistency and representativeness of the samples.
- Frequency: For most cropping systems, soil sampling is recommended every 2 to 3 years for fertility and every 3 to 4 years for soil health. A good rule of thumb is to sample at least once per complete crop rotation. For corn–soybean rotations, it's best to collect soil samples after the soybean crop is harvested in the fall or just before corn planting in the spring.
This recommendation is based on the fact that soybean is a low-residue crop, meaning fewer nutrients are returned to the soil surface. In contrast, high-residue crops like corn leave behind substantial organic matter that gradually decomposes and releases nutrients throughout the winter, especially under regular rainfall. Sampling immediately after a corn crop can result in misleading soil test values due to the ongoing nutrient release from crop residues. More accurate nutrient assessments can be obtained by aligning sampling timing with crop rotation and residue levels, which can lead to better fertilizer planning and improved crop performance.
Sample handling and submission
- Drying: If samples are wet, air-dry them at room temperature. Do not use heat sources like ovens.
- Storage: Store samples in a cool, dry place if immediate shipment isn't possible.
- Shipping: Send samples to the University of Missouri Soil Testing Facilities. Follow the specific outlined instructions for packaging and documentation.
Conclusion
Accurate soil sampling is not difficult, but it does require attention to detail. Adhering to proper sampling depths and techniques will ensure reliable results, which support better fertilizer recommendations and long-term soil health. For more information or sampling supplies, contact your local extension office or the University of Missouri Soil Testing Facilities.