Here are some common problems with screened doors and windows:
- Screen is damaged and cannot be patched.
- Screen is weakened from rust.
- Screen is torn from the frame.
- Wood frame is weak at the joints.
- Screw holes holding hinges have become enlarged from strain or rot.
- Door hinges are defective so that the door will not close properly.
To repair them, you will need:
- New screen (16 mesh; for type, see step 1 below)
- Wood molding (1/2 inch by 1/2 inch quarter round, if required)
- Scrap lumber pieces (2 to 3 inches wide)
- Metal braces (Ts and Ls) and screws
- Butt-type spring hinges and screws (if required)
- Wood filler (if required)
- Tacks
- 2d finishing nails
- Knife or razor blade
- Steel C-clamps (4 each)
- Small crosscut saw
- Try square (if required)
- Hammer
- Small screwdriver
- Work table or floor space big enough to work around the job
Replacing screen in wood frames
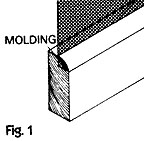
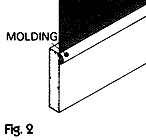
Aluminum, galvanized steel or plastic screen are recommended because they will not stain, rust or need painting. Match other screening when practical. Examine the frame. Is the screen built into the frame or attached to the edge of the frame with a molding trim piece? Compare Figures 1 and 2.
For screens attached to the frame:
- Measure the length and width of the screened opening. Cut screening 6 inches longer and 3 inches wider than the opening.
- Remove door or window. Place on a flat surface. Remove the molding that holds the screen in place. Remove the old screen.
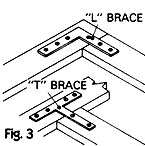 Examine the joints of the frame to see if they are sturdy and firm. If joints are weak, reinforce them by placing L-type or T-type braces over each joint as shown in Figure 3.
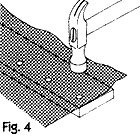 Carefully place new screen over the frame. Make sure the screen is aligned with the frame. The top of the screen should be 1 inch above the top of the opening. Staple or tack every 2 inches across the top of the screen (Figure 4).
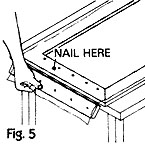 To pull screen tight from top to bottom, place a board against the bottom of the frame. Nail screening to the board. Slip the frame to the edge of the table so that the board nailed to the screen can be bent downward. This tightens the screen for nailing as pictured in Figure 5.
- Nail across the bottom every 2 inches. Nail sides and center rail. Cut away the excess screen. Replace molding. Attach molding with finishing nails.
If the screen is built into the frame:
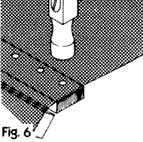 First, follow steps 1 through 5 above. At step 6, nail the screen to the side of the frame that faces outdoors (Figure 6).
- Measure the screened opening. Add 1 inch to this measurement and mark this length on a molding strip. Saw off the required length of molding.
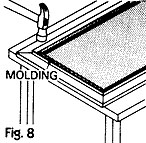
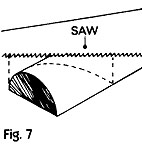 Mark off a distance of 1/2 inch at each end of the molding strip. Using the saw, cut this portion off at a 45 degree angle to have mitered corners (Figure 7). Using the hammer and finishing nails, nail the molding over the screen along the inner edge of the frame surface (Figure 8).
- Repeat these steps for the opposite end and sides of the frame and also the center rail if you're repairing a screened door.
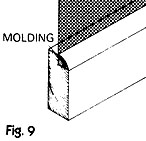
- Remove the clamps and cut away the excess screen. The slot in the frame that housed the old screen should now be covered with molding strips. Do steps 2, 3 and 4 above. Cut and place the required molding over the slot along the inside edge of the frame (Figure 9). Paint the new molding with two coats of paint.
Replacing screens in metal frames
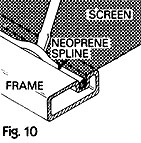 First, use the procedures described in steps 1 and 2 for wood frames. The screen usually will be held in place by a strip of neoprene (a type of synthetic rubber) forced into a groove of the frame (Figure 10). Using the screwdriver, carefully remove the neoprene strip, or spline, and remove the old screen.
- Proceed as described in steps 4 and 5 for wood frames. Now with the screen taut and in place over the frame, fasten screen to the frame by replacing the neoprene spline in the grooves, using a screwdriver.
- Remove the clamps and cut away the excess screen.
Replacing screen-door hinges
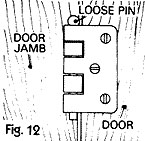
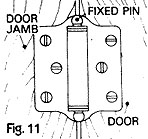 Examine the old door hinges to see what type you need. The hinge may be either a "loose pin" type that allows removal of the pin or a "fixed pin" type that does not. The hinges also may be the full surface-mounted type with the hinge fully exposed when the door is closed (Figure 11), or the half-surface mounted type in which the hinge is only partially exposed when the door is closed (Figure 12).
To remove the door from the frame:
For loose-pin type hinges —
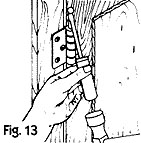 Remove the pin from both the top and bottom hinges by tapping the pin upward with a hammer and screwdriver (Figure 13).
- Lay the door flat on the floor. Remove the hinge leaves attached to the door. Then remove the hinge leaves from the door jamb.
For the fixed-pin type hinges —
- Remove the door by first removing the screws that attach the hinge leaves to the door frame. Lay the door down flat.
- Unscrew the hinges from the door jamb.
To rehang the door in the frame:
For loose-pin and fixed-pin type hinges —
- Place the new hinges on the door in the same location as the old hinges. Use slightly longer screws than the old ones, for a tighter fit.
- Lift the door and place it in the door openings.
- Using small wood strips or other scrap material, shim the door until it is in the proper position. Now attach the hinge to the door frame. Fill enlarged screw holes with a wood filler; let dry and make new holes.
Your benefits
The house will look better; insects will not enter; and the screen door will not be damaged further.
This guide was reprinted from the United States Department of Agriculture publication, Program Aid number 1193, Extension Service.