Spectrographic analysis of plant tissue is a relatively new and accurate method for determining levels of major and minor elements in growing crops. However, good results make proper sampling of crops necessary. Keep the following points in mind when taking samples:
- Take plant samples at the proper stage of growth.
- Select tissue from proper portion of plant.
- Handle samples properly after collection.
- Take soil sample at the same time tissue is collected.
If you follow the suggestions provided here, results of tests should be helpful. They can aid in diagnosing problem areas within fields, or in evaluating the fertility practices being followed on fields, or farms, where maximum yield is the goal.
Corn
When to sample
Sample sometime between emergence and pollination. Do not sample after silks have dried.
What part of plant
Before tasseling and shooting, take the entire first mature leaf below the whorl, or top of plant (Figure 1). A mature leaf is completely unrolled from the stalk.
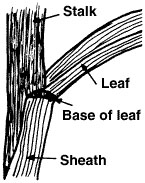
Figure 1
A mature leaf completely unrolled from the stalk
From tasseling and shooting to pollination, take the entire ear or shoot leaf (Figure 2).
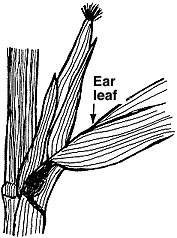
Figure 2
Take the entire "ear" or "shoot" leaf
How to sample
Remove one leaf per plant from 15 to 25 plants selected at random in the problem area or field. Break off the leaf at its base. Do not include portions of the leaf sheath.
Soybeans
When to sample
The ideal time to sample is when the first bloom appears. However, if problems develop prior to bloom, a sample can be taken. Do not sample after the first pods begin to fill.
What part of plant
Select the first fully developed trifoliate leaf below the top of the plant. (Trifoliate leaf includes three leaves on one stem or petiole). Do not use upper leaves that have not developed to full size.
How to sample
Remove one trifoliate leaf per plant from 35 to 50 plants selected at random in the problem area or field. Remove and discard stems or petioles as shown in Figure 3.
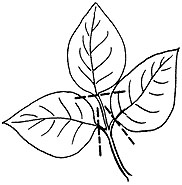
Figure 3
Pinch leaves from stem or petiole as shown by broken lines
Small grains and grasses
When to sample
Any time before the head emerges.
What part of plant
Select tissue from the upper third of the plant.
How to sample
Collect tissue from 50 to 60 randomly selected plants. If the stand is a mixture of grasses, sort leaves by species and submit a separate sample for each kind of grass in the stand.
Alfalfa and clovers
When to sample
Just prior to bloom or harvest, whichever comes first. Earlier sampling is suggested only if a problem occurs.
What part of plant
For a sample taken just prior to harvest, or bloom, take the top 6 inches of plant. Samples taken earlier should include the top third of the plant.
How to sample
Collect material from 40 to 60 randomly selected plants in the problem area or field. If the stand is a mixture of legumes, separate by species and submit as separate samples.
Sorghums
When to sample
The ideal time is when the head is fully emerged but before pollination. Samples may be taken at an earlier stage if problems develop.
What part of plant
The second leaf from the top of the plant is sampled after heading but before pollination. If it is necessary to sample earlier, take the first leaf below the whorl.
How to sample
Take one leaf per plant from 15 to 25 randomly selected plants.
Cotton
When to sample
Collect cotton leaf petioles from first square to mid-bloom growth stages.
What part of plant
Take the fourth leaf petiole from the top of the plant.
How to sample
Collect the most recently matured leaves from 35 to 50 plants selected at random in problem area or field.
Care and handling of samples
Start with a paper bag
A kraft paper bag is ideal for collecting, drying and mailing samples. It must be clean.
New unused bags are available at most grocers. The 10- to 12-pound sizes are satisfactory for corn. Smaller ones are suitable for soybeans and other crops. Sample kits available from commercial laboratories also are suitable.
Carry an open bag
Drop the leaves in the open bag as the tissue is removed from a plant. Leave them loose to allow for air drying. Do not wad or tie the leaves into a bundle, or heating and molding may occur.
Leave the bag open
Do not close the bag after the sample has been collected. Take the sample immediately to your local MU Extension center, or air dry the sample and then deliver or mail it.
How to air dry
Select a room or shed as free of dust as possible. Avoid areas where chemicals are stored. Place the open bag on a clean wooden surface. When the plant tissue is as dry as well-cured hay, it can be mailed. This normally will require 24 to 48 hours.
Mailing samples
Air-dried samples can be taken or mailed to your local MU Extension center in the same bag used for collection and drying. To mail, break larger pieces of tissue into sections that will lie flat on the bottom. Then fold the bag over to form a compact package. Place the folded bag in a small box or manila envelope and mail. For direct mailing to a commercial laboratory, use the mailing kit provided.
Taking a soil sample
Get a good soil sample from the field or problem area at the same time plant tissue is collected. Take a core of soil 7 inches deep adjacent to each plant from which tissue is taken. (If row or band application of fertilizer was used, do not take the core from the narrow strip where fertilizer was placed). Place cores in a clean container. When sampling is complete, thoroughly mix the soil collected. Place about one pint in a clean bag and take it to your local MU Extension center for a test.
Different soil areas require separate samples
If a field contains more than one kind of soil, take separate plant tissue and soil samples from each soil area. An alternative is to take one sample from the soil that makes up the major portion of the field.
Avoid contamination
Carry gloves while taking samples. Wear them when taking and handling soil cores. Slip them off and use bare hands for tissue samples. Avoid taking samples along a road where tissue may come into contact with dust. Do not haul samples in the trunk of an auto.
Revised September 2019 by Gene Stevens