Burning Issue: Canning Homemade Soups
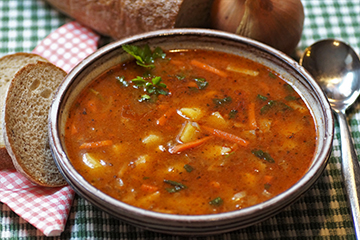
The winter season means soup season! Enjoying a warm bowl of homemade canned soup is a great way to stay warm and cozy in these cold months. The key to canning a safe, high-quality soup is to follow directions provided by a reliable science-based source such as USDA, the National Center for Home Food Preservation (NCHFP), or a state Extension service.
Vegetable-based soups are mixtures of low-acid ingredients, and they MUST BE pressure canned to control for botulism food poisoning. There are no recommendations to can a vegetable or vegetable-meat soup in a boiling water bath canner.
There is only one version of pressure canning directions for home canned soups available on the National Center for Home Food Preservation website. Consumers should follow these directions exactly as written: https://nchfp.uga.edu/how/can_04/soups.html (No longer available online.) If additional ingredients or thickening is desired, the soup should be canned as described in the recipe, and those additional ingredients should be added when the jar is opened for serving. See Soups as an alternative to the link above.
The NCHFP procedure is not an exact recipe; it allows you to have some choice of vegetables, dried beans or peas, meat, poultry, or seafood. It does NOT allow you to include noodles or other pasta, rice, flour, cream, milk or other thickening or dairy ingredients.
If dried beans or peas are used, they must first be fully rehydrated. To rehydrate each cup of dried beans or peas add 3 cups of water, boil 2 minutes, remove from heat, soak 1 hour, heat to boiling, and drain.
Each vegetable should be prepared using the ‘hot pack’ method according to USDA directions. To find directions for preparing the vegetables in your soup, visit the NCHFP website and search for the vegetable you wish to use in your soup. If there is not a separate canning recommendation for a vegetable, then do not include it.
Meats recommended for canning should be covered with water and cooked until tender, then cooled and the bones removed. Next, all the prepared ingredients should be cooked together with hot water, broth or tomatoes, and boiled for 5 minutes. Salt can be added to taste, if desired. Do not fully cook the soup before filling jars; the canning process completes the cooking at the same time it eliminates harmful microorganisms.
A very important step in these procedures is that jars should only be filled halfway with the mixture of solids. The rest of the jar is filled with the hot liquid, leaving 1-inch headspace.
Process the jars in a pressure canner according to instructions provided in the recipe and based on your altitude and type of pressure canner.
Source:
National Center for Home Food Preservation
Orange Marmalade Recipe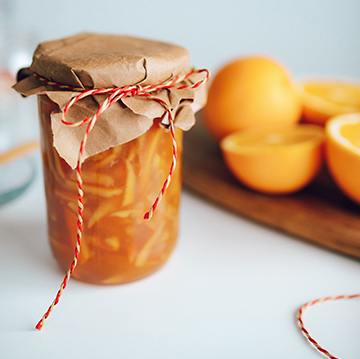
In addition to the winter being soup season, it is also orange season. If you are looking to preserve your oranges, orange marmalade is a tasty way to savor the flavor of this seasonal fruit.
Yield: About 7 or 8 half-pint jars
Ingredients
- 4 cups thinly sliced orange peel with albedo (about 2.5 to 3 lbs. oranges as purchased
- Albedo is the white pith of the peel and is needed in this recipe because it provides the pectin needed for the marmalade to gel.
- 4 cups orange pulp, cut up
- 1 cup thinly sliced lemon (about 1 large lemon as purchased)
- 6 cups of water
- 6 cups of sugar
Procedure
- Wash and rinse half-pint canning jars; sterilize the jars and keep hot until ready to fill. Prepare lids and ring bands according to manufacturer’s directions.
- Rinse oranges and lemons well in clean water.
- Peel oranges and slice orange peel with albedo attached into 1/8” strips. Measure 4 cups. Remove seeds and membrane from orange pulp. Cut sections into smaller pieces; measure 4 cups.
- Slice lemon(s) into 1/8” slices and remove seeds. If desired, cut slices into halves or quarters. Measure 1 cup.
- Add water to fruit in a 10-quart stock pot. Bring to a boil and cook over medium heat until peel is tender, about 1 hour.
- Add sugar and bring slowly to a boil; stirring until sugar dissolves. Cook rapidly to the jellying point, about 45 minutes, stirring occasionally. Be careful not to get burned with spattering marmalade. Quickly skim foam, if any, from top of mixture.
- Fill hot marmalade into hot pre-sterilized jars, leaving ¼” headspace. Wipe rims of jars with a dampened, clean paper towel. Apply and adjust prepared canning lids.
- Process filled jars in a boiling water canner according to the directions in the table below.
- Let processed jars cool, undisturbed, 12 to 24 hours and check for seals.
Process Time at Altitudes
- Style of Pack:
- Hot
- Jar Size
- Half-pints
- 0 - 1,000 ft
- 5 min
- 1,001 - 6,000 ft
- 10 min
- Above 6,000 ft
- 15 min
Source:
Orange Marmalade