How to Determine Spoilage in Home-Canned Goods
Spoilage in home-canned food does happen. Make sure you examine your jars carefully before serving food from them to your family, friends or pets. There are definite signs to look for, but always keep in mind that botulism can be undetectable in home-canned foods. Even a small taste of this disease-causing toxin can be fatal, the Centers for Disease Control and Prevention warns.
Stay safe by not tasting food from a jar that shows signs of spoilage. A jar with an unsealed li can be a sign of spoilage even if you see no other indications. Growth of spoilage bacteria and yeast can produce gas, which pressurizes the food, swells lids and breaks jar seals. Never use foods from containers that have:
- Loose or bulging lids on jars
- Foul odor
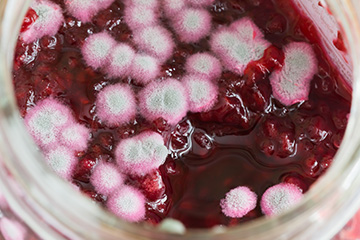
- Mold
Many people believe it is safe to scrape mold from sweet spreads and then consume the product. But it is best if you do not open a jar with mold in it at all, and, if mold grows after you open the jar, dispose of the product. For items like pickles, cloudy brine inside the jar is a sign that bacteria are starting to grow.
Spoiled food needs to be disposed of properly. If you have jars that are still sealed but show signs of spoilage, you can leave the jars intact and place them in a heavyweight garbage bag, close the bag and place it in the trash.
If you have spoiled food jars that are not sealed, detoxify the jars before disposing of them. Contact with botulinum toxin can be fatal whether it is ingested or enters through an opening in the skin, so take care to avoid contact with suspect foods or liquids. Follow these steps to dispose of foods that may be contaminated:
Wear rubber or heavy plastic gloves when you handle the suspect foods or clean up contaminated work surfaces and equipment.
- Remove the lids from the jars. Carefully place both the jars and the lids on their sides in a large pan.
- Add water to the pan until it is 1 inch above the jars.
- Cover the pan and bring the water to a boil. Boil for 30 minutes to detoxify any possible botulism toxin in the food.
- Cool and discard the containers, their lids and the food in the trash.
To decontaminate your work surfaces, equipment and other items that may have been exposed to suspect food or liquid, use a fresh solution of 1 part unscented liquid household chlorine bleach to 5 parts clean water.
Spray or wet contaminated surfaces with the bleach solution* and let them stand for 30 minutes. Wearing gloves, wipe up any treated spills with paper towels, being careful to minimize spread of the contamination. Dispose of the paper towels by placing them in a plastic bag before putting them in the trash. Next, apply the bleach solution to all surfaces and equipment again, letting it stand for 30 minutes. Rinse. As a last step, thoroughly wash all detoxified counters, containers, equipment and clothing. Discard your gloves when the cleaning process is complete.
* Bleach is an irritant itself and should not be inhaled or allowed to come in contact with your skin.
Sources:
Centers for Disease Control and Prevention. 2019. “Home-Canned Foods.” Botulism. Last reviewed June 6, 2019.
National Center for Home Food Preservation. 2018. “Identifying and Handling Spoiled Canned Food.” General Canning Information. Last reviewed May 2018.
Dry Bean Storage
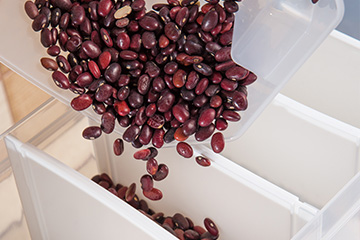
Dry beans are a food that many people consider for long-term storage. But just how long can beans be kept in storage without losing nutritional or functional value?
When beans have been stored in regular food-grade bags — that is, either the bag they were purchased in or a regular food storage bag — they are good for one year or up to the expiration date. Beyond that, the beans are not unsafe to eat but lose their oil and become so dry that they are unable to rehydrate correctly. Beans still can be used as a food source even if they are too dry for rehydration — for example, consider grinding over-dry beans to use as bean flour. They are still a good source of protein and can replace other flours as an ingredient.
If beans are stored in food-grade sealed buckets, reduced-oxygen packaging or heavier plastic (Mylar) bags, they can be kept for 10 years or more. Store beans in a cool dark location at 70 degrees F to help them retain their oil for easier rehydration and protect them from losing nutritional value.
To rehydrate dry beans, soak them overnight and rinse them in potable water. Then simmer the beans for two to four hours until they are tender. You typically will need 3 cups of water to rehydrate 1 cup of beans. Parboiling and then soaking the beans on a countertop for several hours is not recommended because the water temperature provides a good growing ground for bacteria that can cause foodborne illness.
Source: Adapted with permission from Fifield, Karen. 2016. “Dry Bean Storage.” Michigan State University Extension. September 16, 2016.