Time for Apples!
Fall is a wonderful time of year for many reasons, and the season’s abundance of fresh produce like apples is one of them. Whole apples store well in the refrigerator or in a cool, dark place for six to eight months (depending on the apple and storage conditions), but you also can preserve them in other ways that take less refrigerator space and extend their shelf life. You can dry apples or make them into applesauce, apple butter or sweet spreads. You can freeze or can them, producing a softer finished product for baking or cooking. You also can preserve apples in more novel ways, incorporating them into such specialty foods as peach-apple salsa, sweet apple relish or fruit leather.
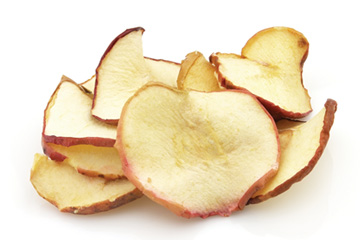
Select apples for preservation that are free of bruises, skin breaks and decayed spots. Note that little brown spots appearing only on the skin of the apple do not affect the quality or safety of the apple. However, browning in an apple’s flesh could indicate spoilage — such as rot or mold — so avoid preserving apples with browned flesh.
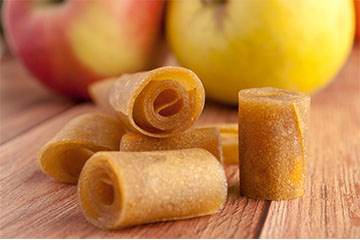
You may want to start preserving your extra apples or applesauce by trying this newsletter’s recipe for homemade apple leather. Homemade apple leather may be less expensive and contain less sugar than store-bought “fruit rolls,” so it can be a healthy as well as fun lunchbox treat or snack for both kids and adults. Apple leather can be stored up to one month at room temperature or for up to one year in the freezer.
Apple Leather
Ingredients:
To start with fresh apples
- Select ripe or slightly overripe apples.
- Wash apples in cool water. Peel and core.
- Cut apple into chunks. Use 2 cups of apples for each 13-by-15-inch fruit leather. Cook apples in a small amount of water to soften. Puree fruit in blender until smooth.
To start with applesauce
- Use 1 pint of applesauce for each 13-by-15-inch leather.
Instructions for either method:
- Add 2 teaspoons of lemon juice for each 2 cups of apples or applesauce to prevent darkening.
- Optional: To sweeten, add corn syrup, honey or sugar. Use ¼ to ½ cup of sugar, corn syrup or honey for each 2 cups of fruit or applesauce. Saccharin-based sweeteners may also be used to reduce tartness without adding calories.
- Prepare the drying trays.
To dry in an oven, use a 13-by-15-inch cookie pan with edges. Line the pan with plastic wrap, being careful to smooth out any wrinkles. Do not use waxed paper or aluminum foil.
To dry in a dehydrator, use specially designed plastic sheets or plastic trays lined with plastic wrap. - Pour the fruit leather. Either a single 13-by-15-inch sheet or several smaller sheets may be used to hold the leather. Spread the puree evenly, about 1/8 of an inch thick, onto the drying tray. Avoid pouring the puree too close to the edge of the cookie sheet.
- Dry the fruit leather at 140 degrees F. Leather dries from the outside edge toward the center. Larger fruit leathers take longer to dry. Approximate drying times are six to eight hours in a dehydrator or up to 18 hours in an oven. Test for dryness by touching the center of the leather; no indentation should be evident.
- Peel the leather from the plastic while it is warm, and roll it. Allow it to cool, then rewrap the roll in plastic. You can use cookie cutters to cut out shapes that children will enjoy before rerolling the fruit leather.
Source: Andress, Elizabeth L. 2016. “Apples Are Peaking; Choose the Best Preservation Method.” National Center for Home Food Preservation, June 2016. https://nchfp.uga.edu/tips/fall/apples.html. (No longer available online.)
How to Safely Preserve Pumpkin for Pie
If you are cooking a pie pumpkin this year, remember that you cannot safely can pumpkin puree at home. The best way to preserve pumpkin puree is to freeze it. Simply wash the pumpkin, remove the seeds and cut it into cooking-sized pieces.
Pumpkin can be cooked in boiling water, in steam, in the oven or in a pressure cooker. Cook the pumpkin until it is soft, then remove the pulp from the rind and mash it. Place the pumpkin puree bowl in another bowl filled with cold water and stir the puree occasionally, until it is cool. Package the puree in freezer containers sized for your future use (2 cups of puree equals one can of pumpkin). Remember to thaw the pumpkin in the refrigerator when you are ready to use it.
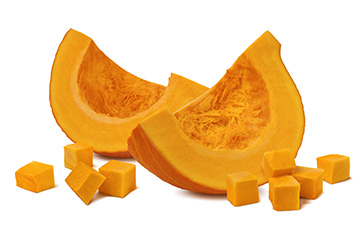
If you would prefer to preserve pumpkin for shelf storage, you’ll need to pressure can the product. Pumpkin can only be safely canned in cubes. Canning pumpkin butter or mashed or pureed pumpkin is NOT recommended.
To pressure can cubed pumpkin, first wash the pumpkin and remove its seeds. Next, cut the pumpkin into 1-inch wide slices, then peel and cut the flesh into 1-inch cubes. Blanch the cubes in boiling water for 2 minutes. Fill the canning jars with the cubes, and cover them with the hot cooking liquid. Leave 1 inch of headspace. Using a dial-gauge canner, process at 11 pounds of pressure for both pints and quarts. Process pints for 55 minutes and quarts for 90 minutes. Please contact your local extension center for guidelines on weighted-gauge canner processing and adjustments for altitudes of over 1000 feet.
Source: National Center for Home Food Preservation. 2015. “Home-Preserving Pumpkins.” Last revised September 2015. https://nchfp.uga.edu/tips/fall/pumpkins.html. (No longer available online.)