Grafting is the act of joining two plants together. The upper part of the graft (the scion) becomes the top of the plant, the lower portion (the understock) becomes the root system or part of the trunk. Although grafting usually refers to joining only two plants, it may be a combination of several. A third plant part added between two others becomes the trunk or a portion of it. This is called an interstem. Multiple grafts may produce an apple tree with several varieties or a rose-of-Sharon shrub with several different colors of flowers.
Why graft?
Some cultivars (varieties) of plants do not come true from seeds. Others are difficult or impossible to reproduce from cuttings or other propagation techniques. Grafting (topworking) is a way to change a large tree from an old to a new variety. It is also a method of using a root system better adapted to soil or climate than that produced naturally by a non-grafted plant. By using special understocks or interstems, grafting is a way to produce dwarf plants.
What are the limitations?
Not all plants can be grafted. Generally, only plants closely related botanically form a good graft union. Grafting is not a means of developing new varieties. The stock and scion must be compatible. Incompatible grafts may not form a union, or the union may be weak. A poor union results in plants that either grow poorly, break off or eventually die.
The compatibility of plants has been determined through many years of trial. There is no other way to determine whether or not two plants will produce a good graft union. This publication will help you make a decision about the possibility.
What can be grafted?
Most varieties of a particular fruit or flowering species are interchangeable and can be grafted. Because of differences in vigor, some are better able to support others as understocks. For example, although a union is possible, sour cherry is not a good understock for sweet cherry. Sweet cherry is more commonly grafted onto Mazzard (Prunus avium) or Mahaleb (P. mahaleb) seedlings.
Plants of the same botanical genus and species can usually be grafted even though they are a different variety. Plants with the same genus but of a different species often can be grafted. But the result may be weak or short-lived, or they may not unite at all.
Plants of different genera are less successfully grafted, although there are some cases where this is possible. For example, quince, genus Cydonia, may be used as a dwarfing rootstock for pear, genus Pyrus.
Plants of different families cannot be grafted successfully. Although it has been reported that relatively short-lived grafts of herbaceous plants of different families have been made, there is no successful practice for commercial or home grafting of woody plants of different families.
It is sometimes believed that two plants can be made into a genetically different plant by the process of grafting. However, there is no basis for this idea. Although there are cases where a different type of shoot develops from the graft union, this is the result of a chimera, a type of mutation. This is not a true intermingling of the genetic structure of two different plants as occurs in seed-produced hybrids.
When is the proper time to graft?
Most grafting is done in late winter or early spring before new growth begins. The best time is after the chance of severe cold has passed but well before hot weather arrives. Scion wood may be collected during the winter. Store it in a cold, moist place at temperatures close to 34 degrees Fahrenheit. At home, a few scions could be stored in a plastic bag in the refrigerator with moist paper towels, or they could be dipped in paraffin so they retain moisture.
What materials are needed?
- Knife
A good-quality carbon-steel knife, able to hold a sharp edge, is the key to grafting success. Although special grafting and budding knives are desirable, you can use almost any good pocketknife. Keep material to sharpen the knife handy. - Grafting wax
After the graft is made, some covering must be used to keep it from drying out. Either hand wax or brush wax may be used. A hand wax is most commonly used for home grafting. It is softened by the heat of the hand and can be easily applied. Heated waxes may be brushed on, but make sure the wax is not too hot. Heat could damage the tender cambial tissue. - Grafting tape
This is a special tape with a cloth backing that decomposes before girdling the plant can occur. Tapes may be used for binding grafts where there is not enough natural pressure. Electrical and masking tapes are also used. Masking tape is suitable where little pressure is required, as in the whip graft. - Budding strips
Budding strips are elastic bands. They look like a wide rubber band that has been cut open. Budding strips secure several types of grafts with small stocks and scions. - Nails
Veneer, bridge and inarching grafts require long, thin nails. Half-inch nails are long enough for most grafts, except for bridge grafting, which may require 3/4-inch nails. - Grafting tool
Specially designed tools have been developed for grafting. The most common one is used for cleft grafting. It has a blade used to split the stub and a wedge to hold the split open while the scions are inserted. If this tool is unavailable, use a heavy knife and a fairly wide wedge, at least 2 inches long, for cleft grafting. Use a mallet or hammer to pound the grafting tool or heavy knife into the stub. Split the stub and insert the wedge to open the split.
What grafting technique should be used?
Grafting techniques can be divided into two basic types, which are largely determined by the size of the understock. In some cases, a graft may be made to join a scion and understock of nearly equal size. The other type attaches a small scion to a much larger understock. In this case, several scions may be attached to the understock as in cleft or bark grafting.
Figure 1.
Whip graft
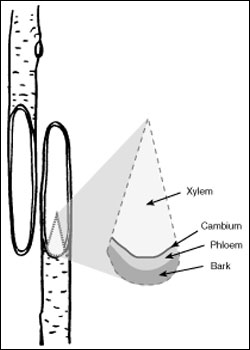 A. Cuts for the whip graft must be smooth and straight.
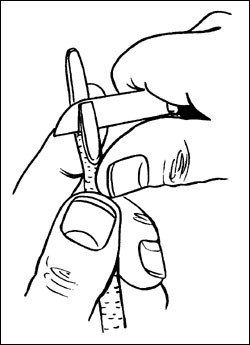 B. Cut again to form the tongue.
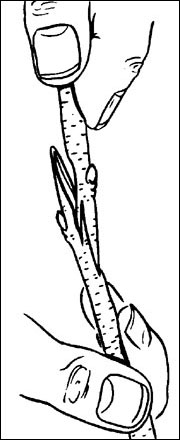 C. Push stock and scion tightly together.
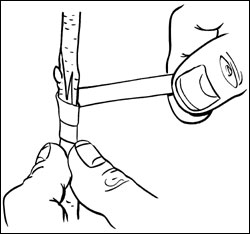
 D. Wrap graft to keep cuts tight and to prevent drying.
E. Whip and tongue graft with scion attached to root system.
Grafts with similar scion and understock sizes
Whip graft, bench graft
The whip graft (Figure 1) is fairly easy and heals rapidly. It works best when the stock and scion are of similar diameter, preferably between 1/4 and 1/2 inch.
The stock can be either a plant growing in the field or a dormant bareroot plant as in a bench grafting. The stock should be smooth and straight-grained. Do not graft near a point where side twigs or branches have developed.
The scion should be 1-year-old wood, preferably the same size as the stock. If the stock is larger than the scion, contact can be made on only one side. The scion should never be larger than the stock.
- Preparing the stock and scion
For this technique, the cuts made in both stock and scion should match. On both parts, make a smooth sloping cut 1 to 2-1/2 inches long depending on the thickness of the material (Figure 1a). Make the first cut with a single, smooth cut with no waves or whittling. The beginner should practice by cutting extra twigs. A good-quality, sharp knife is essential. - Cutting the stock
The stock may be (for a bench graft) a stem and root system of a young plant or a piece of root. Make a slanting cut about 2 inches from the butt (start of root system) of the young whip.
Although grafts may be made with a simple union of two slanting cuts, the strongest graft results from a whip-and-tongue system. To form the tongue, hold the one-sided, slanting cut facing you and support it with your finger. About one-third down from the tip of this cut, make a downward cut about 1/2 inch long as close to parallel with the grain of the wood as possible (Figure 1b). - Cutting the scion
The cutting procedure should be exactly the same as that for the stock. The only difference is that the cuts are made at the bottom of the scion piece, whereas they were made at the top of the stock. The more similar the cuts on the two pieces, the greater chances of a successful graft union. - Fitting the stock and scion
After the cuts are made on both parts, push them together tightly enough so that the cut surfaces match as closely as possible (Figure 1c). The cambial area (area immediately under the bark) of both pieces must be aligned for a union to develop. If the scion and stock are not the same size, match the cambiums on one side only. The lower tip of the scion should not hang over the stock. - Wrapping the graft
In most cases, it is safer and better to wrap the graft to keep it tight to prevent drying (Figures 1d and 1e). Wrap the graft with a rubber budding strip, grafting tape or a plastic tape such as electrical tape. If the wrapping material does not decay naturally, cut it about a month after growth begins. - Waxing
To prevent the graft union from drying, the area should be waxed. Cover the wrapped area with wax as uniformly as possible. In wrapping and waxing, be careful not to dislodge the aligned cambial areas.
Figure 2.
Cleft graft
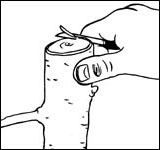
 A. Cut stock smoothly. Trim any rough edges with a knife.
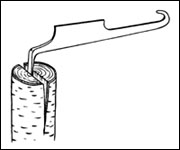
B. Split stock, and open with a cleft grafting tool.
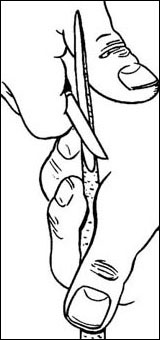
 C. Make a long, smooth cut to prepare scion.
D. Cut again to make a pie-shaped wedge.
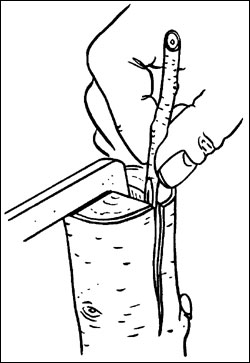 E. Promptly insert scion into stock after cutting.
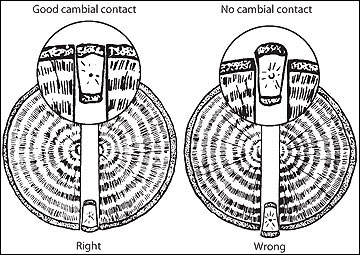
F. Cambium layers must match closely.
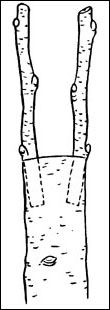
 G. A very slight slant can ensure cambial contact.
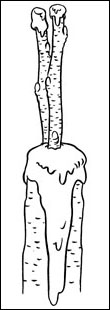
H. After insertion, wax thoroughly to prevent drying.
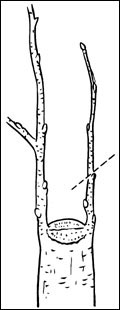
I. After the first year, shorten one scion to allow the other to develop.
Grafts with small scions and large understocks
The cleft graft
The cleft graft (Figure 2) is most commonly used to topwork a tree; that is, to change from one variety to another. It can be used on either young or mature trees. Young trees may be cleft grafted on the trunk, while older trees are grafted on branches not more than 2-1/2 inches in diameter. Branches fully exposed to sunlight and in the main stream of sap flow are more successful than those in shaded or inactive areas. Grafts on upright branches grow better than those on horizontal branches.
- Preparing the stock
Branches of large trees or the trunk of a small tree must be sawed off to provide a stock for the scions. Select a smooth, knot-free, straight-grained section. Saw the branch off at a right angle to the grain (Figure 2a). Don't tear or split the bark. If the saw cut is not smooth, use a knife to trim off the rough edges. The bark must be tight to form a successful graft. Using a grafting tool, or a heavy knife that may be tapped with a mallet, drive the blade into the stub to split the stock through the center so a split extends about 2 inches into the branch (Figure 2b). - Preparing the scion
The scion for the cleft graft should be made from 1-year-old wood about 1/4 inch in diameter. Usually, it is best to cut the scion long with three buds so it can be inserted with the lowest bud just above the stock. Always note which is top and bottom of a scion stick. A scion will not grow if inserted upside down.
Start below the lowest bud, and make a long, smooth cut toward the base (Figure 2c). The cut should have a surface 1 to 1-1/2 inches long. Turn the scion to the opposite side and make a second smooth cut of the same length so that one side (the side containing the lowest bud) is slightly thicker than the other side (Figure 2d). The wedge that is formed does not need a sharp point; a blunt point is preferable. Do not use more than three buds. If wood is scarce, two buds should give good results. - Inserting the scion
With a grafting chisel or a small wedge, open the crack wide enough to insert the scion easily (Figure 2e). Insert the scion with the thicker side toward the outside with the cambiums in contact (Figure 2f). Although maximum contact is obtained with straight positioning, a slight slant may help ensure contact (Figure 2g). The best contact point is about 1/4 inch below the shoulder of the stock. After properly positioning the scion, remove the wedge or chisel from the slit. The pressure of the stock against the scion should be greatest where the cambiums touch. When the scion is placed in the crack, the cut surface of the scion wedge should be almost entirely hidden.
Two scions are usually inserted in each slit, one at each side. This gives a better chance for getting at least one graft to grow. - Waxing the cleft graft
The cleft graft should be waxed so that all cut surfaces are covered (Figure 2h). Cracks sometimes develop as the wax sets. Check wax after a few days and again after several weeks to ensure that all surfaces are kept covered. - Caring for the graft
After the graft begins to grow, it must also be given attention. During the first season, don't prune branches that grow. Grafts that grow vigorously may need to have the tips pinched out to stimulate branching. Very long shoots may break loose during strong winds. Cleft grafts should grow vigorously and need only light pruning to shape their development (Figure 2i). Never prune heavily.
After the first year, some training and branch selection may be necessary. Do this at the usual pruning time in late winter or early spring. If both scions in a cleft grow, shorten one to allow the other to develop and become dominant. Do not remove the second graft until later, because it will help to cover the wound faster.
In topworking large trees, it is best to graft about half the branches the first year and the second half the next. Start with the upper center limbs the first year. The best time to topwork is just as growth begins in the spring; however, it can be done several weeks earlier or later.
Figure 3.
Bark graft
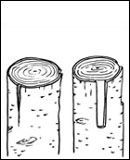

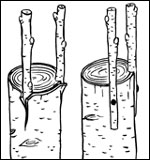 A. Stock may be prepared with a single cut, left, or a double cut.
B. Cut scion to form a shoulder.
C. For single cut, left, insert scion under bark, making a tight fit. For double cut, use small nails to secure scions.
Bark graft (veneer graft)
Bark grafting (Figure 3) is relatively easy and requires no special tools. It is similar to cleft grafting and may be performed on branches ranging from 1 inch to several inches in diameter.
- Stock preparation
The branch or trunk is cut off at a right angle in the same manner as described for cleft grafting. The bark graft can be made only when the bark slips or easily separates from the wood. This usually is in early spring as growth begins.
Several techniques can be used on the stock for the bark graft (Figure 3a):- Make a slit in the bark about 3/4 inch long.
- Make two slits in the bark separated by the width of the scion.
- Scion preparation
The scions should be dormant, so gather deciduous plants before that time and keep them wrapped in plastic under refrigeration to prevent drying.
The scion should be 4 to 5 inches long with two to three buds. Prepare the base of the scion by cutting inward 1-1/2 to 2 inches from the base then downward, forming a shoulder and long, smooth cut (Figure 3b). The long cut should extend about one-third through the twig, keeping its base strong enough to insert but not too thick. On the side opposite the long cut, make a short cut to give the base of the scion a wedge shape for easier insertion. - Inserting the scion
A knife may be used to lift the bark at the top of the slit but may not always be necessary. Push the scion down and center it in the slit or between both slits if the double slit method is used. Insert the scion until the shoulder rests on the stub (Figure 3c). If the scion is large enough, one or two small nails may be used to tighten the scion to the stock. Some prefer to use electrical tape or masking tape to pull the surfaces tight. In some cases, the bark may not split or tear and nailing or wrapping is not necessary. In all cases, the graft should be thoroughly protected with wax over all open surfaces after it is completed.
Figure 4.
Side graft

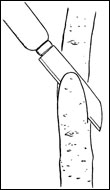

 A. Cut scion to form a short, smooth edge.
B. Make a slanting cut into the stock.
C. Insert scion so that cuts on thicker side match the cambium of the stock.
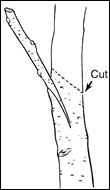
D. Cut off the top of the stock only after growth begins.
Side graft, stub graft
The side graft is relatively simple and is suitable for plants that are too large for a whip graft but not large enough for cleft or bark grafts (Figure 4). The plant or branch that will serve as the stock should be between 1 and 2 inches in diameter. The material for the scion should be about 1/4 inch in diameter.
- Preparing the scion
The scion should contain two to three buds and be about 3 inches long. Make a wedge at the end of the scion similar to that made for cleft grafting, but it should be shorter (Figure 4a). Make one side slightly thicker than the other. It is not necessary to make the cuts more than 1 inch long. As with all grafting cuts, they must be made straight and smooth, with a single movement of a sharp knife. - Preparing the understock
Select a smooth area near the base. Use a sharp knife to make a slanting cut into the stock cutting (Figure 4b). The cut should angle downward and extend about halfway through the branch. - Inserting the scion
Pull the upper part of the stock back to open the cut. Insert the scion into the open cut with the slightly thicker side lying along the cambium. Set the scion at a slight angle to give maximum contact (Figure 4c). When the top is released, the scion should be held in place, so no tacking or wrapping is necessary. Some people prefer to tack or wrap the union. Do this carefully, so the cambial alignment is not disturbed. The stock or stock branch should then be cut off 5 to 6 inches beyond the graft. Also, remove any lateral branches on the stub that might crowd the graft as it begins to grow. Wax the graft carefully so that all cut surfaces are covered. The tip of the scion, as well as any open wounds made by removing lateral twigs on the branch, should also be waxed. After several weeks, when the scion has started growth, the remainder of the stock should be carefully cut closer to the graft, and the new cut should be waxed (Figure 4d).
Grafting tips
Scion
Scion wood should always be dormant. Scion wood should be made from previous season's growth and have a diameter of 1/4 to 3/8 inch. Store the scion in moist sphagnum moss, sand or a plastic bag in a cool place. It must be kept moist and cool until used. After the cuts are made, scions must be inserted immediately, or cuts should be kept moist until used.
Scion wood should be made of twig sections with two to three buds each. Discard the tip of scion wood and recut the base before grafting.
Timing
The best time for grafting is in the spring just as growth starts. When necessary, grafting can start several weeks before growth is expected and can continue a few weeks after growth has started, if you have dormant scion wood in storage and if weather is not exceptionally warm.
Other suggestions
The stock and scion must have cambial contact for union and growth to take place. All cut surfaces must be covered and kept covered with grafting wax until complete healing has occurred. In a few techniques, alternate methods for maintaining moisture in the union are used. But if you are grafting only a few plants, you will find waxing the graft most satisfactory.
After the graft has taken and growth has started, cut off any side shoots or competing twigs that would shade or compete with the development of the new graft.
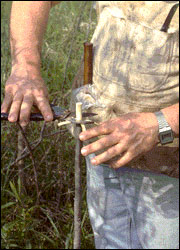
Audio clip 1.
The banana graft can be used for slightly older plants where stock and scion are about the same size. The stock is peeled as shown and the wood is cut.
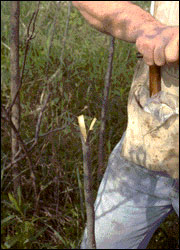
Audio clip 2.
Here the wood has been removed from the stock and is ready to receive the scion, which is being prepared.
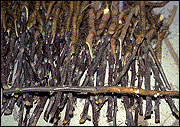
Audio clip 3.
Apple plants joined by whip-and-tongue grafting.
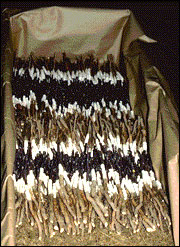
Audio clip 4.
After the stock and scion are fitted together, they are wrapped to keep the union tight and moist. After healing through the winter, they will be ready for the field by spring.
Audio clip 5.
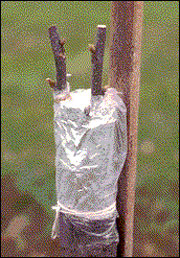
For a cleft graft, where the stub is split, two scions are normally used.

Audio clip 6.
This scion of pecan being prepared for bark grafting will be fit on a section of the 1-1/2-inch pecan seedling rootstock that has been cleared of bark.
Audio clip 7.
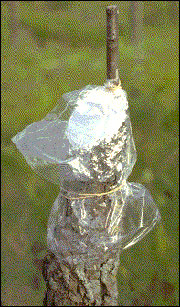
After completing the grafting process, promptly cover the union to keep the graft cool and moist.
Original authors: Ray R. Rothenberger and Christopher J. Starbuck
Department of Horticulture