Preface
Information about no-till crop production comes to us from all over the United States, but can it be used on Missouri farms? The purpose of this publication is to review briefly what has been learned and applied in Missouri. These pages will not contain all available no-till wisdom. You will discover here a useful collection of information that covers many of the issues surrounding this crop production technique.
As you read, you will find selected references noted in the text. These are for anyone wishing to learn more about specific topics. This will make it easier for those who provide advice to find more information or to have some degree of confidence in the information presented.
It is important to understand that what you find here is not a recipe. You will also not find the only answer to your question. No-till is a very dynamic system. That is, there are too many variables within each field to write a recipe or a static recommendation. What you will find is information that will help you think through the problems you encounter in no-till systems.
I thank the Missouri Soybean Merchandising Council for supporting this effort. Thanks also to the many farmers and researchers who contributed to the knowledge base presented in this publication. Some contributed unknowingly and unintentionally over the past 25 years as we all learned together. It is important we remember what they did and why it turned out the way it did.
Gary D. Hoette, CPAg
Agronomy and Natural Resource
MU Extension
This manual was reviewed and edited by regional and state extension specialists as members of the Crop Production Systems Base Program of MU Extension and by members of the Plant Science Unit of the College of Agriculture, Food and Natural Resources.
Preparation of this manual was funded in part by Missouri soybean farmers with checkoff dollars through the Missouri Soybean Merchandising Council.
Introduction
The variability of Missouri's weather affects the way plants grow and also hinders our ability to accept at face value farming information from other parts of the country. Even within Missouri, crop production methods developed in one part of the state may need to be adapted to conditions in another part. Your success with no-till, as with any other management practice, begins with an awareness of the various conditions affecting crop production in your area.
No-till crop production systems enable farmers to control erosion, improve the soil, and save time, fuel and moisture. These systems require a high degree of management skill. As we reduce tillage of the soil, we eliminate its positive aspects along with the negative. An example is that when we plowed the clover field, mice were quickly eliminated. In a no-till field the mice leave as the clover dies. To make no-till planting systems work, special consideration must be given to controlling weeds and insects, fertilizer placement, monitoring soil temperatures and moisture, machine management and other factors in a slightly different way than when tillage was also a part of the crop production system. That is why this publication deals with no-till planting systems. There is more than one approach.
No-till methods have been the subject of many research studies and farm demonstrations. Long-term yield studies, conducted at MU and other Midwestern universities, have shown little difference in yield among various tillage systems. Table 1, for example, compares corn yields under different tillage systems over 14-year period at the MU Greenley Research Center near Novelty. This long-term study showed considerable variability in corn yield from year to year but little difference among tillage systems overall. When observed, differences in yield are often a result of other management decisions. Economic differences generally favor no-till systems when both short- and long-term costs are considered (Ervine, 1982; Jordan et al., 1995b; Pfost, 1988; Quarles, 1994; Wollenhaupt et al., 1987).
Each farm and field will need individual attention to maximize returns. To avoid serious economic damage to the farm business, the plan needs to change as conditions change. The next few pages offer information needed to take advantage of the benefits of these planting systems.
The absence of traditional tillage practices requires greater attention to plant nutrition, soils, plant and weed growth, herbicide modes of action, and environment (Figure 1). Success is also more likely when farmers are able to adjust their plans to the changes that occur within each season. The need to think about the effect of decisions made in one cropping season on another becomes more important. The calendar becomes less important. Information from other states or regions must be evaluated for its utility in Missouri.
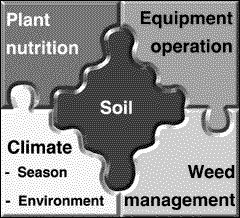 Figure 1
By not tilling the soil, you increase the management intensity of the remaining elements of your crop production system.
Table 1
Long-term tillage corn yields in bushels per acre
| Year | Plow + Disk | Chisel + Disk | Disk | No-till | Average |
|---|---|---|---|---|---|
| 1976 | 75 | 75 | 73 | 75 | 75 |
| 1977 | 76 | 77 | 78 | 91 | 81 |
| 1978 | 110 | 111 | 112 | 107 | 110 |
| 1979 | 164 | 164 | 175 | 170 | 168 |
| 1980 | 103 | 115 | 119 | 118 | 114 |
| 1981 | 145 | 159 | 146 | 101 | 138 |
| 1982 | 68 | 59 | 66 | 80 | 68 |
| 1983 | 14 | 19 | 19 | 11 | 16 |
| 1984 | 32 | 32 | 37 | 33 | 34 |
| 1985 | 157 | 158 | 152 | 152 | 155 |
| 1986 | 127 | 125 | 123 | 134 | 127 |
| 1987 | 105 | 107 | 113 | 100 | 106 |
| 1989 | 83 | 40 | 38 | 123 | 71 |
| 13-year average | 97 | 95 | 96 | 100 | 97 |
Source
Quarles (1994)
Soil changes
Soils change when tillage stops. Organic matter is no longer mixed into the soil with steel, but is incorporated into it by living organisms of various sizes. The lack of mechanical mixing reduces the rate at which organic matter decomposes. Over a 3- to 5-year period, the biological fraction in the soil adjusts to the new environment.
Biological changes
Soil organic matter is a complex collection of living, dead and decomposing plants and animals. As crop residues accumulate on the soil surface, they are added to the soil organic matter complex by the action of bacteria, fungi and larger organisms. In no till fields, soil organic matter is greatest in the top inch of soil (Figure 2).
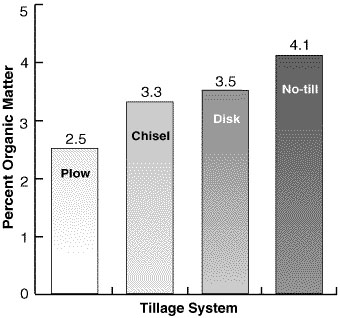 Figure 2
The amount of soil organic matter in the top inch of soil depends on tillage system.
Data source
Quarles (1994)
The biological component is probably the least understood or appreciated part of the soil. Earthworms have been accepted in recent years, by no-till enthusiasts and scientists, as an indicator that the biological fraction of the soil has increased or improved. We have seen earthworms return to no-till fields in great numbers. The presence of bacteria, fungi and enzymes is another measure of soil quality. The time required for these biological agents to increase in numbers and diversity is that period of transition we know so little about. A practical observation suggests the transition period will be the time it takes the soil in the field to acquire the characteristics of undisturbed soil in the fence row. There, organic matter is high, the soil is full of roots (alive and dead) and organic material binds soil particles that crumble in chunks when dug (Buchholz and Wollenhaupt, 1987; Jordan et al., 1995a, 1995b).
Because grain and cereal crops are high in carbon, it takes a significant population of soil organisms plus nitrogen to break down cornstalks and wheat straw. A soil low in organic matter will have neither the microbial population nor the free nitrogen needed at the soil surface to break down that crop residue. The result is that dead crop residue on the soil surface becomes a short-term barrier to air entering the soil. The effect of that period of transition can be reduced by good weed control, crop rotations that include legumes, and cover crops.
Tillage historically has served several functions, including aeration of poorly drained soils. Unfortunately, tillage has also led to significant losses of topsoil to erosion. No-till systems rely on a large, diverse biological fraction to drain the soil of water and get air into it. Included in that biological fraction are the roots from previous crops. Even the weeds that show up in the field before a crop is planted can be helpful in aerating the soil. A network of fibrous and tap roots through the soil profile provide a path for the exchange of air and moisture after they die. These tender root threads are replaced by the roots of the next plants to occupy the field.
Soil temperature and moisture changes
In most years, Missouri has an early warm-up in late winter before the last cool period in April or May. It would not be unusual to find minimal soil temperatures two weeks before planting time in a field covered with residue. The early warm-up also lets weeds get an early start. These weeds or the cover crops we sow can deplete soil moisture quickly.
It is not wise to make assumptions about soil moisture or temperature under crop residue. Various farm supply catalogs and stores offer special soil thermometers. Measure soil temperature before 9:00 a.m. at a depth of 2 to 3 inches to determine the minimum temperature of the soil after it has lost the heat of the previous day.
Tables 2 and 3 show actual soil temperatures taken in the spring in 1984 and 1985 under different kinds of residue in Montgomery County, Missouri. These two springs were quite different. The spring of 1984 warmed up slowly but steadily. It was a wet spring and little was planted before the end of April. As Table 2 shows, the soil was warm enough to plant corn (50 degrees) by the end of April, when fields were dry enough for planting. The spring of 1985 was dry. There was an early warm-up followed by a cold wave in early April. The dry soil lost some of the heat it had collected. But again, when the soil was dry enough for planting it was also warm enough for germination.
Table 2
| Time | Date | Groundcover | ||
|---|---|---|---|---|
| Sod | Wheat plants | Corn stalks | ||
| 8:30 a.m. | 4/3 | 46 | 45 | 45 |
| 8:00 | 4/10 | 49 | 48 | 50 |
| 7:45 | 4/13 | 51 | 49 | 51 |
| 7:45 | 4/17 | 49 | 48 | 47 |
| 7:30 | 4/20 | 51 | 49 | 47 |
| 8:00 | 4/26 | 50 | 55 | 55 |
| 8:40 | 4/30 | 54 | 52 | 48 |
| 7:30 | 5/11 | 56 | 56 | 56 |
| 8:00 | 5/14 | 59 | 58 | 56 |
Table 3
Soil temperatures, spring 1985 (measured at 2 inches in degrees Fahrenheit)
| Time | Date | Residue type | |||
|---|---|---|---|---|---|
| Sod | Wheat stubble | Corn stalks | Soybean | ||
| 7:30 a.m. | 3/22 | 44 | 43 | 42 | 44 |
| 8:00 | 3/25 | 43 | 44 | 44 | 43 |
| 8:10 | 3/26 | 46 | 46 | 47 | 46 |
| 7:30 | 3/28 | 48 | 51 | 55 | 48 |
| 8:00 | 4/2 | 39 | 40 | 35 | 36 |
| 7:15 | 4/11 | 48 | 49 | 50 | 48 |
| 7:10 | 4/17 | 56 | 57 | 57 | 57 |
| 7:10 | 4/25 | 59 | 59 | 59 | 59 |
In Missouri, soils warm up earlier than in states to the north. Crop residue reduces soil cooling as temperatures cycle in the late winter and early spring. It is possible for the soil in a no-till field to be warmer at planting time than a field that is bare. Checking temperature also gives you time to study soil moisture. Soils need to be dry enough for seed to develop and the planter to work properly. Heavy clay soils that are new to no-till would benefit from cover crops to aid drying and improve soil tilth.
The year 1984 became a disaster for farmers without patience or who were new to no-till. As soon as the planter could be used in the field, they planted corn. Because the field was wet, the soil was compacted during planting, and the seed was placed in a furrow that was too shallow for exposed seed. As the spring sun warmed and dried the soil, seed germinated and died. Stand loss became excessive and no-till was blamed for poor yields in the fall. Dry conditions are also important for proper action of the planter unit, which must cut through residue rather than "hairpin" it into the soil. Hairpinning allows residue to wick moisture away from seed. Planting in wet soils calls for higher seeding rates to compensate for poor germination conditions.
Seed placement
The planter is the main implement in any tillage system. Hybrid and variety performance is not affected by tillage (Newhouse and Crosbie, 1986), but the planter must place the seed properly. In no-till systems the planter has to function without the benefit of previous tillage. Great attention has been given to planter design and coulter selection (Lear and Kelly, 1994a; Phillips and Nelson, 1973). The disk opener-style planter unit, offset or paired, can slice through moist soil and dry residue without a coulter. But a coulter can be used to reduce wear on the opener. Bearings and openers wear faster in firm soil.
Seed must be properly placed. That is, corn and soybean seed must be placed in and gently covered by an inch and a half of soil. Wheat and grain sorghum need about 3/4 to 1 inch of soil cover. Farmers new to no-till will have the hardest time with seed depth. The best recommendation for corn and soybeans is to set the planter or drill for an inch and a half and leave it. Moisture movement in no-till fields differs from that in tilled soil. Rainfall or bright sunshine can quickly change the moisture characteristics of the seed furrow. Shallow placement risks soil drying and seedling death, while deeper placement can become too deep when soil near the seed furrow is moved by rain into or over the seed furrow.
Experienced no-tillers have a foul-weather exception when the seed trench does not close. Those farmers who insist on planting in extremely wet soils often find that they cannot get the seed furrow to close, even when the planter seems to be set properly. This often occurs when spring rains delay planting to the extreme and farmers feel the need to get seed in the ground. To compensate for the lack of furrow closure, they will put the seed one-quarter to one-half inch deeper than normal and increase the seeding rate. This is the best alternative under poor planting conditions.
Planter problems
The most common planter-related mistake operators make is not running the planter level (Figure 3). A good indicator is a folded row marker, which should be perpendicular to the soil surface when the planter is lowered. The disks for covering seed and the wheels for closing seed furrows will function correctly when the planter runs level.
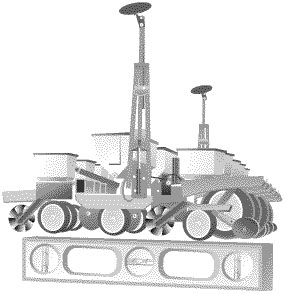 Figure 3
The most common cause of stand failure is failure to operate the planter in a level condition.
Sidewall compaction is another common planter-related problem. A coulter will not eliminate sidewall compaction. The problem is not caused by the double-disk openers. Rather, it is caused by misadjustment of the V-press wheel units on the Kinze and Deere planters.
In recent years, farmers who have seen sidewall compaction share these four observations:
- The problem occurred when they planted in wet conditions.
- They used Kinze, Deere or White planters with the V-press wheel configuration.
- They had problems closing the top of the seed furrow.
- They increased the down pressure on the V-press wheels to try to close the seed furrow.
Research done at the University of Wisconsin shows that increasing the downward pressure on the V-press wheels can create sidewall compaction. This is a result of the way these press wheels work. The wheels are angled so that the forces they create intersect approximately 1-1/2 inches below the soil surface. This is the typical depth for planting corn. If you increase the downward pressure, the wheels press the trench together tighter at the point where the seed is lying in the furrow, creating sidewall compaction. Another effect of too much downward pressure with the V-press wheels occurs in seeding beans, which are often planted between 3/4 inch and 1 inch deep. If the pressure on the V-press wheels is increased, the furrow closes tightly first under the seed and can actually push the seed upward and decrease seed depth.
To set the press wheels for proper seed-to-soil contact, set the press wheel spring so that it takes 50 pounds of pressure before the spring begins to give. This can be measured by using a bale scale and a piece of pipe. Hook the scale to the press wheel bracket. Put the pipe in the other end of the scale and lift, reading the scale as you lift.
If you have trouble closing the top of the seed furrow in wet conditions, do not increase the downward pressure on the V-press wheels or closure disks. First, check to see if the seed is covered in the bottom of the trench. If so, then consider using a pesticide incorporation harrow behind the unit to redistribute residue over the furrow to act as a mulch (Lear and Kelly, 1994b).
Coulters can be useful in dry conditions or where previous crop residues are heavy. Planters can function in a wide range of conditions without a coulter. The 2-inch fluted coulter was the original design used on the early planters or on drills (Figure 4). The wide design of openers on older planters and drills required a device to till the soil. Since the coulters were located 2 to 4 feet in front of the opener, width was used to aid tracking when straight row farming was not possible. This design works well in soils with a low clay content or at low (4 mph) operating speeds. At speeds over 4 mph, the 2-inch coulter will toss soil out of the trench as speed increases.
 Figure 4
Coulters used on no-till planters and drills. From left to right: straight (bubble), ripple, narrow-fluted, wide-fluted.
Several drills on the market use soil movement from fluted coulters to improve drill performance over a wide variety of soil conditions. Selection of the coulter type should be determined by operator preference and field conditions. For example, drills operating in heavy residue may need to be pulled at a slight angle to the old corn row to get the corn residue to feed through. Clamping coulters on two beams separated by 12 to 18 inches would do more for residue flow than changing the type of coulter on the beam.
With new planters, the rippled or 3/4-inch fluted coulters have become the most common designs. These work well at higher speeds. It is important that these coulters produce sufficient loose soil for good seed-to-soil contact. They must also be large (16 to 18 inches) and sharp enough to cut surface residue, which is easiest to cut when dry.
The coulter should be positioned so that it runs 1/8 to 1/4 inch above the opener depth. Seed may be placed too deep in wet soils if the coulter runs deeper. Occasionally, some coulter adjustment will be needed for variation in soil moisture (Lear and Kelly, 1994a; Phillips and Nelson, 1973).
Removing residue
Residue movers (Figure 5) are used to move some of the residue from the row. The value of these units is greater in northern climates where soils are slower to warm. If the planter can do an adequate job of putting seed in the soil without coulters or residue movers, leave them off. Farmers new to no-till often use them because they are used to seeing seedlings emerge in clean soil.
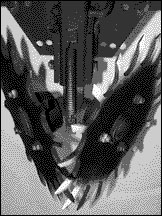 Figure 5
Residue movers can be used when crop residues from previous crops need to be moved from the row on poorly drained soils.
In poorly drained soils covered with heavy residue (180-bushel cornstalks or last year's wheat straw mixed with lots of dead weeds), it may be helpful to move some of the residue away from the row. The exposed soil will be dried by the sun after those early spring rains. The residue between the rows will help conserve moisture for later in the season.
Most planters built in the last 15 to 20 years are capable of planting in no-till and high-residue tillage systems without the need for aftermarket parts. Some of these planters were specifically designed to operate in no-till and high-residue conditions without any additional equipment at all. Doing some basic adjustments will help you get started in no-till. Planters should be adjusted so that the units penetrate the residue and soil, make a firm seed trench, place the seed at the desired depth and close the trench to give proper seed-to-soil contact. If the planter is not adjusted to make these four things happen, you will be unhappy with the results.
Weight transfer is probably the most critical adjustment on planters used in no-till systems. Planters should be able to transfer 300 to 400 pounds of downward pressure to each row unit. This amount of downward pressure will allow the planter to penetrate heavy residues without the need for a coulter and to operate in heavy soil conditions. If coulters are used, an additional 50 to 200 pounds may be needed to allow the coulter and the planter unit to penetrate the residue and soil properly.
The first adjustment to achieve correct weight transfer is to add heavy-duty downward pressure springs to each planter unit, if the planter does not already have them. Check the operator's manual to see if you have the heavy-duty downward pressure spring option. Heavy-duty springs are also available from aftermarket suppliers.
Setting downward pressure
To check downward pressure, run the empty planter in the field and at the intended planting depth. After you have pulled into the field several feet, try to spin the depth gauge wheels on the planter. John Deere (7000, 7100 and older 7200 series), White and Kinze planters with the solid T-depth stop need only one depth gauge wheel that will not spin on each unit to indicate adequate downward pressure. Depth is controlled by only one of the depth gauge wheels on these planters. Case-IH, Landoll, Deutz-Allis, John Deere 7200 series (1994 and newer) and other planters with a walking or oscillating depth control need both depth gauge wheels in contact with the soil to indicate adequate downward pressure. Walking or oscillating depth control units are available for the planters with the solid T-depth control through aftermarket suppliers.
While spinning the depth gauge wheels, try to spin the drive wheels of the planter. If you can, this indicates that more weight is needed on the toolbar to provide weight to the row units. Weight can be added to the toolbar by adding lime or sand to dry fertilizer units that are not in use or water to liquid fertilizer units. Cast iron weights can be added by mounting support brackets onto the toolbar. Weight can also be added by placing bags of lime or other materials in the herbicide/insecticide boxes on the back of the planter units. Be sure to disengage the drive units or place a piece a plywood in the bottom of the box to keep the units from destroying the bags. If weight is added to the row units, pressure can be removed from the downward pressure units.
Adjusting blade contact
Blade contact on the double-disk openers is the next adjustment on the planter. This adjustment is necessary to help the units better penetrate the residue and soil and make a firmer seed trench with less loose soil.
Planters with standard double-disk openers, such as the Deere, White and Kinze planters, require at least 2 to 2-1/2 inches of blade contact. (The older White planters require 1-1/2 to 2 inches because of a smaller blade diameter.)
To check blade contact, use two business cards. Place one card between the edges of the two blades above the point of contact and push the card downward until it is held in place (Figure 6). Place the other card between the bottom edges of the two blades below the point of contact and push upward until it is held in place. Measure the distance inside between the two cards. If it is not 2 to 2-1/2 inches, adjustments must be made. Begin by removing a shim from behind one blade of the double-disk opener, and check the blade contact again. If it is still not 2 to 2-1/2 inches, remove a shim from the other side. Work back and forth until the proper contact is achieved. The contact can then be maintained yearly (1,000 acres or less) by removing a shim on one side only. Do not exceed the blade contact recommended. Excessive blade contact increases wear on blades, bearings and spindles.
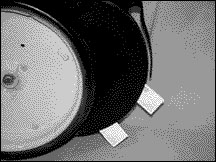 Figure 6
Business cards can be used to set the 2-inch blade contact recommended on John Deere and Kinze planters.
While making the blade contact adjustment, check the scraper/seed tube protector. Make sure that it is loose in its mounting bracket and that the scraper can touch both blades.
When reassembling the double-disk openers and gauge wheels, make sure the depth gauge wheels barely contact the blades of the double-disk opener or are separated by a gap no wider than the thickness of a business card. This allows the wheel to turn freely and not crowd the blade. Excessive contact will increase tire wear. Too much gap will allow dirt and residue to enter behind the wheel and interfere with depth control and blade operation.
On planters with offset double-disk openers, the blades should just barely contact each other or be separated by no more than a business card thickness (Figure 7). This adjustment keeps the loose soil and residue out of the seed trench while allowing the blades to operate freely. Too much blade contact can cause the following blade of the opener to cut the lead blade off. Adjustment procedures are similar to the steps for the standard double-disk opener.
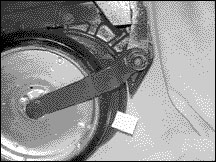 Figure 7
Blade contact on a Case-IH planter is measured with a single card. Blades should hold the card firmly.
The Case-IH planters and others use a firming point to help firm the bottom of the seed trench. While you are adjusting the blade contact, check the wear on the firming point. If the point has worn 1/8 inch or more, replace it.
Controlling furrow closure
Adjustment of the seed furrow closure device is critical to achieving proper seed-to-soil contact. On planters using the V-press wheel configurations (Figure 8), the press wheel downward pressure spring should be set to provide 50 pounds of downward pressure. There is a tendency to apply too much tension to these devices to close the seed trench, particularly when it is wet. Check the pressure by seeing if the seed is covered. If the trench is completely closed, or if the seed is covered but the top of the trench is still open, the downward pressure is correct. Excessive downward pressure on the V-press wheels will force the seed up in the seed trench when seeding shallow crops such as soybeans. Excessive pressure on the press wheels has been linked to sidewall compaction when planting corn. If you encounter problems closing the top of the seed trench with the V-press wheel units, use other methods of covering the trench. One method is to use pesticide incorporation tines to bring loose soil and residue over the trench. The other option is to stay out of the field when it is too wet to close the seed trench.
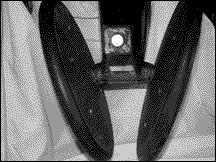 Figure 8
V-type closing wheels should provide 50 pounds of downward pressure
The Case-IH planters and others use two disks to squeeze the seed trench closed (Figure 9). On these units, increase downward pressure by working the mounting brackets through a series of holes or by adding shims under the downward pressure spring. Adjust the tension on the springs until the seed is covered or the trench is closed.
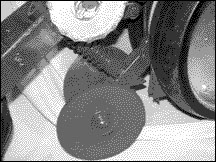 Figure 9
Adjust closing wheels so that the seed furrow is closed by varying spring tension.
Spending the time to make the proper adjustments on your planter in the fall can save you time and frustration as you begin operations at planting time. These adjustments can also save you money by reducing the number of aftermarket add-ons you need for your planter (Lear and Kelly, 1994a, 1994b).
Residue management
Crop residue helps conserve soil, build organic matter and save water for the dry summer. Each field and soil type must be managed according to individual characteristics. Cover crops are often helpful on poorly drained fields when you are trying to plant early. Heavy surface residue can be lightly incorporated into the soil in the fall by drilling cover crops to aid drying in the spring. At harvest, all combines should be equipped to spread straw, and those with heads wider than 15 feet should have a chaff spreader.
Medium- to well-drained soils can generally tolerate heavy residue without hindering soil drying. In any situation, plant residue or vegetation should provide at least 40 percent ground cover. This will protect the soil surface from raindrop compaction and excessive runoff of soil and water. Large seeded cover crops like wheat or hairy vetch can be broadcast with fertilizer in the fall. The light tillage will also level the field and blend some of the residue in the top 2 to 3 inches of soil. Soybeans, grain sorghum and other crops are often planted late in the spring. Cover crops or surface residues will help keep spring weed growth in check (Johnson, 1988).
Cover crops can be used following low-residue-producing crops or tillage to increase residue cover for the next crop. The cover crop can protect the soil by reducing the splash action of raindrops, providing roots that hold soil particles together and impeding the flow of excess water running off the field. Slowing water movement with cover crops will reduce the formation of small gullies.
Long-term research at the University of Tennessee by Duck and Muller (1986) has shown that cover crops can be used to build soil organic matter in surface layers. Increasing organic matter adds stability to soil structure, increases porosity and water infiltration, provides a buffering action for herbicides and increases the water supply available for crop growth.
Nutrient cycling within the soil can be improved by cover crops. Nutrients that are otherwise lost to runoff or leaching can be saved for the next crop. Leguminous cover crops can serve as a nutrient reservoir by fixing atmospheric nitrogen (Table 4).
Table 4
Effects of cover treatment and nitrogen fertilizer on corn yield (1977 to 1981) (in bushels per acre)
| Cover treatment | Nitrogen application rate, pounds per acre | ||
|---|---|---|---|
| 0 | 45 | 90 | |
| Hairy vetch | 102 | 108 | 143 |
| Big flower vetch | 67 | 105 | 105 |
| Crimson clover | 70 | 91 | 118 |
| Rye | 64 | 91 | 121 |
| Corn residue | 60 | 83 | 104 |
Source
Ebelhar et al. (1984)
At MU, research by Reinbott and Blevins (1989) showed crimson clover and Austrian winter pea to be suitable cover crops when no-tilled into soybean stubble in September and October, respectively. Consistent winter survival of these crops has been disappointing in Missouri.
Soil temperature and moisture can also be modified by cover crops. Shading may delay warming during cool, wet springs. Growing cover may deplete soil moisture reserves in a dry spring. Both problems can be resolved by killing the cover early if they pose a threat to the next crop. Shading provided by the residue can benefit the crop by providing cooler soil temperatures during the summer. This is a plus for root growth and nutrient uptake.
Wheat makes an excellent cover crop. Sown at a rate of 1/2 to 1 bushel per acre and lightly disked in, it is easily killed in the spring and does not grow very tall. The light disking does minimal damage to the biologic complex and may prove beneficial to clay soils. Work done at MU by Wollenhaupt, Helsel and DeFelice (1989) has shown a reduction in the growth of broadleaf weeds and grasses with wheat and rye used as cover crops.
Fescue and other perennial grass sods present barriers as well as opportunities. Fescue can be killed with atrazine, Gramoxone or Roundup. Gramoxone and liquid nitrogen can be used to burn down top growth quickly. The grass will die if the plant was weakened by heavy grazing or haying the previous fall. Low soil fertility is often a major problem for crops planted in grass sods previously used for pasture or hay.
Note
Soil testing is a must for these fields.
Cool-season grass sods, like fescue, go dormant as soil temperature increases. In the dormant state they grow very little. This also means that they are less subject to control by herbicides. Therefore, it is not likely that fescue will die from an application of Roundup made in early June. It also means that the postemergence grass herbicides used in soybeans will be less effective. Management of no-till systems is often harder when planting in grass sods.
Living mulches, where only the cover crop in the row is killed, have been researched by many universities. A perennial sod or legume between the rows is thought by some to deter weed production and maintain soil cover. At this time experience in the Corn Belt states has not proven this practical. Competition for nutrients and rainfall has reduced yields of the intended crop.
Fertilizer in no-till systems
Simply put, inject the nitrogen and spread the rest on top. The response from banding will pay for the extra expense only in low-fertility soils. Lime can be surface applied, but be cautious of surface pHs. Soil testing should be used to closely monitor the top 2 inches as well as the standard 6-inch depth.
Several researchers have reviewed the use and placement of fertilizer for no-till crop production. Their results suggest that crops can be grown with surface applications of fertilizer and lime in most cases. Ideally, the best location for plant nutrients is below the soil surface with the plant root system. A plant cannot be expected to make efficient use of fertilizer applied to the surface of a low-testing soil (Blevins and Murdock, 1979; Blevins et al., 1979; Kroth and Mattas, 1981; Stecker et al., 1989, 1993a, 1993b; Triplette et al., 1979; Whitaker et al., 1978).
In general, university research data and farmer experience indicate that banding of any kind will not stand on its own in soils testing medium to high. Responses to banding alone will not pay. However, when you go to the low-fertility soils and no-till systems, you can expect yield responses to make banding economically feasible. Many people are experimenting with depth of placement and it has produced an overabundance of testimonials but little research. You will find little data to support placement deeper than 4 to 5 inches. Soil fertility work in other states results in different conclusions that may not be valid here.
Nitrogen
Nitrogen is used most efficiently in corn and grain sorghum production when it is injected. This has nothing to do with tillage but is a function of the volatility of nitrogen. Knifing in nitrogen solutions (UAN) or urea can result in a 20 percent yield advantage over broadcasting or a 5 percent increase over a band dribbled on the surface. The real experience on the farm has produced many disappointing yields from surface applications of nitrogen on warm soils. Whereas nitrogen is applied to cool soils when fertilizing wheat, nitrogen for corn and grain sorghum is spread when soil temperatures are quickly rising and the risk of loss is high (Buchholz and Wollenhaupt, 1987; Whitaker et al., 1978).
The most common source of nitrogen for injection is anhydrous ammonia. The applicator may need to be fitted with a coulter to cut heavy trash such as cornstalks, grain sorghum or dense fescue. Table 5 indicates that injection of anhydrous may offer some economic benefit in addition to the greater efficiency with which it is used by plants.
Table 5
The cost of applying 120 pounds of nitrogen per acre using two sources
| Source | Cost per pound | Nitrogen cost | Application cost1 | Total cost |
|---|---|---|---|---|
| Ammonia | $0.18 | $21.60 | $6.00 | $27.60 |
| Urea | $0.24 | $28.80 | $3.50 | $32.30 |
1MU publication G302, Custom Rates for Farm Services in Missouri.
Knife tracks left in the field become a practical issue if injection is done just before planting or when it is followed by heavy rain, as the tracks may distract the driver during planting. Runoff may erode the tracks on long slopes. Therefore, running the applicator at an angle to the direction of planting or across the slope may prove helpful where it is possible.
Research results at MU (Figure 10) are typical of those across the Corn Belt. Highest yields are obtained when injecting nitrogen or using ammonium nitrate. If you are forced to make surface applications of nitrogen, use ammonium nitrate. When making surface applications of nitrogen solutions or urea, you can expect yield reductions of 15 to 20 percent. Early spring applications, before soil warms, have not been shown to improve efficiency. There is a greater chance for rain to wash the nitrogen into the soil. But loss from denitrification replaces the risk of loss from volatilization and from nitrogen applied as liquid solution being tied up in plant residue. These early surface applications can serve as a carrier for early preplant herbicides and in part compensate for the loss of nitrogen applied at the surface.
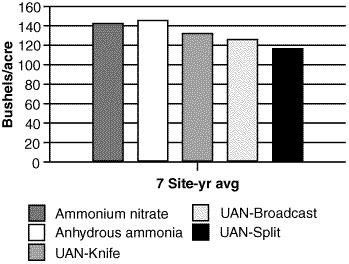 Figure 10
How different sources of nitrogen affect corn yield. UAN = urea ammonium nitrate solution.
Legumes can supply part or all of the nitrogen needed for the next crop because they release nitrogen as they decompose. They need not be tilled to release nitrogen. As tillage is reduced, soil organic matter will increase and legumes can replace some of the fertilizer nitrogen.
Other nutrients
Phosphorus, potassium and lime can be surface applied. Phosphorus and potassium can also be injected with special fertilizer applicators or planter units. These are larger tubes welded to ammonia-type knives that are attached to coulters (Blevins and Murdock, 1979; Kroth and Mattas, 1981).
An important point to remember is that clay is used in some solutions to keep phosphorus in suspension. Be cautious when combining herbicides and liquid suspensions because clay can deactivate herbicides like Gramoxone and Roundup.
Surface application
Surface application of fertilizer and lime generates a number of questions, the most common being "Is the plant getting the fertilizer?" The answer is provided by long-term tillage studies. A study begun in 1975 at the Greenley Memorial Center near Novelty, Missouri, has shown no yield advantage for any tillage system. Surface application of fertilizer has been shown to satisfy plant nutritional needs. No-till systems have more roots near the surface to take up nutrients (Buchholz and Wollenhaupt, 1987).
Stratification of fertilizer and root development occurs as expected with reduced tillage (Table 6). Concentrations of soil organic matter, phosphorus and potash also increase near the soil surface as soil mixing is reduced. This stratification can be viewed as a horizontal band of nutrients. The increase in soil organic matter at the soil surface will affect herbicide rate selection. Soil pH, however, remains somewhat stable. For these reasons, soil sampling should include both a shallow 0- to 2-inch sample and a standard-depth sample.
Table 6
Tillage effect on corn root weight
| Soil depth | Tillage system | ||
|---|---|---|---|
| Plow | Chisel | No-till | |
| Root weight (milligram per cubic centimeter) | |||
| 0 to 3 inches | 0.75 | 0.83 | 1.88 |
| 3 to 6 inches | 0.98 | 0.98 | 0.75 |
| 6 to 9 inches | 0.51 | 0.50 | 0.50 |
| 9 to 12 inches | 0.23 | 0.22 | 0.23 |
Source
Mengle (1990)
Fertilizer and lime application should be made using the standard sample. But lime application should be adjusted on the basis of the shallow sample. For example, if the surface pH is medium, but the standard sample calls for lime, apply the lime in small amounts to avoid excessive surface buildup. This would help avoid excessive surface buildup and the production or weed control penalties that coincide with high pH levels.
Fertilizer in no-till systems
Fertilizer application equipment has improved greatly in recent years. Squeeze and diaphragm pumps for use with fertilizer have improved capacity and performance. Coulter-knife packages are available commercially for liquid and dry fertilizer as well as ammonia. Many producers want to know if they can still use anhydrous ammonia, or they would like to inject liquids or dry fertilizers in no-till systems. Application equipment is available to apply all types of fertilizers in a wide range of no-till situations. Manufacturers' philosophies differ on construction of equipment to perform any given task.
Anhydrous ammonia applicators for no-till differ significantly from their conventional relatives (Figure 11). Most no-till anhydrous applicators use some type of coulter to cut the residue and start the trench ahead of the knife. Knives of this type may be only 5/16 to 3/8 of an inch thick. They leave a very thin slot, which minimizes disturbance of the soil and residue. This limited disturbance is important in situations where residue is needed to reduce erosion or control weeds. It is also important on fragile soils where ammonia tracks might be eroded, scarring the soil surface.
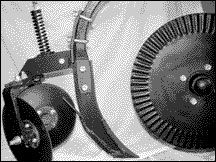 Figure 11
Ammonia applicators can be fitted with coulters to improve their movement through crop residue
Even with the narrow slot made by these knives, closure of the trench is essential to hold in the anhydrous and reduce damage to the soil surface. The best closure system for anhydrous applicators is an inverted concave double-disk setup. These disks are similar in design to the seed furrow closure disks on the Case-IH planters. The disks actually compress the soil back together instead of throwing soil back into the trench. These units also minimize residue loss. Most units of this type will reduce residue cover by only 5 percent or less. Any system that compresses the trench back together should work equally well. A triangular piece of steel or beaver tail on the backsides of the knives, installed with a 15-degree drop from the leading edge, can help closure. In wet conditions, the beaver tail may actually help hold the slot open instead of closing it.
Liquid application
Liquid applicators can be broken down into two basic types. The first is a knife injection system that uses a coulter (usually a 1/2-inch ripple or 3/4-inch wavy) to cut the residue and start the furrow, closely followed by the injection knife. The alignment and closeness of the knife are critical in these type systems. You should have spacers or some type of adjustment to align the knife behind the coulter and to place the knife as close to the coulter as possible. If the knife is not close to the coulter or is out of line with the coulter, residue can begin to build up on the knife. This residue can stop the coulter from turning or widen the fertilizer furrow or plug up the unit, affecting how the fertilizer is placed in the ground. Figure 12 shows an example of an attachment that ensures close alignment between coulter and knife.
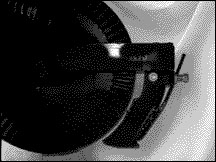 Figure 12
Fertilizer attachments mounted on planters should limit soil disturbance and should align with coulter and knife
The other type of liquid applicator is an injection system. This system uses high pressure (40 to 120 psi) to spray a stream of fertilizer into a trench cut by a 1/2-inch ripple coulter or dribble the liquid into a tilled area behind a 3/4-inch fluted, or wavy, coulter (Figure 13).
 Figure 13
Nozzle injector on heavy spring attached to coulter
Metering the fertilizer flow for these systems is done through an orifice plate or nozzle. Nozzles also reduce the turbulence of the fertilizer under pressure. Alignment of the nozzle and coulter is essential for these units to work properly.
The liquid injection systems can be purchased or made from equipment no longer in use, such as plow coulters and old cultivators and sprayer parts. Use the cultivator toolbar and part of the row units to make the frame for the nozzles and mounting brackets for the plow coulters. Fertilizer is delivered to the units by a centrifugal pump. These pumps are less expensive than positive displacement pumps. But you do need to place an orifice in the line to develop sufficient pressure to control the application rates. Also in assembling the system, you will want to avoid using brass where it will contact the fertilizer. Brass will corrode and fail after a short time. If you use any plastic fittings, keep a few spares on hand to replace those that break under stress.
Liquid injection systems typically require less horsepower to operate than do injection systems for anhydrous ammonia. The nature of the product does not require placement as deep as anhydrous ammonia.
Dry application
Dry fertilizer applicators for no-till have been constructed mainly for planter mounting to apply starter fertilizer, although large-volume pneumatic equipment is also available. The planter-mounted units can be knife systems similar to those used for applying liquid fertilizer, or they use a smooth coulter that is tilted and angled to form a narrow trench with a drop tube to deliver the fertilizer. The dry applicators have an advantage over the liquid applicators in that they can also be used to place liquid fertilizers by mounting a liquid applicator tube inside or behind the larger dry applicator.
When mounting applicator units on planters, make sure the applicator produces a minimum of soil disturbance and does not leave clods of soil directly in the path of the planter depth gauge wheels. Look for applicators that use smooth or ripple coulters to minimize soil disturbance, or use some type of firming wheel to hold the soil in place as the unit moves through the soil.
There are many equipment options that can be put together to make fertilizer work efficiently for you without spending a lot of money.
Controlling weeds
The process of controlling weeds extends throughout the year. Weed seed can survive many years in the soil. Remember that no-till planting systems rely on herbicides and crop competition to control perennial and winter annual weeds. In conventional tillage, we had the option of using soil-incorporated herbicides, but no-till systems place total reliance on herbicides applied to the soil surface or foliage. Therefore, when matching the herbicide to the weeds, consider their emergence and growth stage. Planning multiple passes to apply herbicides timed to match weed growth will increase success.
Often farmers ask whether to spray before or after planting. No answer fits all occasions. In no-till we need to consider the stages of weed development, from seed to sprout, seedling and mature plant (Figure 14). We can control seeds as they emerge with preemergence herbicides. Sprouted seeds that have not broken the soil surface can be missed by burndown herbicides.
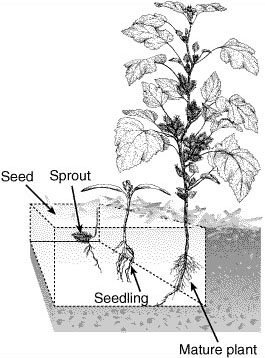 Figure 14
Development of the common cocklebur from bur and seed to sprout, seedling and mature plant
Planning a weed control program
The elimination of tillage does not change the principles on which a properly designed weed management plan is designed. Correct weed identification and appropriate use of pre- or postemergence herbicides are required. A flexible approach that considers local weather, soil, and weed conditions will be most successful.
For both no-till and conventional-till systems, a seedbed free of living vegetation at planting is needed to provide the crop with the even-start habitat necessary to achieve optimum early-season crop development. In no-till crop production, burndown herbicides are used instead of tillage to control existing vegetation. After the crop is planted, weed control practices are similar in no-till and conventional-till crop production with several exceptions. Mechanical weed control such as rotary hoeing and cultivation are rarely used in no-till production. Rotary hoeing is used less in no-till because greater amounts of surface residue are present to intercept rainfall and reduce crusting of finely worked conventionally tilled soil. Rotary hoeing may be considered for corn planted into soybean residue because it can be used to reactivate residual herbicides if rainfall does not occur soon after application. Cultivation is becoming less practical in no-till soybean production as row widths are reduced. However, cultivation in no-till corn production is possible. Equipment manufacturers have made great strides in developing cultivators equipped to handle the greater amounts of surface residue present in no-till production.
Because tillage is eliminated, soil-incorporated herbicides cannot be used in no-till production systems. These herbicides (e.g., Treflan and Sutan) are effective and inexpensive.
The crop canopy is an important component of all weed-control programs. A crop that shades the soil surface rapidly reduces the amount of weed seed germination and reduces seedling growth after emergence. Average row spacing in Missouri soybean production has been reduced from 25 inches in 1990 to 18 inches in 1995 (Missouri Agricultural Statistics Service, 1995). An advantage of narrow rows is quicker canopy closure, thus reducing the length of time needed by chemical control methods. Current research is focusing on narrow-row corn production as a method of providing quicker canopy closure.
Regardless of the crop grown, use of the optimum row spacing and plant populations to achieve rapid canopy closure (Table 7) is an important part of reducing chemical weed control inputs. Shading the weeds and soil as early as possible makes the crop less susceptible to weed competition and reduces late-season weed germination and growth.
Table 7
Canopy closing dates for soybean
| Row spacing | Planting date | ||
|---|---|---|---|
| Before May 5 | May 6 through 15 | May 16 through 25 | |
| 7 inches | June 5 | June 10 | June 15 |
| 15 inches | June 20 | June 25 | June 30 |
| 30 inches | July 15 | July 20 | July 25 |
Profitable Midwest No-Till Soybean Production. North Central Region Extension Publication number 580, Ohio State MU Extension Publications Office. (January 1996)
Burndown herbicide programs
For most situations, growers should target burndown applications 15 days or less before the planned day of planting and tank mix the burndown with a residual, preemergence herbicide. Burndown herbicide rates can be reduced if weeds are small and identified properly (Table 8). Figure 15 shows the average duration of several weeds common to no-till crop production in Missouri. Three distinct "generations" of weeds emerge within a year. Winter annuals germinate in late fall, remain dormant during winter, and resume growth in early spring. Early spring germinating summer annuals emerge in April and are actively growing by planting time. Summer annuals usually emerge after planting. Burndown herbicides must control all weeds present before planting. However, in cool springs, the late winter/early spring weed emergence is suppressed and the possibility of not needing a burndown herbicide with the residual herbicide is enhanced, especially for corn production.
Table 8
Burndown application rates for two herbicides as plant heights increase (rates in pints per acre)
| Herbicide | Plant height (inches) | |||
|---|---|---|---|---|
| 0 to 3 | 3 to 6 | 6 to 12 | 12 to 18 | |
| Gramoxone Extra | 2 | 2.5 | 31 | 1 |
| Roundup Ultra | 1.5 | 1.5 | 2 | 3 |
1Not recommended for weeds taller than 6 inches.
Source
Data from herbicide manufacturers' labels
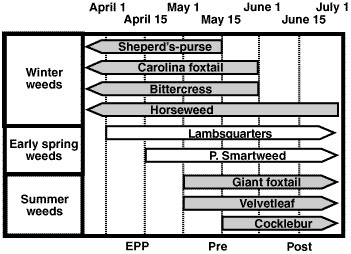 Figure 15
Comparison of growing seasons for weeds. EPP = early preplant; Pre = preemergence; Post = postemergence.
Preplant intervals longer than 15 days may lead to residual preemergence herbicides breaking down too soon after the crop is planted. Also, there is a much higher probability that a second burndown will be needed, thus increasing herbicide costs. Additional disadvantages to exceptionally long preplant intervals are that early removal of winter vegetation can leave the soil vulnerable to erosion and increase the probability of herbicide contamination of ground and surface water.
Scouting techniques and postemergence weed control with herbicides in no-till will make use of the same herbicides as in conventional-till crop production.
Burndown herbicide programs for field crops
The following herbicides are commonly used in burndown weed control programs for Missouri spring-planted crops — corn, soybean and grain sorghum. These herbicides provide no residual weed control but may be tank-mixed with appropriate residual herbicides.
- Gramoxone Extra works well on annual weeds smaller than 6 inches. It provides a quick burn-back that might be advantageous with late planting dates. Because only above-ground parts of the plant are killed, control of perennial weeds is usually not complete. Gramoxone Extra can also be used in preplant applications to control small annual weeds in no-till wheat.
- Roundup Ultra controls both annual and perennial weeds. It is the preferred herbicide for weeds taller than 6 inches. Plants die more slowly with Roundup Ultra than with Gramoxone Extra, but the herbicide is translocated to the roots for complete kill of perennial weeds. Roundup Ultra is the preferred herbicide for large weeds in no-till wheat.
- Sencor/Lexone is a contact herbicide and is usually tank mixed with either Gramoxone Extra or Roundup Ultra. It is recommended if smartweeds are part of the weed population.
- 2, 4-D and Banvel both control broadleaf weeds but are usually tank-mixed with either Gramoxone Extra or Roundup Ultra. They are particularly useful if legumes are part of the vegetation to be controlled. For 2,4-D applications of less than 1 pint per acre, label restrictions specify a 7-day waiting period before soybean planting; for applications of more than 1 pint of 2, 4-D per acre, the waiting period is 14 days.
Note
Do not use Banvel to prepare a field for soybean planting
Other herbicides may be used in burndown programs but are restricted to specific crops. For example, before planting soybeans, Canopy provides excellent burndown control of small winter weeds. Atrazine provides foliar burndown activity on small weeds (less than 2 inches) in both corn and grain sorghum. Both Canopy and atrazine provide residual weed control and can be tank-mixed with either Gramoxone Extra or Roundup Ultra.
Your choice of a burndown herbicide as well as a residual herbicide depends not only on the crop to be planted but also on the size and type of weeds present and on soil moisture. Consult manufacturers' labels for further information.
In addition, see the following publications:
Weed Identification Guide. Weed Science Society of America, Champaign, Ill.
Weeds of Nebraska and the Great Plains. Nebraska Department of Agriculture, Bureau of Plant Industry, Lincoln, Neb. 1994.
Weeds of the North Central States. Bulletin 772. University of Illinois, Urbana. 1981.
Spray nozzles and water volume
The sprayer used should distribute a uniform pattern over the target. Flat fan nozzles are a good all-purpose nozzle for most spray operations (Figure 16). Flooding nozzles work well for larger carrier volumes of water. Always consult the manufacturers' directions for the specific nozzle to determine the optimum nozzle height, spacing and operating pressure.
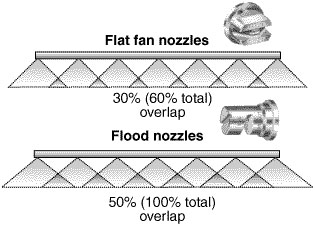 Figure 16
Spray patterns of flat fan and flooding nozzles.
The volume of carrier to use when applying pesticides is affected by legal (the label) and practical (delivery to the target) issues. The label is the law for the purpose of performance guarantees and liability issues. Any variance from label directions eliminates these protections. The delivery to the target is determined by a uniform sprayer pattern and droplet size. However, label instructions allow for a wide variation in volume (5 to 40 gallons per acre) depending on the pesticide and the application equipment being used. Volume will not ensure adequate coverage. Select the lowest carrier volume suited to the pesticide and your equipment, then focus on spray pattern and delivery. Equipment manufacturers and Extension agricultural engineers are sources of information about application design.
When applying burndown herbicides that have contact activity, such as Gramoxone Extra, atrazine, Extrazine, Sencor/Lexone, or Canopy, use higher spray volumes (20 gallons per acre or more) to ensure adequate spray coverage and penetration into the weed canopy. Herbicides that are translocated, such as Roundup Ultra, 2, 4-D, and Banvel, also work well at lower spray volumes down to 10 gallons per acre. Although many dealers and custom applicators are using spray volumes under 10 gallons per acre for many herbicides, keep in mind that many of these applications are not within the legal constraints of the respective herbicide label. Thus, if a herbicide fails to control labeled weeds when applied at a carrier volume lower than specified on the label, by law it is the applicator's fault for not following the label and not the herbicide manufacturer's fault.
If you are new to burndown herbicide application, you should follow label directions closely to provide the highest probability of success in your weed control operation. As you gain experience and confidence, carrier volumes can be reduced so you can spray more acres per tank.
Special weed problems
Common milkweed and hemp dogbane
Like most perennials, milkweed and hemp dogbane have underground root systems for storing energy. These weeds emerge most years when corn is small and are generally seen about the time many people plant soybeans. Some years they will emerge earlier, because they have not been slowed by tillage. As these plants emerge, Banvel or 2,4-D can be used to aid the performance of Roundup. As with most perennials, you need to see slow but consistent decline in plant health to kill it. Banvel can also be used as a planned postemergence treatment in small corn or at higher rates after corn harvest.
Soybeans are quite sensitive to Banvel (Figure 17).
 Figure 17
Leaf damage due to Banvel drift demonstrates the sensitivity of the soybean plant to this herbicide
Fescue
Fescue is often considered difficult to control because producers wait too long to spray it or they want to harvest a hay crop before spraying. In either case, they are trying to control a plant that is approaching maturity and summer dormancy. Atrazine, Bladex and Gramoxone in various combinations can be used to eliminate fescue better than tillage. When fescue is 6 to 12 inches tall, these three can burn it down and keep it down. Killing fescue early, a few weeks before planting, will improve planter performance in the sod as the plants decompose in the warm temperatures of spring.
To plant soybeans into fescue, start herbicide application early. A quart of Roundup in April, or as soon as the fescue is 6 inches tall, is a start. Delay increases risk as this cool-season plant reduces growth as temperatures rise. At planting, add Gramoxone to the preemergence application to kill plants that sprout from dying crowns or dormant seed. There are no soybean herbicides with activity like atrazine or Bladex. And don't expect to kill fescue or other cool-season grasses in June when they are going into summer dormancy.
Note
Because of the sensitivity of soybeans, Banvel should not be used when soybeans are the intended crop. Fall application of all herbicides to brush is highly recommended.
Wild garlic
This weed is costly to wheat growers. In addition to the herbicides that can be used in wheat, we can use Gramoxone to control garlic when applied as an early burndown ahead of soybeans or corn. This will help to rid the field of this weed eventually and the problem it causes in wheat. The hard bulbs common to this plant will make its control a long-term project.
Other considerations
When the weather turns against you and wet springs delay field work to the point that weeds are big and varied, a different strategy is required. When you get to the field, spray it with a minimum of one quart of Roundup plus a pint of 2,4-D per acre. Be sure to get the spray pattern higher than the weeds by raising the boom or using closer nozzle spacings or nozzles with a wider spray angle.
Give the weeds a few days to soak up the herbicides before you stress them with planter traffic. Preferably, return to the field in three weeks to see what is growing before you plan postemergence treatments. Often you will find that the dense cover of dead weeds will give you good weed control by itself, and the dead root channels make it possible for water to enter the soil faster.
In all cases, pay attention to the weeds, not the calendar. Each year, growth of weeds will start at different dates. Apply herbicides to take advantage of their strengths. Pay attention to soil temperature and the growth and development of plants inside the field for clues. Knowledge of herbicide modes of action can yield economic benefits in weed control.
Insects, diseases and rodents
The potential exists for greater disease, insect and rodent problems in some no-till systems than in conventional tillage. However, these problems have not proved to be consistent or unsolvable (Aldrich et al., 1975; Burns, 1973; Clark and Young, 1986; Niblack et al., 1993; Smith 1995; Wooley et al., 1986). Crop rotation, hybrid or variety selection, proper seed placement, seed treatments and scouting are still the most practical control measures. Control recommendations are updated annually by MU integrated pest management specialists, entomologists, plant pathologists and others. Many references, complete with pictures, are available from your local MU Extension center to help you identify pests.
Field crop diseases
No-till is not an automatic invitation to diseases; some actually decline under no-till conditions. However, ignoring the potential for crop diseases can be an invitation to disaster, regardless of your tillage system. No-till can affect the development of crop diseases in two ways:
- Infested crop residues left on the soil surface favor the survival of certain disease organisms from one season to the next
- Because no-till fields are generally slower to dry out and warm up in the spring than conventionally tilled fields, diseases that thrive in cool, damp conditions may increase.
The key to managing crop diseases in your no-till operations is to be familiar with the diseases likely to occur in specific crops and fields, understand the environmental conditions that favor these diseases, and know your options for dealing with them.
A cornfield infected with gray leaf spot, for example, is at risk of being reinfected the next season if it is planted in no-till corn, because the fungus that causes the disease survives on the old crop residue left on the soil surface. Rotating that field to soybeans or wheat can avoid this. Choosing hybrids or varieties with resistance or tolerance to an anticipated disease can also help reduce losses.
Cool, wet conditions favor the development of Pythium and Phytophthora, which can cause seed and root rots, damping off, and seedling blight in various crops (Figure 18). Being aware of soil temperatures, delaying planting, using fungicide seed treatment, and planting at the proper depth with good seed-soil contact can all reduce losses from these diseases. Again, understanding how field conditions and disease organisms interact is the key to reducing crop diseases, whether or not you till your fields.
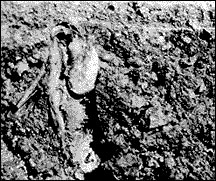 Figure 18
Cool, wet soil conditions favor Pythium and Phytophthora.
Common insect pests in corn
Not all insect pests in corn are affected the same way by changes in tillage (Figure 19). Populations of corn insect pests are influenced by factors such as the previous crop, management of early-season weed growth, soil characteristics or type, amounts of plant residue left in the field, weather events, and general field conditions. No-till fields may be at higher risk than conventionally tilled fields for some insect pests and at lower risk for others. In most cases, the many benefits derived from no-till production systems far outweigh the potential for increased insect problems in no-till fields. Effective pest management options are available for control of corn insect pests.
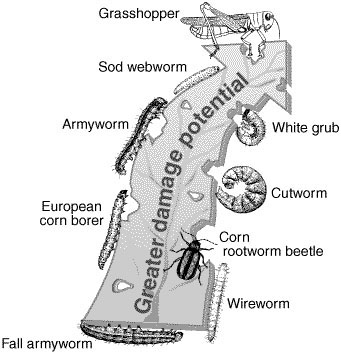 Figure 19
The potential for insect damage in no-till corn depends on the insects present.
A majority of problems with insects in no-till corn occur when corn is planted into a field of sod or thick wheat cover crop. Soil-dwelling insects such as sod webworm has a higher potential for damage in all tillage systems following sod. Producers should scout for this pest on emerging and small corn seedings. If economic infestations are found, several insecticides will provide effective control.
Early-season weed management, where burndown herbicide is applied to sod vegetation, may destroy food sources of some immature insects and force the insects to feed on seedling corn plants. The black cutworm lay eggs and feed on early-season weeds and may attack seedling corn under these conditions. No-till fields are at slightly higher risk than conventionally tilled fields. Good insect control can be achieved through scouting and application of an insecticide once the pest problem has been identified.
Soils with high levels of organic matter are attractive to the grasshopper damage is potentially higher in fields without tillage, because eggs laid in the soil are not disturbed; therefore, grasshoppers occur uniformly throughout the field. Grasshopper nymphs feed for several weeks on vegetation in areas where the eggs were laid and the nymphs emerged. If eggs are laid in border areas of a field, nymphs will feed on border vegetation for several weeks before moving into crop fields. In no-till fields, feeding by nymphs begins with their emergence from the soil and may continue throughout the growing season. A good scouting program and selective use of pesticides provide effective control of grasshoppers in no-till corn fields.
Seed treatments
Seed treatments that contain fungicide and insecticide ingredients can protect germinating seeds from a wide range of pests for a reasonable price. Almost all field corn seed comes with a fungicide seed treatment. Insecticide seed treatments on corn usually need to be requested or applied as a hopper box treatment. When planting corn in soils that are cool and wet or in soils with high organic matter, an insecticide seed treatment may be warranted to prevent damage from seed corn maggots, seed corn beetles, wireworms and other soil insects. The majority of soybean seed is not treated, so fungicide and insecticide seed treatments must be requested or applied after purchase. Four years of research at MU shows a significant yield increase from the use of fungicide seed treatments on soybean. Protecting seed from Rhizoctonia, Fusarium, Pythium and Phytophthora can add 1 to 7 bushels per acre (Smith, 1995). Not all research trials have shown such consistent yield improvements with soybean fungicide seed treatments. When planting soybean in soils that are cool and wet or in soils with high organic matter, an insecticide seed treatment may be warranted.
Animal pests
Rodents and other wildlife are often blamed for stand reductions in no-till planting systems. Fields with heavy residue provide cover for mice or voles. A large portion of their diet is made up of small insects and high-protein plant seedlings (Clark and Young, 1986; Wooley et al., 1986). In general, control of rodents to protect corn planted in low to moderate residue no-till systems is not warranted. The best control is to avoid having fields with lush, dense cover at planting. These kinds of fields should be sprayed in early spring to destroy food and shelter used by rodents. For further information, see MU publication G4448, Controlling Vole Damage in No-Till Corn and Soybeans.
Social and economic implications
The ultimate decision to use high-residue and no-till planting systems rests with the ability to satisfy social and economic needs. Failure to address these issues will result in failure of communities and individual farmers to accept no-till as a part of their crop production.
In many communities no-till planting systems run counter to all measures of success. Fields are cluttered with crop residue. Landlords may not understand the system. Large tractors and implements, indicators of success to some, are not required to plant the same number of acres.
Old rules about tilling the soil for such things as weed control, insect control and fertilizer application are disputed. Those rules of thumb become less useful as the need for new management skills intensifies with the change in management techniques (DeFelice, 1994).
To evaluate tillage systems, we have to accept a measure of the production potential and ensure that treatment is equal. MU research (Pfost, 1988), like that in other states, has found little difference in yield as a result of tillage. An example is the long-term results from the clay pan soils of the Greenley Memorial Research Center near Novelty, Missouri.
Poorly drained soils are not thought to be good places for no-till. Yet corn yields at the Greenley Research Center differ little between tillage systems, and the top yielder changes from year to year. The difference of 4 bushels per acre between average yields from different tillage treatments at Greenley is less than the variation within the individual systems in the comparison.
Part of the reason for changing to no-till systems is to control soil erosion. There are obviously many erosion control options, each of which can affect farm income.
Economic profits are possible with no-till. Savings on labor, fuel and other machinery operating costs occur when tillage trips are eliminated. The use of burndown herbicides, instead of tillage to control early-season weeds, and more expensive post-applied herbicides can add significantly to production costs — especially if low-cost soil-incorporated herbicides can no longer be used. Savings on fixed machinery costs (depreciation, insurance, interest, etc.) depend on added investment in no-till equipment in relation to reductions in tillage equipment inventories. Profits depend on balancing the reduced labor and machinery cost savings with increased chemical costs and any added machinery investment costs.
The greatest economic benefits may result from increased timeliness. No-till often results in faster planting, enabling the operator to cover larger acreages and finish within optimum planting dates.
It is unclear whether the traditional 50/50 crop share lease arrangements should be adjusted when the tenant no-tills the crops. While it is often assumed that labor and machinery contributions to the arrangement by the tenant would be reduced, this may not necessarily be the case. Investment in expensive no-till equipment along with requirements for increased labor and management skills may offset much of the fuel and other operating cost savings resulting from no-till. Both parties benefit from timeliness gains from no-till and the landlord receives the long-term erosion control and soil structure benefits to the farm resources. The only way to determine the fairness of any lease is to evaluate each party's contributions carefully and determine shares accordingly.
Interest in high-residue and no-tillage systems was heightened by Conservation Compliance provisions of the 1985 Farm Bill. Wollenhaupt and Blase (1990) looked at the economic impact of Conservation Compliance on farms in northern Missouri. Their conclusions are worthy of mention.
- The impact will be lower economic returns to land and management, and subsequently, to the value of the land itself. It is naive and cruel to work with farmers and landowners on soil conservation and ignore the economic consequences.
- The analysis suggests that class IV, class VI, and possibly class III land will be relegated for economic reasons to low input (scrub oak and fescue) pasture in the future. . . . What will happen to the value of this land at the end of CRP?
- Soybeans have tended to be the dominant crop on erodible soils in northern Missouri and are extremely important to the Missouri Agricultural economy. If these erodible soils are to be kept in profitable crop production other than grass and trees, producers will have to use new cultural practices, such as no-till soybeans, and new crops, including nontraditional crops.
- Soil Conservation programs have economic implications on farm income that, in turn, extend into rural economies. There is not doubt that stewardship of the soil resource is deficient, especially on erodible yet profitable land. If present agricultural enterprises are neither consistently profitable nor resource-sustainable, then such alternatives as long-term easements need to be considered as financial means for helping farmers and landowners shift out of an undesirable land use.
References
- Aldrich, S. R., W. O. Scott, and E. R. Leng. 1975. Modern Corn Production. Champaign, Ill.: A and L Publications.
- Blevins, R. L., and L. W. Murdock. 1979. Effect of Lime on No-Tillage Corn Yields. Agronomy Notes volume 12 number 1, University of Kentucky, College of Agriculture.
- Blevins, R. L., G. W. Thomas, and P.L. Cornelius. 1979. Influence of No-Tillage and Nitrogen Fertilization on Certain Soil Properties after Five Years of Continuous Corn. Agronomy Journal 69:383-386.
- Buchholz, D. D., and N. C. Wollenhaupt. 1987. Soil Sampling in Tillage Systems. Agronomy Technical Report. MU Department of Agronomy.
- Burns, E. E. 1973. Will Conservation Tillage Increase the Incidence of Plant Disease? Illinois Agricultural Experiment Station, Illinois Research, volume 15, number 2.
- Clark, W. R., and R. E. Young. 1986. Crop Damage By Small Mammals in No-Till Cornfields. Journal of Soil and Water Conservation, volume 41, number 5.
- DeFelice, M. S., and B. Sims. 1987-89. Herbicide Field Evaluation Reports. MU College of Agriculture, Department of Agronomy.
- DeFelice, M. S. 1994. Does Ammonium Sulfate Improve Roundup Performance, UMC Agronomy Technical Report, volume 12, number 9.
- Duck, R., and M. Muller. 1986. Benefits of Legume and Non-Legume Cover Crops for No-Till Crops. Page 7 in Milan Experiment Station Field Day Report, Tennessee Agricultural Experiment Station.
- Ebelhar, S. A., W. W. Frye, and R. L. Blevins. 1984. Nitrogen from Legume Cover Crops for No-Tillage Corn. Agronomy Journal 76:51-55.
- Ervine, D. E. 1982. Conservation Tillage Seminar Proceedings, MU College of Agriculture, Department of Agricultural Economics.
- Johnson, R. R. 1988. Soil Engaging Tool Effect on Surface Residue and Roughness with Chisel-Type Implements. Soil Science Society of America Journal 52:237-243.
- Jordan, D., R. J. Kremer, W. A. Bergfield, K. Y. Kim, and V. N. Cacnio. 1995. Evaluations of Microbial Methods as Potential Indicators of Soil Quality in Historical Agricultural Fields, Biol. Fertil. Soils 19:297-302.
- Jordan, D., J. Stecker, and J. R. Brown. 1995. Earthworm Activity in No-Tillage and Conventional Tillage Systems in Missouri, Missouri Soil Fertility and Fertilizers Research Update, Agronomy Miscellaneous. Publication #95-02.
- Kapusta, G., and C. F. Strieker. 1976. Herbicide Weed Control in Stubble No-Till Planted Corn. Weed Science Journal, volume 24, number 6.
- Kroth, E. M., and R. Mattas. 1981. Effect of Top Dressed Limestone, Nitrogen, Phosphorus, and Potassium on Yield and Mineral Content of Tall Fescue and Soil Test Values. Research Bulletin 1040, Missouri Agricultural Experiment Station.
- Lear, J. K., and R. A. Kelly. 1994. Planter Adjustments for No-Till, UMC Agronomy Technical Report, volume 12, number 12.
- Lear, J. K., and R. A. Kelly. 1994. Residue Management for No-Till, UMC Agronomy Technical Report, volume 12, number 12.
- Lear, J. K., and R. A. Kelley. 1994. Sidewall Compaction Myth or Reality, UMC Agronomy Technical Report, volume 12, number 12.
- Mengel, D. B. 1990. Fertilizing Corn Grown Using Conservation Tillage. Agronomy Guide AY-268. Purdue University Cooperative Extension Service.
- Missouri Agricultural Statistics Service. 1995. 1995 Missouri Farm Facts. Columbia, Mo.: Missouri Agricultural Statistics Service.
- Newhouse, K. E., and T. M. Crosbie. 1986. Interactions of Maize Hybrids with Tillage Systems, Agronomy Journal 78:951-954.
- Niblack, T. L., G. S. Smith, H. L. Minor, and J. A. Wrather. 1993. Effect of Tillage and Soybean Planting Date on the Interaction Between Soybean and the Soybean Cyst Nematode. Research Update for Crop, Pest and Soil Sciences, Universitiy of Missouri, College of Agriculture, Food and Natural Resources, pp. 46-51.
- Null, D. E., S. Norberg, M. Redelfs, and B. Rudolf. 1994. Efficacy of Sales Selected Herbicide Programs for No-Till Soybeans and Corn, Hundley-Whaley Research Farm Annual Report. pp. 40-50.
- Pfost, D. L. 1988. Long-term Yield Response of Corn Yields to Tillage. Greenley Memorial Research Center data. College of Agriculture, Department of Agricultural Engineering.
- Phillips, S. H., and W. L. Nelson. 1973. No-Till Farming. Milwaukee, Wisc.: Reinman Associates, Inc.
- Quarles, D. 1994. Effects of Ten Years of Continuous Conservation Tillage Crop Production and Infiltration for Missouri Claypan Soils, UMC Agronomy Technical Report, volume 12, number 12.
- Reinbott, T. M., and D. G. Blevins. 1989. Page 5 in Winter Annual Cover Crops for Missouri. Agronomy Technical Report, December.
- Smith, G. 1995. Fungicide Seed Treatments for No-Till Soybeans and Corn, UMC Agronomy Technical Report, volume 13, number 4.
- Stecker, J., D. D. Buchholz, N. Wollenhaupt, and K. McVay. 1989. No-Till Corn Response to Placement and Application Time of UAN. MU Agricultural Chemicals Shortcourse.
- Stecker, J. A., D. D. Buchholz, R. G. Hanson, N. Wollenhaupt, and K. McVay. 1993. Application Placement and Timing of Nitrogen Solutions for No-Till Corn, Agronomy Journal 85:645-650.
- Stecker, J. A., D. D. Buchholz, R. G. Hanson, N. Wollenhaupt, and K. McVay. 1993. Broadcast Nitrogen Sources for No-Till Continuous Corn and Corn Following Soybeans, Agronomy Journal 85:893-897.
- Triplette, G. B., F Haghiri, and D. M. Van Doren Jr. 1979. Plowing Effect on Corn Yield Response to N Following Alfalfa. Agronomy Journal 71(5):801-803.
- Weed Science Society of America, Herbicide Handbook. 1979. Champaign, Ill.: Weed Science Society of America.
- Wiebold, W. 1993. Tillage/Rotation Interactions for Soybean Yield. UMC Agronomy Technical Report, page 13, April 1993.
- Wiese, A. F., and E. W. Chenault. 1985. Texas Agricultural Experiment Station. Weeds Today, Summer.
- Whitaker, F. D., H. G. Heimann, and R. E. Burwell. 1978. Fertilizing Corn Adequately with Less Nitrogen. Journal of Soil and Water Conservation. volume 33, number 1.
- Wollenhaupt, N. C., and M. G. Blase. 1990. The Economic Impact of Conservation Compliance on Northern Missouri Farms. Journal of Soil and Water Conservation, volume 45 number 1.
- Wollenhaupt, N., D. Buchholz, R. Smoot, and S. Anderson. 1987. Long-term Tillage Study for Corn Production on Claypan Soils. Agronomy Technical Report, MU Department of Agronomy.
- Wollenhaupt, N., Z. Helsel, and M. DeFelice. 1989. Cover Crops for Missouri Soybean Fields, Progress Report, R. A. number 054. Missouri Soybean Merchandising Council.
- Wooley, J. B., L. B. Best, and W. R. Clark. 1986. Impacts of No-Till Row Cropping on Upland Wildlife. Transactions of the North American Wildlife and Natural Resources Conference 50. Iowa Conservation Commission, Chariton Research Station, Chariton, Iowa.