The beef cattle industry has increasingly adopted genomic technologies to improve selection decisions, herd management, and the value of breeding stock. Today, numerous commercially available DNA tests provide genomic predictions for economically important traits and can be used to enhance selection accuracy, particularly in young animals. These tests generally fall into four categories:
- Genomically Enhanced Expected Progeny Differences (GE-EPD): Quantitative trait predictions for seedstock producers reported through their respective breed association, based on an animal’s pedigree, phenotype, progeny records, and genotype.
- Molecular Breeding Values (MBV): Quantitative trait predictions available for commercial producers, based only on an animal’s genotype.
- Genetic condition and trait tests for identifying qualitative traits such as coat color, horn status, and known genetic defects.
- Parentage verification to confirm ancestry and improve herd records.
Producers interested in incorporating genomic testing into their breeding programs should understand the appropriate methods for collecting, handling, and submitting DNA samples to ensure accurate and reliable test results.
DNA testing laboratories may require different sample types or collection methods depending on the test requested. Before collecting samples, consult your breed association, veterinarian, MU Extension livestock specialist, or the testing laboratory to determine the preferred sample type, collection procedures, and submission requirements (See Table 1).
Table 1. Collecting, storing and shipping recommendations for DNA samples
| -- | Tissue Sample (TSU) | Blood Card | Blood Tube | Semen |
|---|---|---|---|---|
| Collection equipment and sample size | ||||
| Amount | 1 TSU | 4 drops | 8-10 milliliters | 1 straw |
| Equipment needed | TSU applicator gun and TSU units/vials | 6-gauge needle, syringe, blood card | Double needle, purple cap tube | Can submit as a straw or on a “blood card” (just designate as semen and circle where it was applied) |
| Acceptable storage conditions | ||||
| Equipment | Dry area, no sun | Dry area, no sun | Refrigerator | Freezer |
| Temperature | Room temperature; deep freezer | Room temperature | 35-40 degrees Fahrenheit | Below -5 degrees Fahrenheit |
| Max. length of time | 12-mo at room temperature, years if in deep freezer | Years | One week | Years |
| Acceptable shipping conditions | ||||
| Temperature | Room temperature | Room temperature | Chilled | Room temperature |
| Precaution | None | None | Fragile | Fragile |
| Cooling | None | None | Wet ice | None |
| Packing | Padded envelope or box | Standard envelope | Plastic foam chest | Straw - Padded envelope. Has been recommended to insert inside an empty pen for added safety Blood card – standard envelope |
Tissue sampling units (TSU)
Tissue Sampling Units (TSUs) have become the preferred method for collecting DNA samples in the beef industry. Their uniformity and consistency allow genotyping laboratories to automate much of the sample handling and DNA extraction process, reducing human error and improving sample success rates.
To begin, remove the TSU punch, or vial, from its packaging. The punch and vial should be assembled as a single unit. If they have separated, reassemble them before loading the applicator. Align the groove on the punch with the chamber at the base (black portion) of the applicator. Once aligned, rotate the chamber until the punch locks into place (Figure 1a). Next, squeeze the applicator handles together to set the cutter. When the opposite end of the applicator rests flush against the red plastic clip, release the handles (Figure 1b). The red plastic clip may then be discarded.
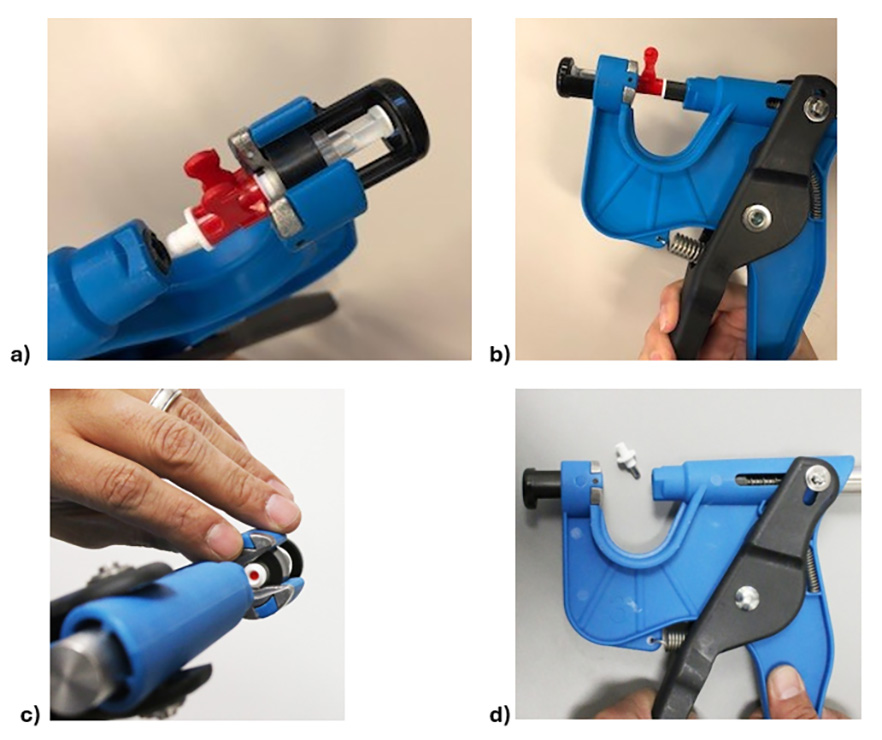
Before collecting a sample, verify that the applicator contains an unused TSU by checking the indicator inside the vial. A green indicator signifies an unused TSU, while a red indicator indicates the punch has already been used and should be replaced (Figure 1c). Position the applicator approximately 1 inch from the edge of the ear, avoiding large veins, ear ridges, tattoos, or existing ear tags. A good rule of thumb is to collect the sample in approximately the same location where an ear tag would normally be placed. Firmly squeeze the applicator handles until the tissue sample has been collected, then release the handles and remove the applicator from the ear. A successful collection is indicated when the green indicator changes to red and a tissue plug is visible inside the collection vial. Remove the TSU by rotating the black chamber and releasing the vial. To remove the cutter, pull the applicator handles apart. Do not use pliers, as they may damage the applicator (Figure 1d).
Immediately record the animal identification next to the TSU barcode corresponding to the sample collected. For 10-pack boxes, the barcode locations are clearly identified. If using a 100-pack box, record both the animal identification and the corresponding TSU barcode on the cardboard insert or a separate record sheet. Do not write directly on the TSU vial, as doing so may interfere with barcode readability during laboratory processing. A video of the steps described above can be found on YouTube.
Store TSUs at room temperature in a clean, dry location out of direct sunlight. Samples may be stored for up to 12 months before submission. For longer-term storage, place samples in a manual-defrost freezer or follow the storage recommendations provided by the testing laboratory.
Blood cards

Although tissue sampling units (TSUs) have become the preferred method for DNA collection, blood collection cards (FTA cards) remain an accepted sample type for many genetic tests. Only a few drops of blood are required to provide sufficient DNA for most applications. If you are not comfortable collecting blood samples, consult your veterinarian for assistance.
Blood may be collected by pricking an ear vein or by collecting blood from the jugular vein or the coccygeal (tail) vein. To collect blood from the ear, properly restrain the animal and hold the ear toward the sun or another bright light source to locate a vein. Using a sterile 16- or 18-gauge needle, puncture the vein until blood flows freely. Fold the ear so the puncture site is directed downward and allow three to four drops of blood to fall directly onto the labeled collection circle of the blood card. Do not touch the card with the needle or the animal's ear.
Blood may also be collected from the jugular or coccygeal (tail) vein using a sterile 16- or 18-gauge needle and syringe. After collecting a small amount of blood, allow three to four drops to fall directly onto the labeled collection circle of the blood card (Figure 2). Use a new sterile needle and syringe for each animal and dispose of all sharps in an approved sharps container.
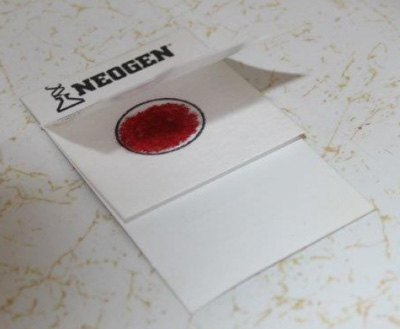
After collection, allow the blood to soak naturally into the collection circle. Do not smear the blood or oversaturate the card. There should be only enough blood to completely fill the designated circle (Figure 3). Fold the card according to the manufacturer's instructions and allow it to air dry completely, typically for at least one hour, before packaging. If the cards cannot be dried immediately, store each card individually until it can be placed in a clean, dry location to finish drying. Never place multiple damp cards in the same bag, as this may result in cross-contamination.
Once completely dry, store blood cards at room temperature in a clean, dry location out of direct sunlight. Excess moisture may promote mold or bacterial growth, while prolonged exposure to heat or direct sunlight can reduce DNA quality.
Whole blood
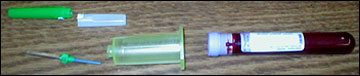
Blood may be collected from any live animal. If you are not trained to collect or are uncomfortable collecting modest amounts of blood, contact your local veterinarian for assistance. Whole blood should be collected and stored in a tube that contains the preservative EDTA. Normally, a specialized double-ended needle (Figure 4) is used to penetrate the jugular vein in the neck or the vein on the underside of the tail when collecting a blood sample. One end is a regular steel needle designed to penetrate the vein. The other end is designed to puncture the rubber stopper on the blood collection tube.
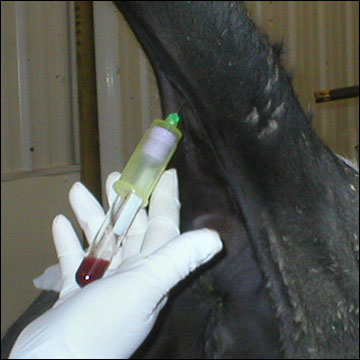
When collecting whole blood, locate a vein with one hand while holding the needle and collection tube in the other. Pierce the vein with the bare end of the double needle and wait for blood to flow into the needle. Then plunge the opposite end through the rubber stopper on the sample collection tube (Figure 5). Once the tube is full (8 to 10 milliliters), withdraw it from the needle, invert the tube, and shake it to mix the blood with the EDTA preservative. If you are collecting multiple samples from the same animal, leave the needle in the vein and again push the opposite end into a new tube to fill it. Use a new needle to collect blood from each animal to prevent sample contamination and possible disease transfer.
Whole blood should be refrigerated at 35 to 40 degrees Fahrenheit from immediately after collection until it is analyzed. See table. Most testing facilities require shipment of whole blood within one week of collection to minimize degradation of the genetic material. Do not freeze whole blood. Freezing will burst the blood cells, including the white blood cells, which are the only components of blood that contain genetic material. Once thawed, various enzymes that are normally present in blood will degrade the genetic material in a previously frozen sample.
Storage options
If storing genetic material short term, all sample types can be stored at room temperature, out of direct sunlight, with the exception of blood tubes, which must be refrigerated (35 – 40 degrees Fahrenheit), and semen if you plan to use it for artificial insemination. For long term storage (> 12 months), blood cards can be stored again at room temperature out of direct sunlight. Blood tubes must remain chilled at 35 – 40 degrees Fahrenheit. Tissue samples (TSUs) are recommended to be placed in a freezer (-5 to 32 degrees Fahrenheit). If you have a choice between a frost-free and a manual defrost freezer, choose the manual defrosting option. A frost-free freezer uses small temperature fluctuations to remain frost-free. These fluctuations can harm genetic material.
Mailing requirements
Contact your local post office or private mail courier to see if any special restrictions apply when sending samples of biological tissue through the mail. See Table 1 for shipping considerations for each sample type.
Obtaining materials for sample collection
Companies that provide genetic testing services usually provide the supplies necessary to collect your samples. If that is not the case, check with your breed association, veterinarian, or MU Extension agent, as they may know where to obtain the needed materials.