Bricks in sand make an attractive, durable and pleasant outdoor paving (Figure 1). They are easy to install — the easiest to handle of all paving materials.
Individually, bricks are small and lightweight. A brick walk or patio can be installed piecemeal at leisure. Do not attempt too much at one time.
Bricks have other attractions: a non-glare surface, pleasant texture, mellow color and pleasing contrast.
On the other hand, weeds and grass may grow up through the joints, freezing and thawing may cause heaving and bricks may need resetting. Bricks are absorbent and can hold stains. The general roughness of the surface makes it unsuitable for dancing and some games.
 Figure 1
Brick patios and walkways provide a durable and attractive outdoor paving.
Use common hard brick
Choose hard-burned brick for paving. Soft bricks crack too easily. If available, slick-surfaced face brick or cleaned old brick may be used. A hard-burned brick will give a clear, high-pitched metallic sound when hit with a hammer. Soft bricks will give a dull thud like a block of wood.
Get enough bricks to do the entire job. There is enough variation in bricks that those from another batch may not match the color or size of those previously purchased. Common brick may range from 8 to 8-1/4 inches long, 3-3/4 to 3-7/8 inches wide, and 2-1/4 to 2-1/2 inches deep.
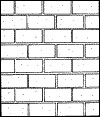 Figure 2
Running bond.
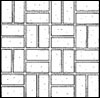
Figure 3a
Basket weave.
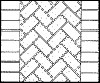
Figure 3b
Herringbone.
Paving patterns
Bricks can be laid with either open or closed joints. Where no mortar is used, closed joints are best. This means that the bricks are butted tightly together. When closed joints are used, the running bond pattern is easiest.
Herringbone and basketweave are popular designs, but are more difficult to lay. Basketweave, when laid with closed joints, will leave a 1/2-inch hole in the center of each group of eight bricks.
Materials and tools
The following materials will be needed to lay a closed-joint brick surface over an area of 100 square feet:
- 500 bricks
- 1 ton of 1/4-inch crushed rock
- 5 cubic feet of coarse sand (about 500 pounds)
- 2" x 4" or 2" x 6" redwood lumber
- 1" x 2" x 12" stakes
- Round point shovel
- Flat point spade
- Hammer (heavy)
- Level
- Iron tamp or heavy post
- Brick set
- Broom
The lumber is used for edging and the amount necessary will depend on the shape used and also the closeness to structures where an edging may not be necessary.
The stakes are used to brace the edging. Cedar, cypress or wood that has been treated with a preservative may be used instead of redwood lumber.
Steps for laying a patio or walk
- Measure the size of the patio or walk desired and order all materials necessary to complete the job. Remember, walks should be at least 4 feet wide. Patios of about 500 square feet will provide enough space for most family functions.
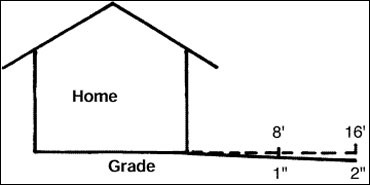 Figure 4
Grade a patio 1 inch in 8 feet away from the house.
- Grade the area to be paved. Dig out existing soil if necessary, or fill where appropriate. The paving of gravel, sand and brick will require a depth of about 6 inches. Use a 2- by 4-inch board of convenient length to level the grade after digging is complete. A level attached to the top of the board will help to guide the leveling operation. For patios, there should be a drop in grade away from the house of about 1 inch in 8 feet. See figure 4. Install the redwood lumber to edge the patio or walk. Use enough stakes to firmly hold it in place. Make sure edging is level.
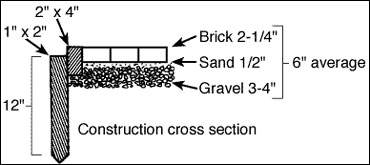 Figure 5
Cross section of patio or walk construction.
- Lay a level, 3- to 4-inch layer of crushed stone, and tamp firm (Figure 5).
- Spread a 1/2-inch layer of coarse sand over the stone.
- Level the sand carefully, using board and level. If edging has been carefully leveled, it will act as a good guide for leveling the other area. Do not step on the leveled sand.
- Set bricks on sand. Place them slightly higher than desired as they will settle. On patios, lay a strip of the desired pattern through the center, and work toward either side. Try to plan to end up with whole bricks whenever possible.
- Tamp bricks firmly as they are set with either an iron tamp, a heavy post or the wooden end of a heavy hammer.
- Lay all bricks that do not need cutting.
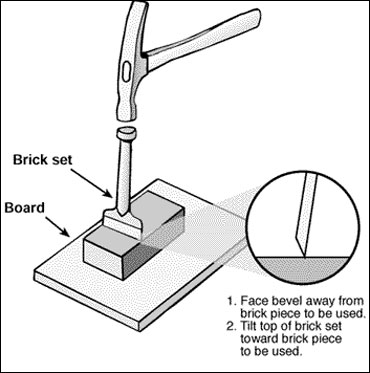 Figure 6
Using a brick set to cut brick.
- Cut bricks to fit wherever needed. Most people find a brick-set the easiest brick cutting tool to use. Place the brick to be cut on a firm base. Hold the brick-set as shown in Figure 6 and give it one hard knock with a heavy hammer. Keep the brick-set sharp.
- Cover the paved surface with sand and sweep it into the cracks.